serene – 1, part 7

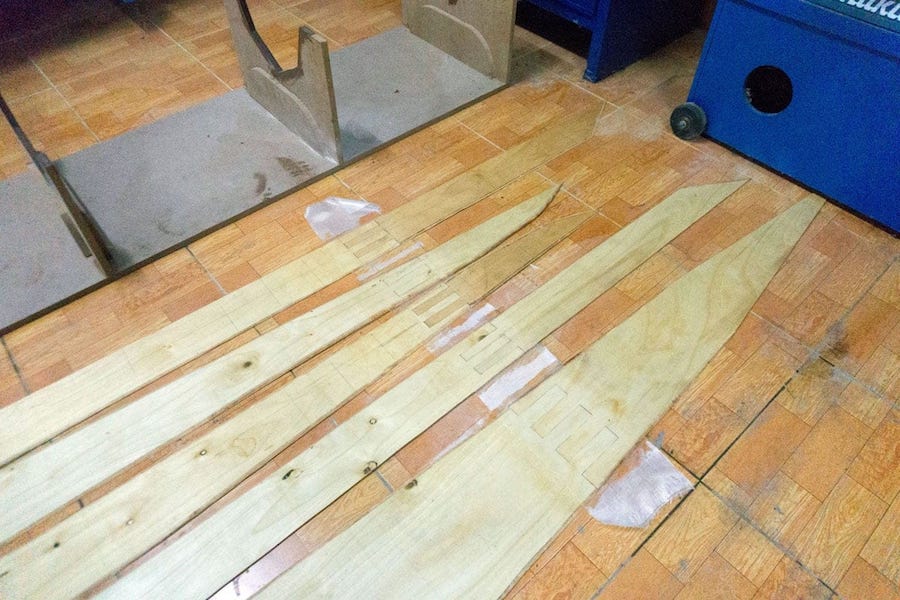
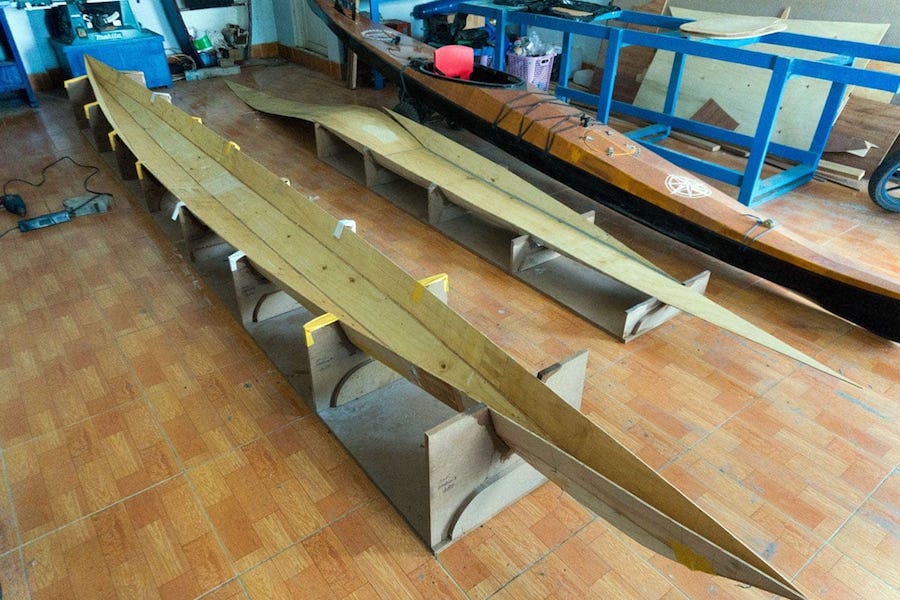
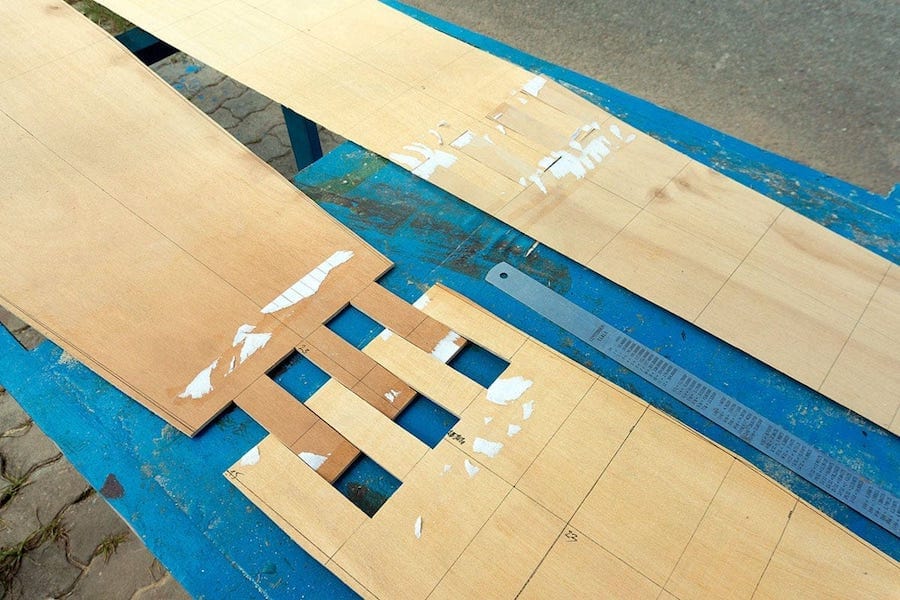
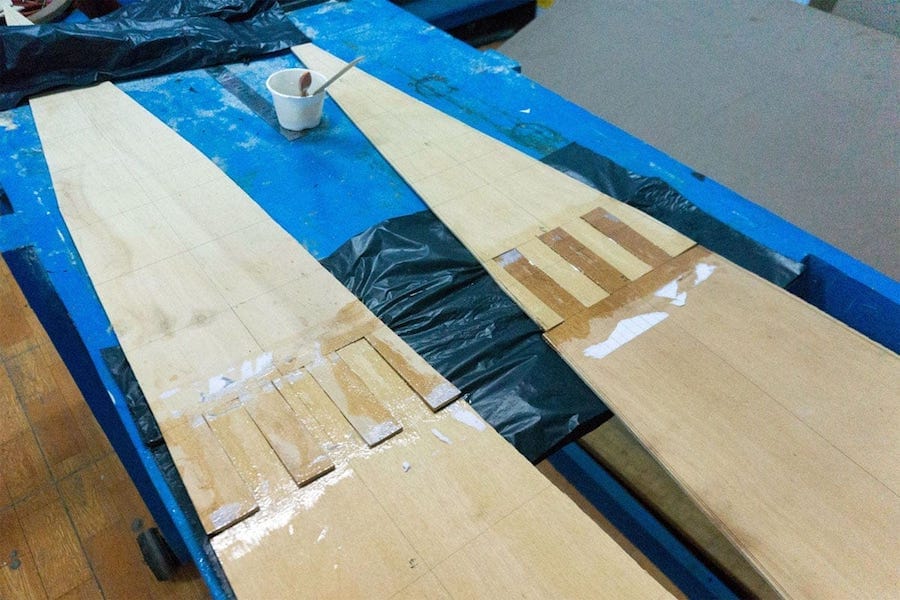
he bigles jointed very well, with just some neglectable tiny defects, port and starboard pairs match perfectly. Before putting them all together to form the initial boat shape, I applied a layer of penetrating epoxy (epoxy thinned with xylene), taking care so that the amount of epoxy used won’t exceed 0.6 kg overall. For this job, I use a kind of elastic epoxy with the B5 slow hardener. There’re two kinds of epoxy: one hard and one elastic, with at least 3, 4 kinds of hardener available in the local market.

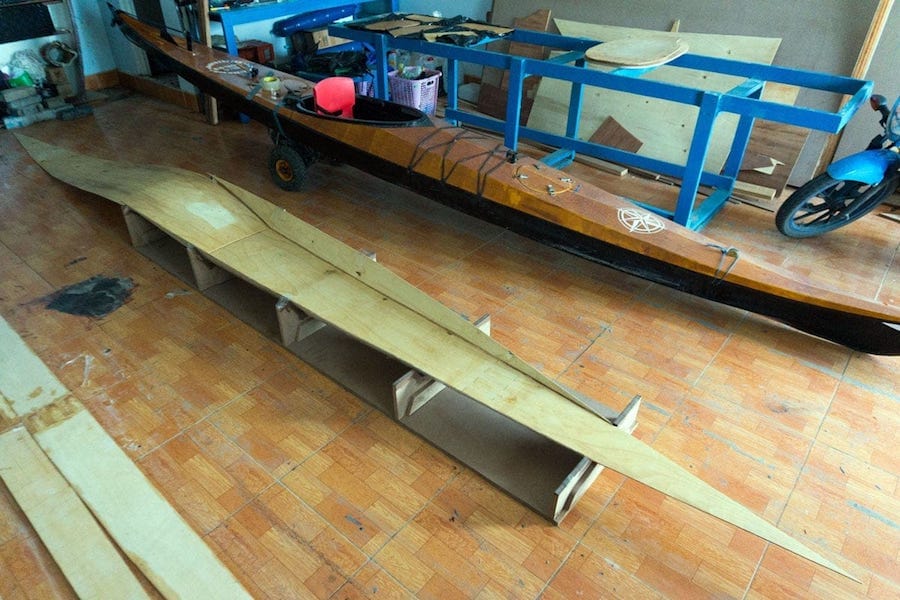
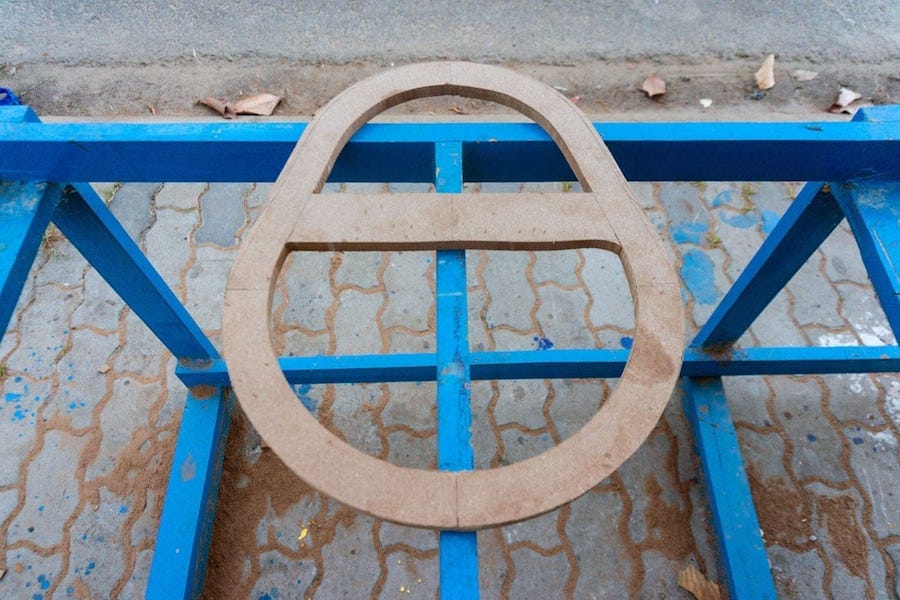
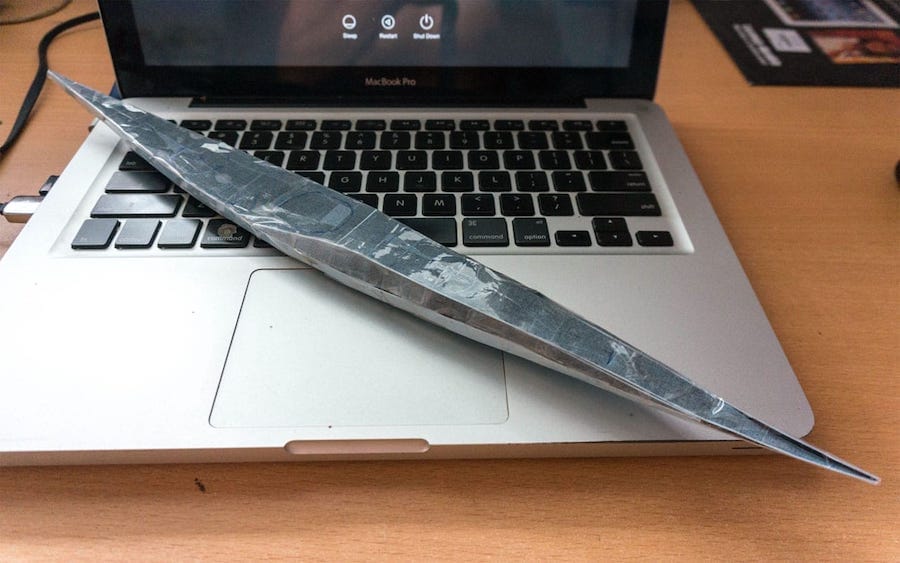
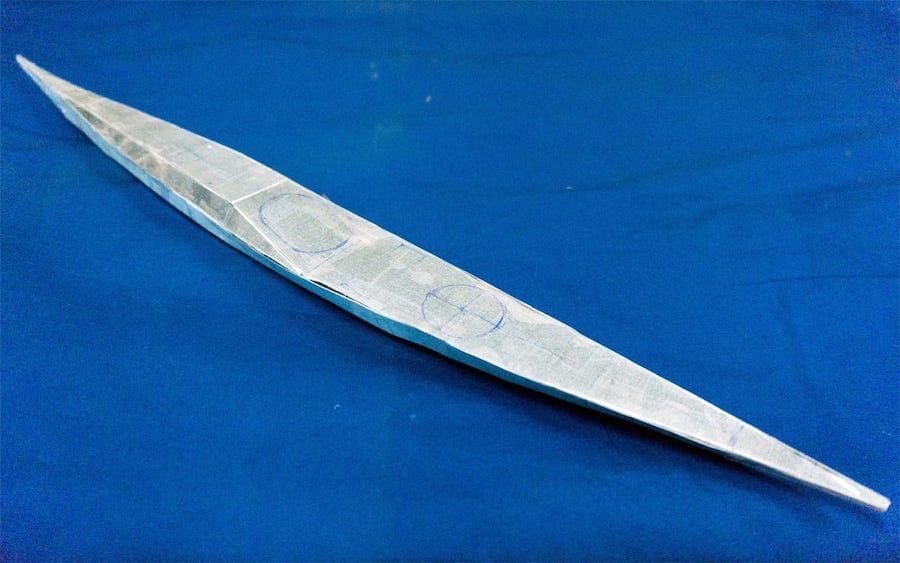
I put a layer of fiberglass to the internal side of each joints before stitching the bilges. The deck is quite easy to form, since it’s very well geometrically – defined, I don’t even need to use steel wire and thus, avoid the unpleasant job of drilling holes, just duct tape over the edges, then dully apply the putty onto the bevelled seams. The hull is not that simple, with wires to fasten particularly at the two ends. Check the geometry of the overall shape, fasten the wires tight, then fill the seams with putty.

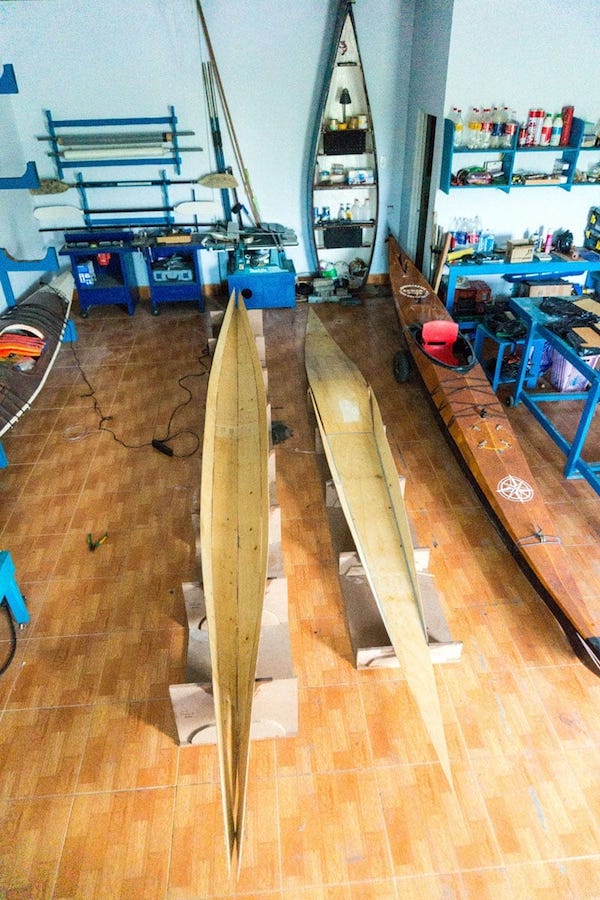
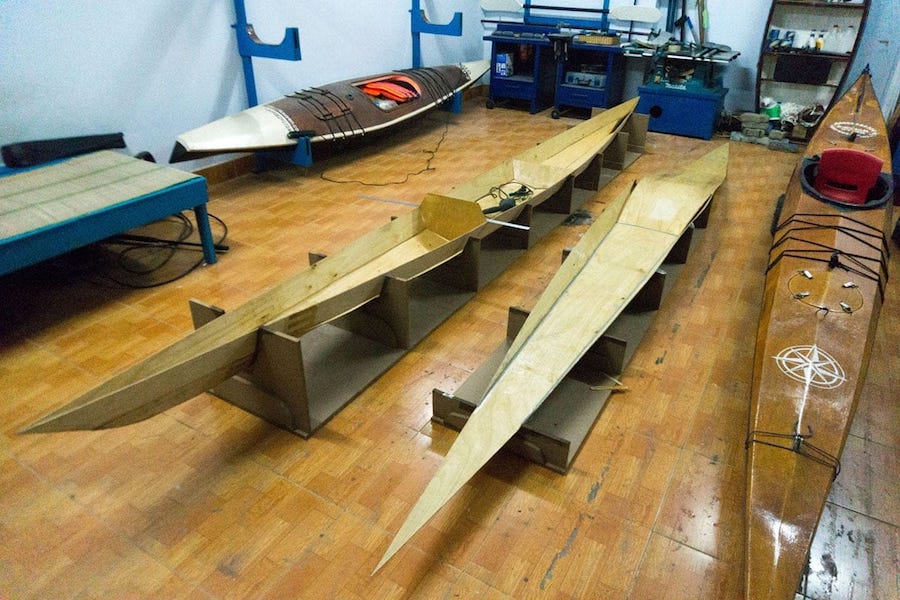
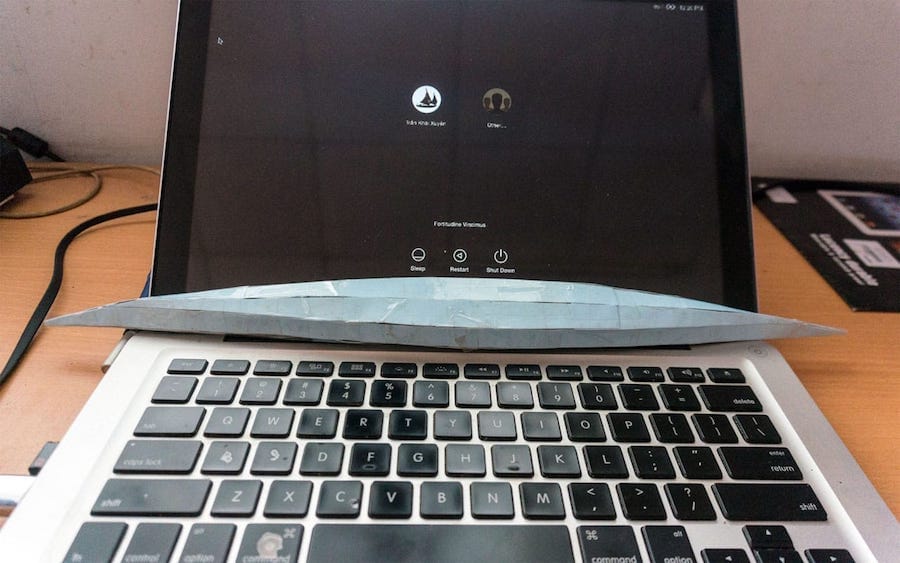
Cares are taken to use as little putty as possible, as I especially long for this to be a light boat. The same steps as in my previous boats, but done by more skillful hands 😀. Actually, I sometimes feel bored with those same things having been been done 4 times already, I should be planning for another boat in a different building method. But sure, not until I could feel I’m good enough at the current method, if you’re not “up to the level” yet, you would probably done wrong with whatever method used.

Serene – 1 p1
Serene – 1 p2
Serene – 1 p3
Serene – 1 p4

I wouldn’t advocate the use of thinned (penetrating) epoxy here, using it or not depends on the specific situations. In general, it should be avoided as it would add much more weight to the final product. However, the plywood available to me is not of marine – grade quality.

It’s made of a kind of “tea tree” wood, though apparently has some tensile strength, is quite porous and indeed lacks compressive strength. To compensate, some penetrating epoxy would help the plywood to become more firm and prevent delaminating in the long run.

serene – 1, part 6

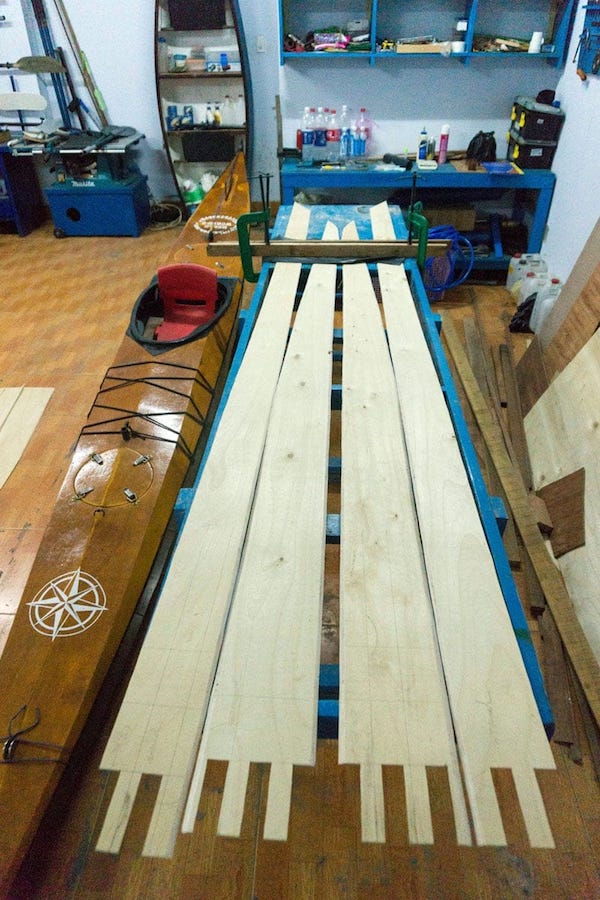
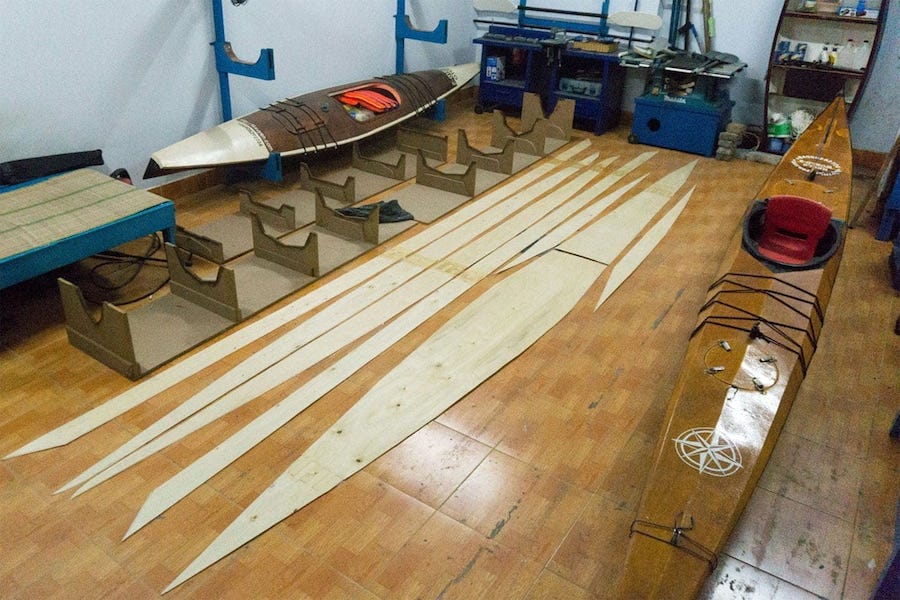
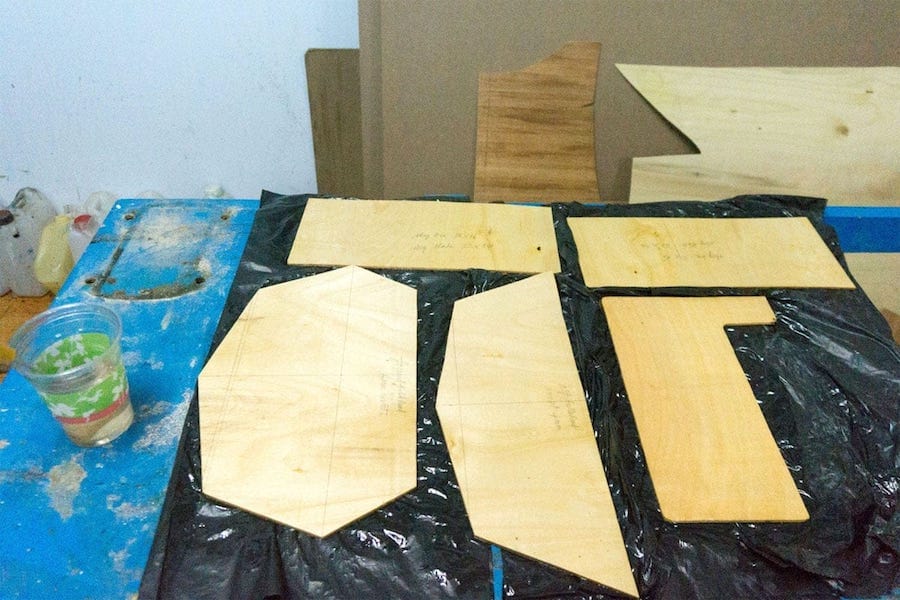
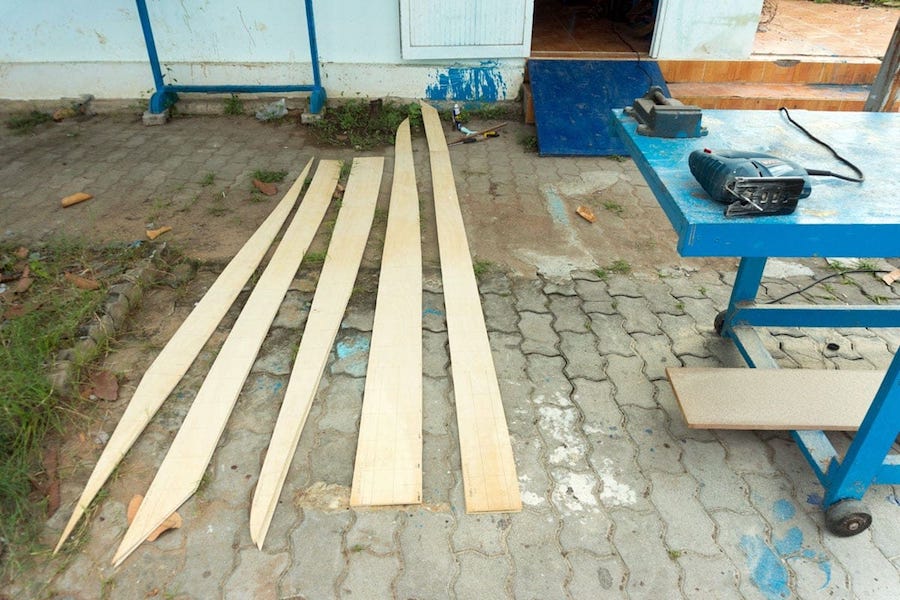
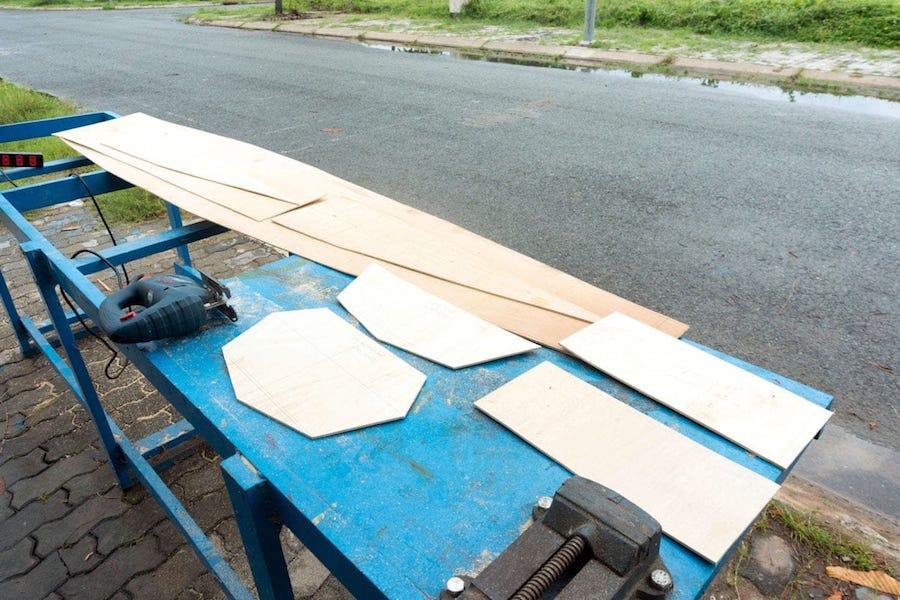
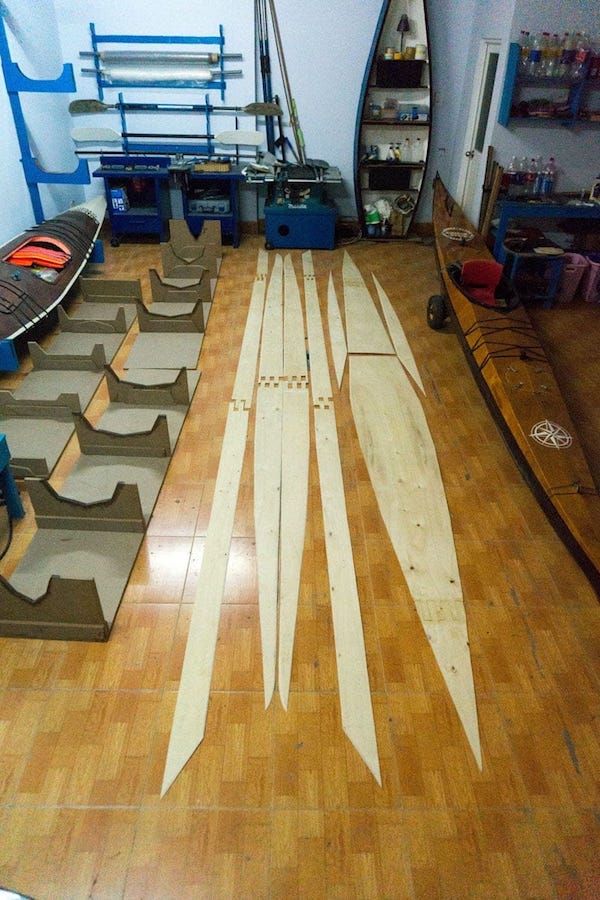
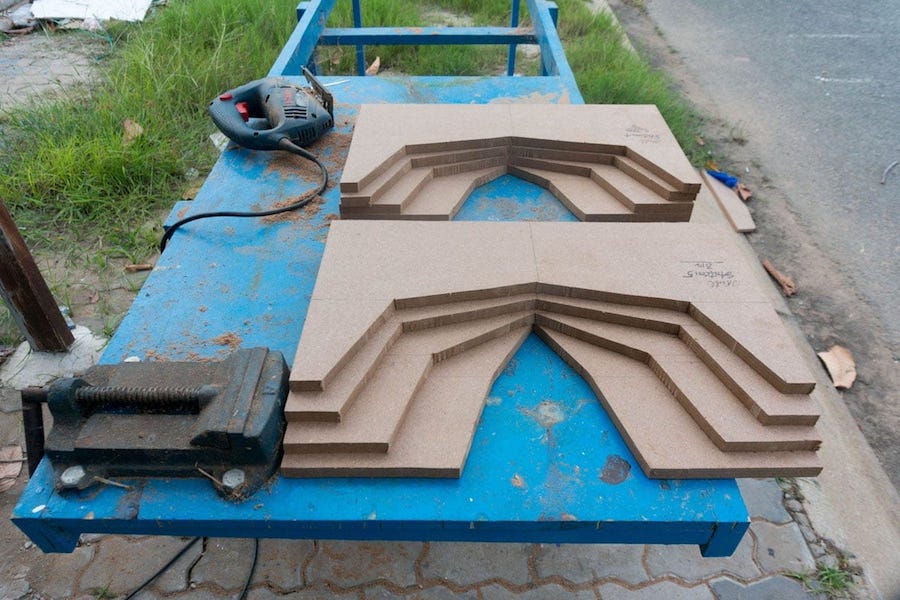
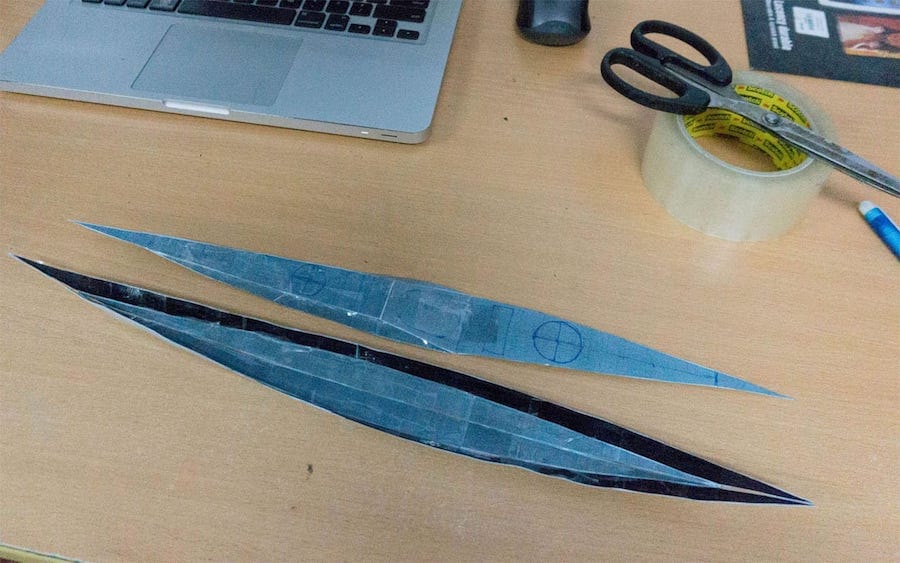
sing staples to clamp 2 sheets of plywood together, I then cut the hull’s planks, port and starboard, all is composed from 3 pieces. Then the deck’s pieces, and other parts: forward and aft bulkheads, skeg box and skeg blade… After 3 boats, I can now cut the wood with quite some accuracy. Sometimes, I’d wished to have the accuracy of a CNC machine, but such a machine that can cut in the 1.22 x 2.44 m dimension is not a possible option for most home builders, including me.

Next is the dusty job of beveling the edges of the plywood bilges, the edges are carefully bevelled at different angles along their lengths, to ensure a suitable gap, not too small, and not too big, for just a small amount of putty to go into the seams in a later phase. Then I joint the parts together using finger joints instead of the originally – planned puzzle joints. Straight finger joints, though not as strong as puzzle joints, they’re easier to cut and to fit, and most importantly, easier to align longitudinally.

This is very important, in my first boat, the 2 ends of port and starboard bilges differ as large as 5 ~ 6 mm. I can now confidently keep the tolerance under 1 mm along the 5.5 m length. Patterns of the joints are drawn on paper, photocopied into multiple sheets, glued onto the plywood and cut accordingly. I work carefully as to ensure a tight fit, an accuracy of a small fraction of a millimeter is required. This is quite hard when done by hand as my thinnest saw blade is already over 1 mm thick.

Serene – 1 p1
Serene – 1 p2
Serene – 1 p3
Serene – 1 p4

The phase measure twice, cut once struck me once again 😢. As I’m about to joint the bottom bilges, I discovered that 2 pieces were incorrectly drawn and hence were cut 10 cm shorter compared to the design. Frustrated, I stopped working for a day, feeling really miserable…

I found out a way to cut (puzzle) joint nicely: just draw & cut something on the 1st piece of wood, the pattern doesn’t need to be too perfect, then use it as a template to draw and cut on the 2nd piece. This method is less error – prone compared to cutting twice following one same pattern.

paroles

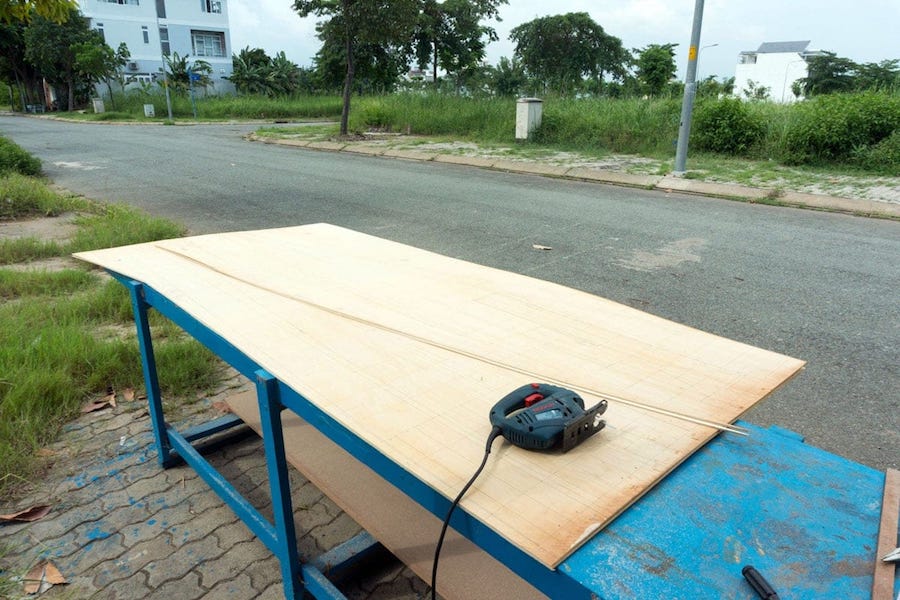
es mots faciles, des mots fragiles, c’était trop beau, bien trop beau… Des mots magiques, des mots tactiques, qui sonnent faux, oui tellement faux… Merci, pas pour moi, mais tu peux bien les offrir à une autre… Paroles et encore des paroles, que tu sèmes au vent!

– C’est étrange, je n’sais pas ce qui m’arrive ce soir. Je te regarde comme pour la première fois.
Encore des mots toujours des mots, les mêmes mots.
– Je n’sais plus comment te dire.
Rien que des mots.
– Mais tu es cette belle histoire d’amour, que je ne cesserai jamais de lire.
Des mots faciles, des mots fragiles, c’était trop beau.
– Tu es d’hier et de demain.
Bien trop beau.
– De toujours ma seule vérité.
Mais c’est fini le temps des rêves. Les souvenirs se fanent aussi quand on les oublie.
– Tu es comme le vent qui fait chanter les violons et emporte au loin le parfum des roses.
Caramels, bonbons et chocolats.
– Par moments, je ne te comprends pas.
Merci, pas pour moi, mais tu peux bien les offrir à une autre, qui aime le vent et le parfum des roses. Moi, les mots tendres enrobés de douceur se posent sur ma bouche mais jamais sur mon cœur.
– Une parole encore.
Paroles, paroles, paroles,
– Ecoute-moi.
Paroles, paroles, paroles,
– Je t’en prie.
Paroles, paroles, paroles,
– Je te jure.
Paroles, paroles, paroles, paroles, paroles et encore des paroles que tu sèmes au vent.
– Voilà mon destin te parler, te parler comme la première fois.
Encore des mots toujours des mots, les mêmes mots.
– Comme j’aimerais que tu me comprennes.
Rien que des mots.
– Que tu m’écoutes au moins une fois.
Des mots magiques, des mots tactiques, qui sonnent faux.
– Tu es mon rêve défendu.
Oui tellement faux.
– Mon seul tourment et mon unique espérance.
Rien ne t’arrête quand tu commences, si tu savais comme j’ai envie d’un peu de silence.
– Tu es pour moi, la seule musique qui fait danser les étoiles sur les dunes.
Caramels, bonbons et chocolats.
– Si tu n’existais pas déjà, je t’inventerais.
Merci pas pour moi, mais tu peux bien les offrir à une autre, qui aime les étoiles sur les dunes. Moi, les mots tendres enrobés de douceur se posent sur ma bouche mais jamais sur mon cœur.
– Encore un mot, juste une parole.
Paroles, paroles, paroles,
– Ecoute-moi.
Paroles, paroles, paroles,
– Je t’en prie.
Paroles, paroles, paroles,
– Je te jure.
Paroles, paroles, paroles, paroles, paroles et encore des paroles que tu sèmes au vent.
– Que tu es belle.
Paroles, paroles et paroles,
– Que tu es belle.
Paroles, paroles et paroles,
– Que tu es belle.
Paroles, paroles et paroles,
– Que tu es belle.
Paroles, paroles, paroles, paroles, paroles et encore des paroles, que tu sèmes au vent.

serene – 1, part 5

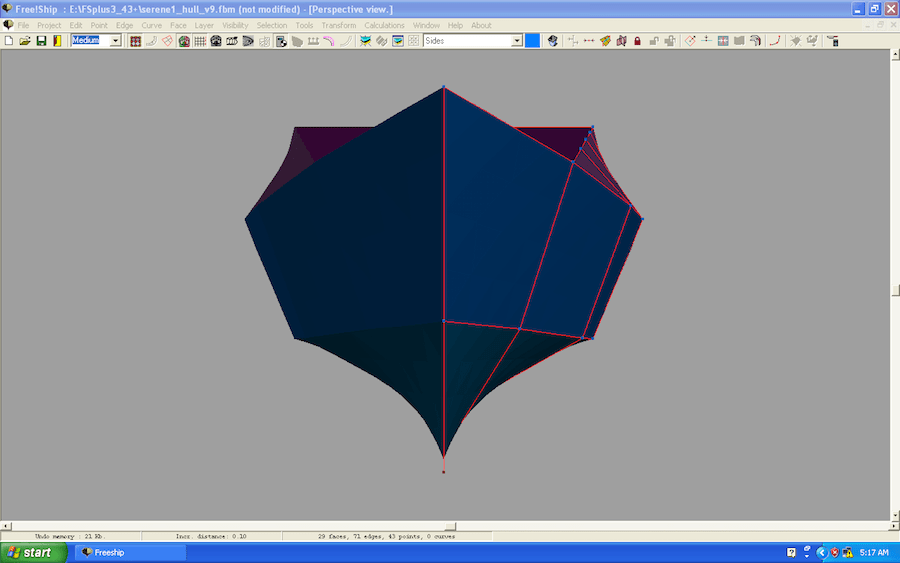
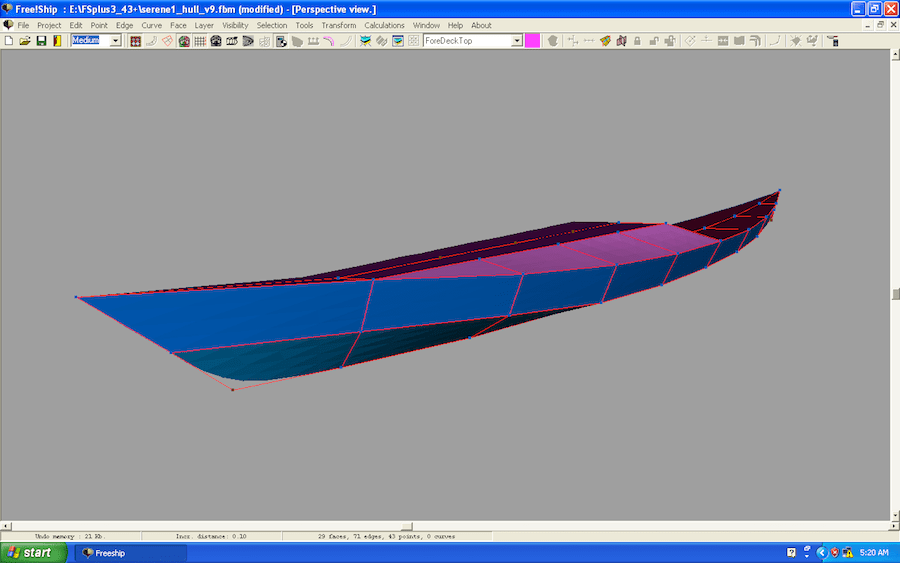
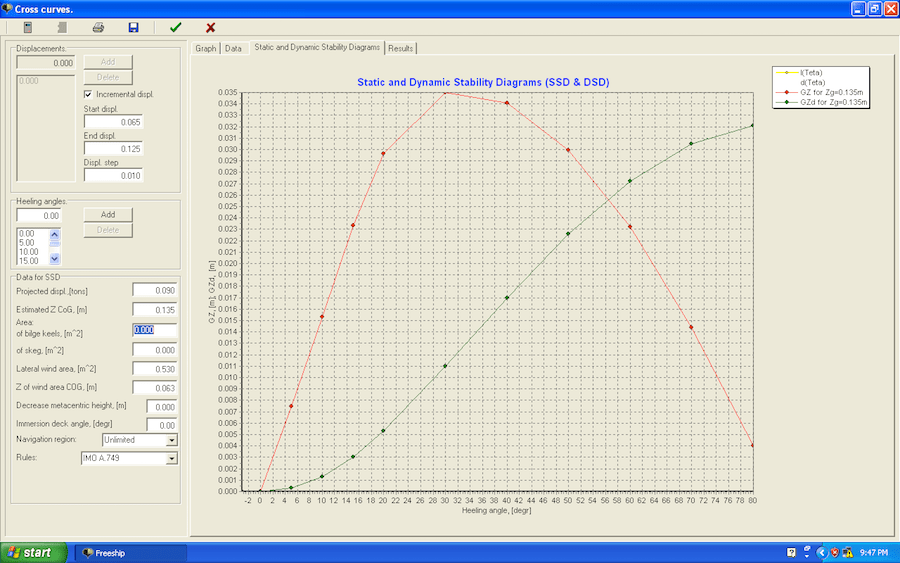
erene – 1 is quite a distinctive boat, originally took inspiration from the Black Pearl and the Anas Acuta, but in it current status, it shares not a single common point with them. The hull has been transformed into a light cruising one with long water line, deeper V bottom, little rockers and a very narrow beam (45 cm). There’re times that I’m worrying on the feasibility of the design, except for some theoretical calculations, there’s nothing to ensure me that it would be a good watercraft.

When you build something from a well – known designer, it’s already a well – proven boat. For Serene – 1, there’s no way to know, unless you build and trial it yourself. Eventually have some free time to proceed on today, first is cutting all the hull & deck framing stations in MDF. Can also see drawn is the cockpit template, this would be a very small one, 50×40 cm in dimensions, that’s what they called an “ocean cockpit”, you would need to climb over the aft deck and slide your legs into the hole.

The framing box showed up, by now, I could see how slim the boat would be, at this size, you just don’t ride the kayak, you essentially… wear it! Like an integral part of your body going to rough water, that’s how the feeling should be! Next would be the important task of drawing, and cutting the bilges from exported offset tables. For ones who don’t know, offset table is just a matrix of (x, y) coordinates, I use a very fine matrix (points every 5 cm interval) to precisely reconstruct the bilges on plywood.

Serene – 1 p1
Serene – 1 p2
Serene – 1 p3
Serene – 1 p4

One important note about various hull shapes (V – bottom, round, flat, etc…), cross section only affect stabilities, they have little effect on the boat’s speed which depends mostly on the waterline length and the wetted surface area. I tend to prefer hard chined V – bottom though.

About Prismatic Coefficient (Cp): a lower value indicates that the boat is more efficient at slower speed, a higher one tells that the boat is more efficient the faster it goes. So higher or lower Cp is neither good nor bad, it’s just that you need to know where is your desired range of velocity.

người đi qua đời tôi

hích nghe chữ gió thứ hai trong bài này, không phải chỉ ngũ cung mới có sự luyến láy, non một chút, già một chút… So chất giọng với phần đông ca sĩ bây giờ, khác nào đem âm thanh đàn organ điện tử so với cây đại phong cầm (pipe organ, không phân biệt được âm thanh của organ và pipe organ thì xin mời ra quán nhậu hát nhạc boléro kẹo kéo!)

Người đi qua đời tôi - Thái Thanh 
Người đi qua đời tôi - Quỳnh Giao 

Thực ra tôi cũng thích nghe Thái Thanh hát nhạc Trịnh Công Sơn 😀, ví như: Tuổi đá buồn, Ca dao me… (nghe trong post trước về Thái Thanh của tôi). Lẽ đương nhiên, “thích” có vô vàn sắc thái, góc độ khác nhau, cũng có vô vàn ẩn ý, ngữ nghĩa khác nhau, ví như tôi cũng thích nghe boléro, ví dụ như bài này.

serene – 1, part 4

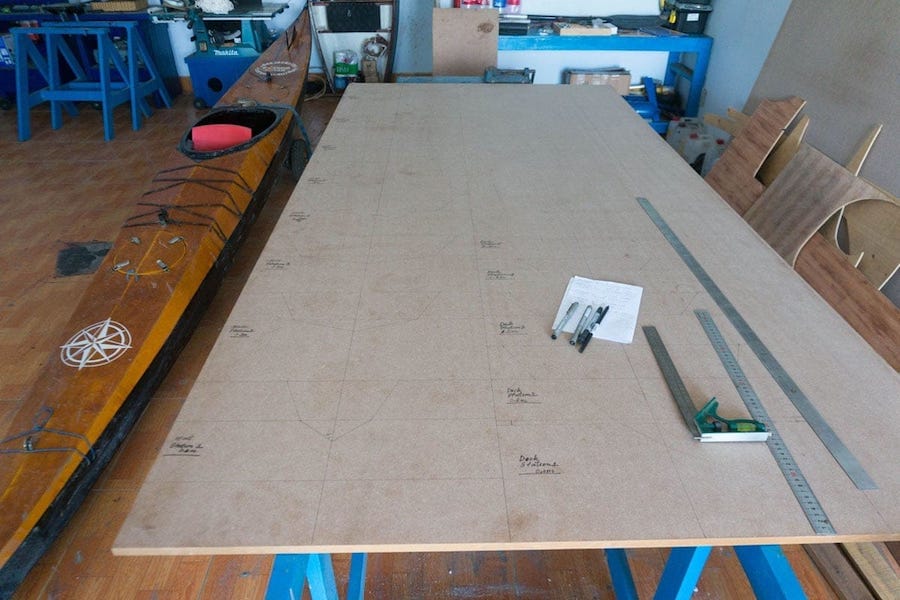
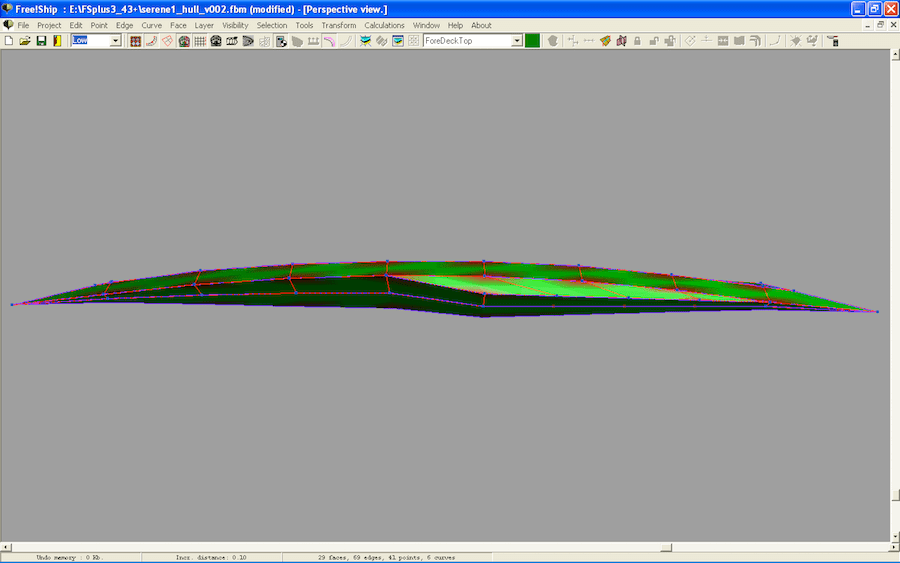
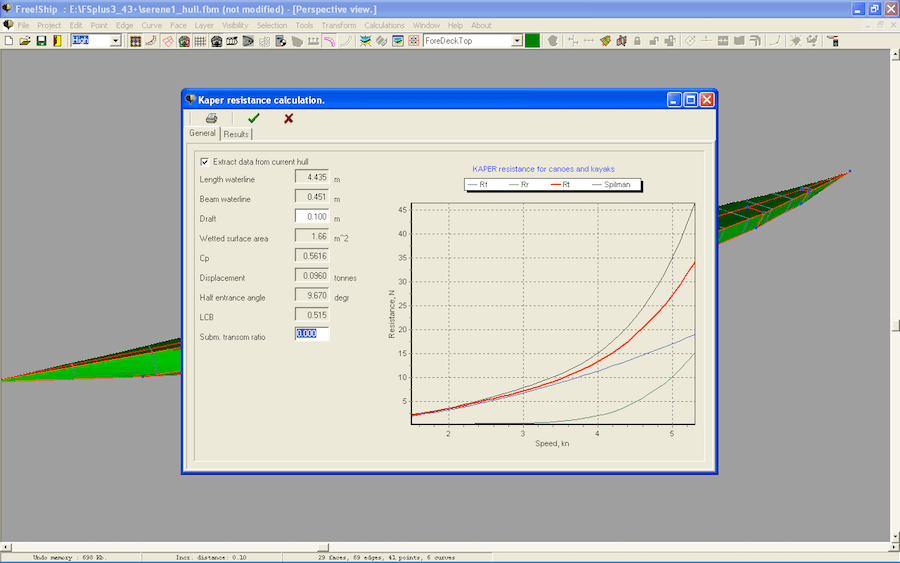
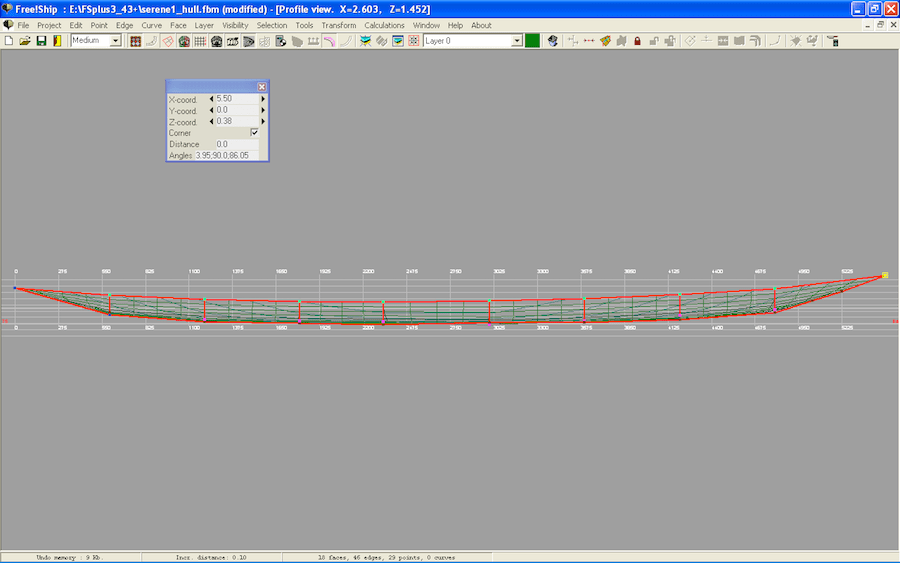
inalized my new kayak design, a considerable amount of work on optimizing the hull shape, adjusting it back and forth to find out the minimum drag numbers (based on the Kaper algorithm) while keeping stabilities and other parameters under control. Some numbers: LOA / LWL (length overall / waterline): 5.500 / 4.945 m, BOA / BWL (beam overall / waterline): 0.452 / 0.420 m. I reduced the boat width to exactly my hip plus 4 fingers (that is: 36 + 9 cm, my fingers are quite big, 9 cm for 4 fingers).

Designed draft: 0.11 m, Designed displacement: 95 kg, Cp (prismatic coefficient): 0.5475, Cb (block coefficient): 0.4064, LCB (longitudinal center of buoyancy): 0.5225, VCB (vertical center of buoyancy): 0.0690 m, LCF (longitudinal center of floatation): 0.5136, Cw (waterplane coefficient): 0.6445, S (wetted surface area): 1.699 m2, Aw (waterplane area): 1.329 m2, Am (midship section area): 0.034 m2, Cm (midship coefficient): 0.7466, KMt (vertical transverse metacenter): 0.196 m.

Predicted drags at 0.11 m draft (95 kg of displacement): 3 knot ~ 7.122 N, 4 knot ~ 12.622 N, 5 knot ~ 23.763 N. Predicted drags at 0.121 m draft (110 kg of displacement): 3 knot ~ 7.679 N, 4 knot ~ 13.611 N, 5 knot ~ 25.506 N. The hull is heavily optimized for speed in the [4 ~ 5] knot range with some sacrifices in stability and load capacity. Now that all “theoretical calculations” has completed, it would take a few months to build the physical boat to tell the real truths about the design! 😀

Serene – 1 p1
Serene – 1 p2
Serene – 1 p3
Serene – 1 p4

While 45 cm could be considered “extreme” for nowadays kayak (few available on the market has width at or below that value), it’s not really so with the traditional Greenland ones, some could be as narrow as 39 cm. Well for sure, it requires lots of skills to handle such a narrow boat.

The very important point here is the CG (Center of Gravity) used in calculating stability. The Sea Kayaker magazine uses a standard 25.4 cm as CG, as a reference point to compare different kayaks. I used the midpoint of VCB and KMt as CG, which is usually [12 ~ 14] cm for my cases.

serene – 1, part 3

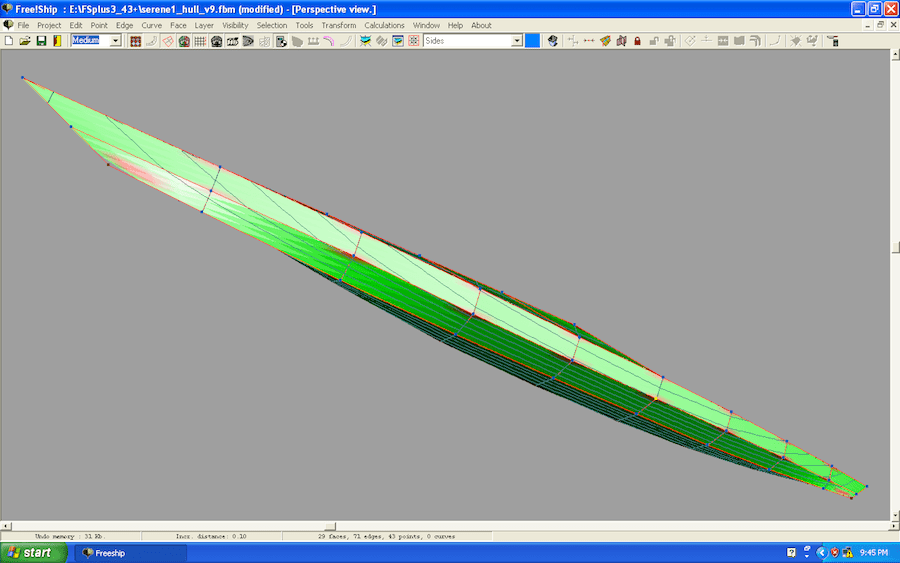
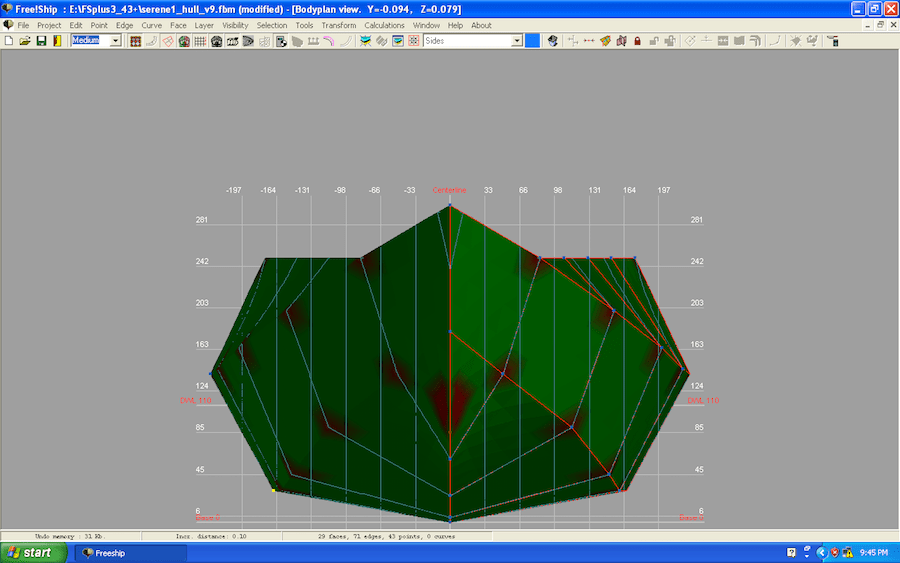
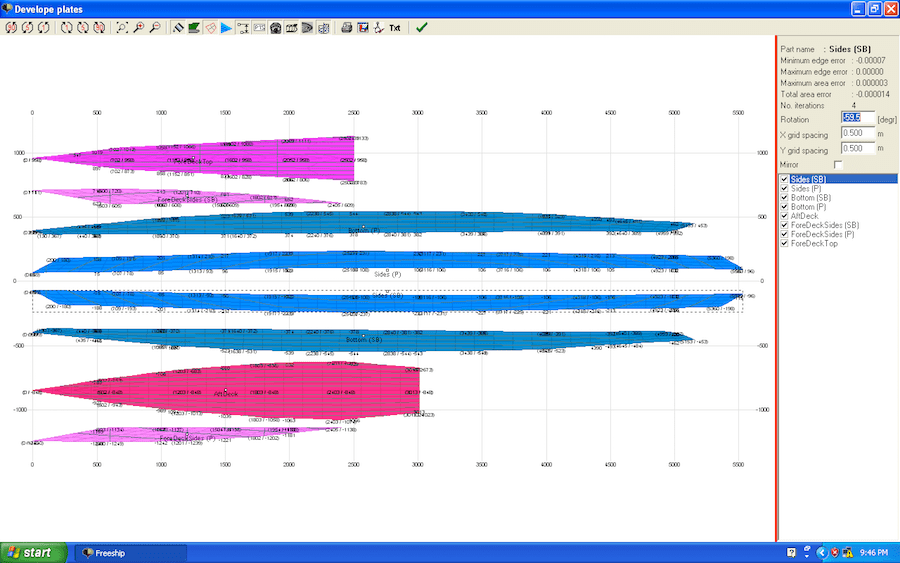
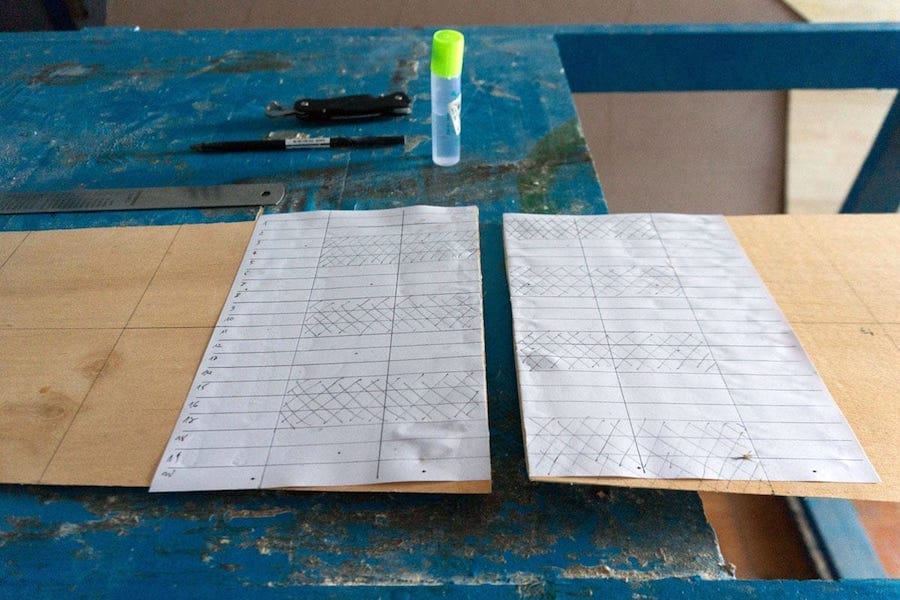
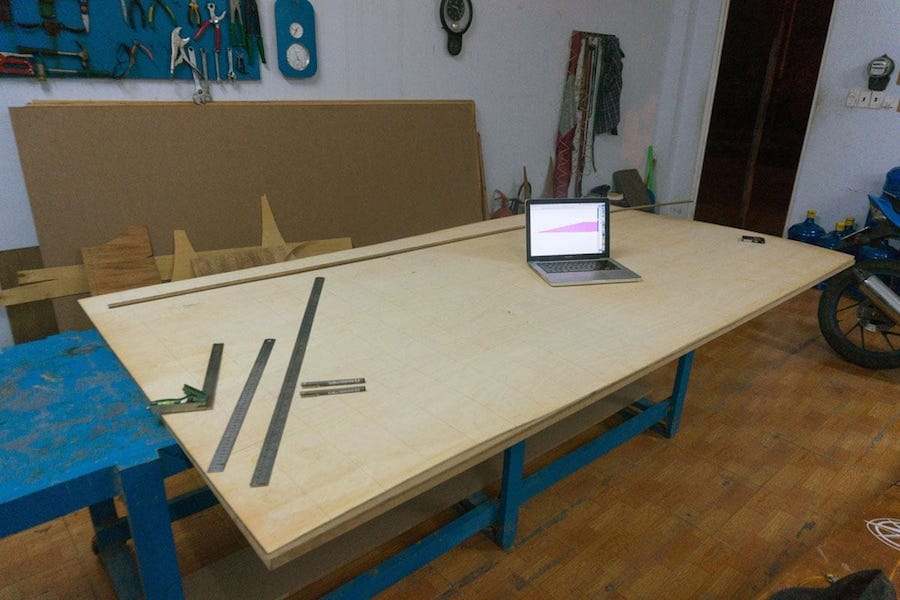
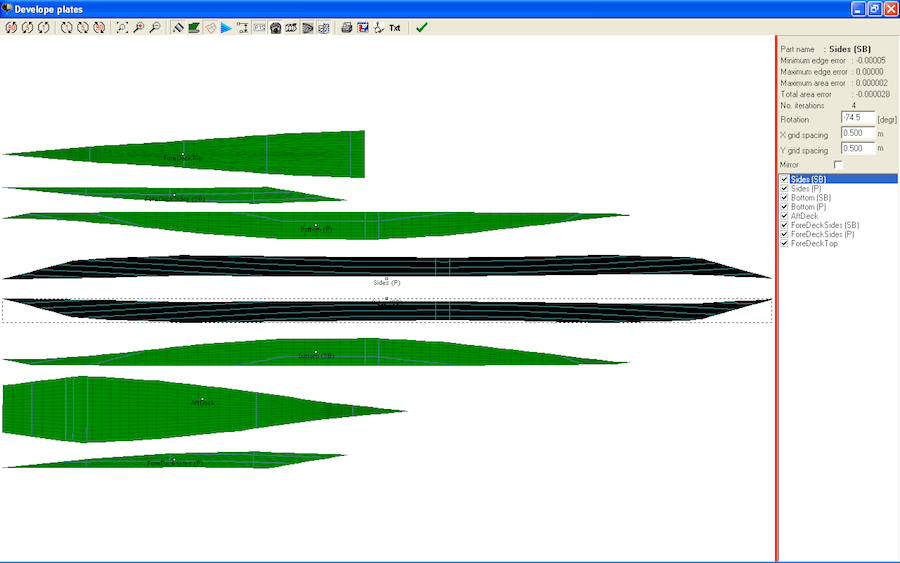
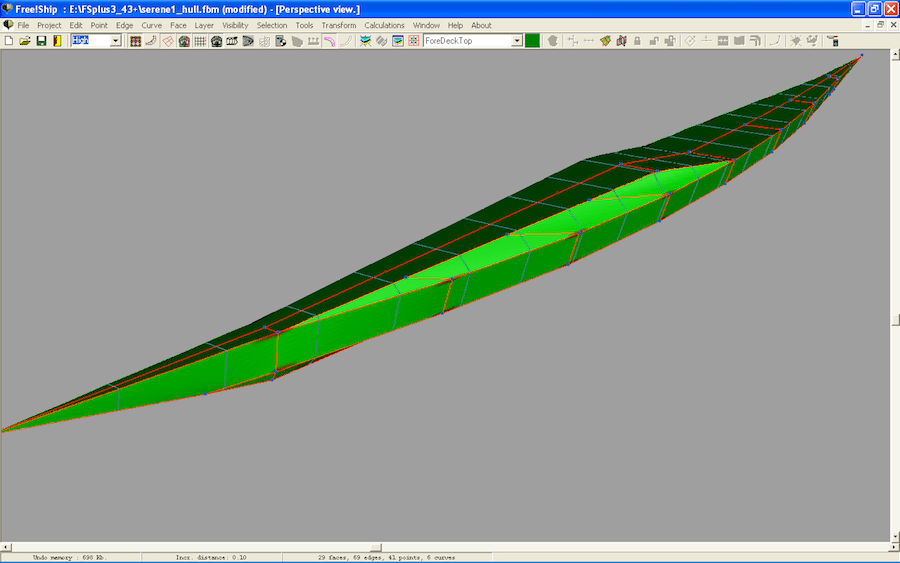
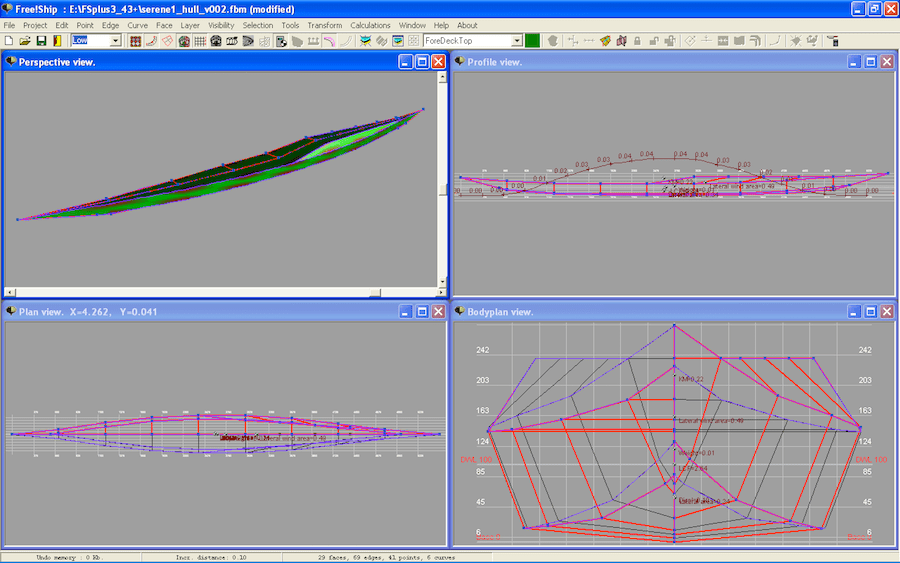
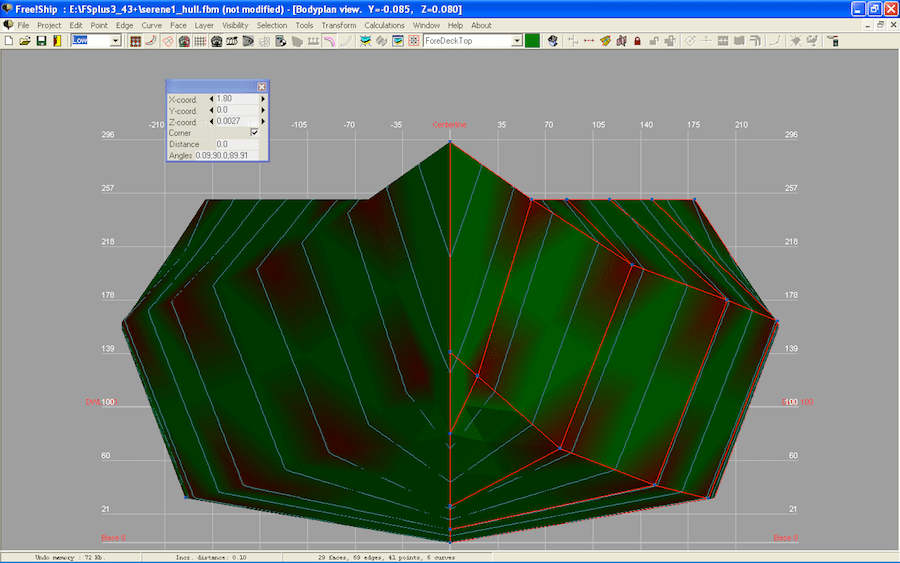
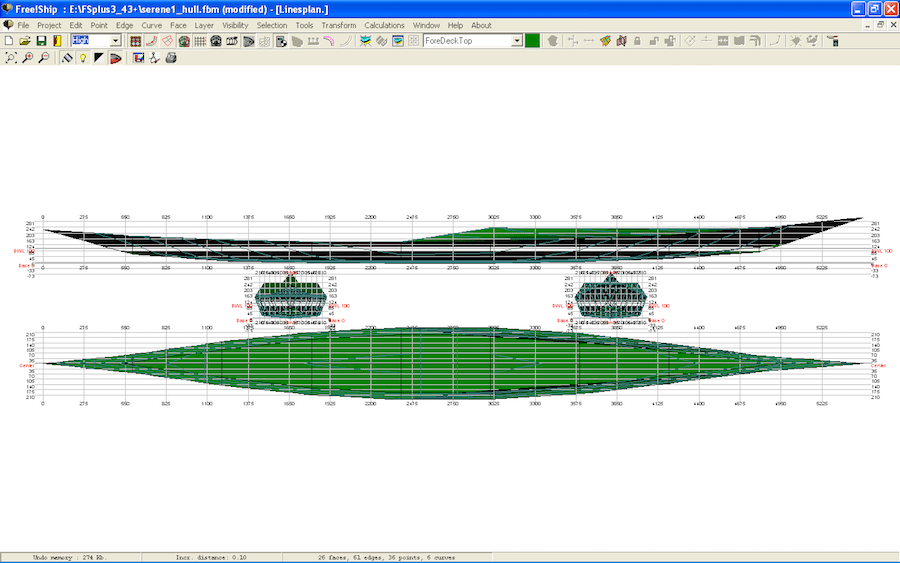
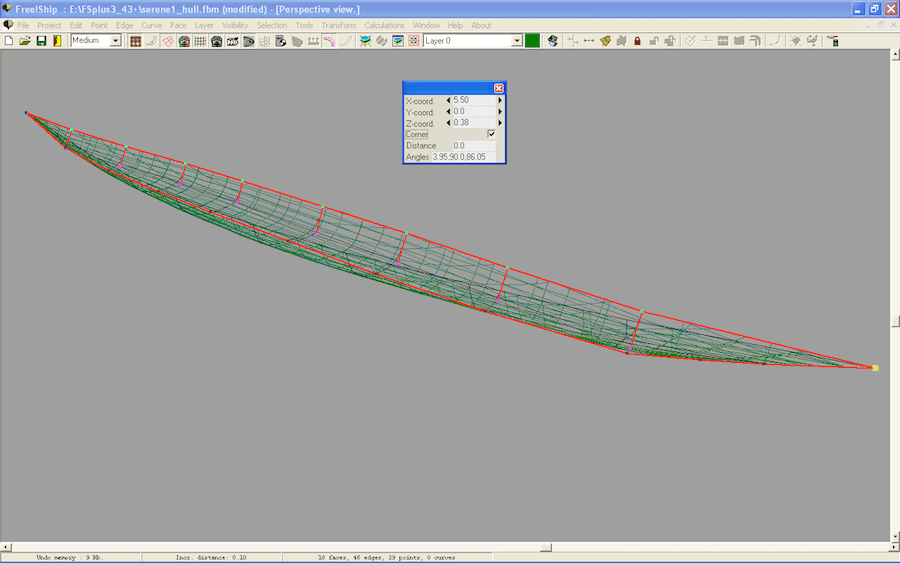
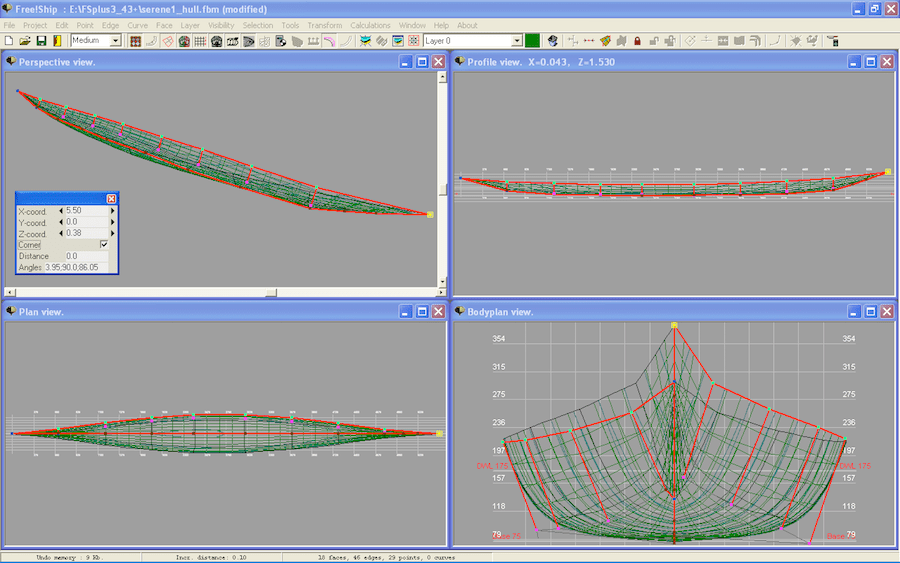
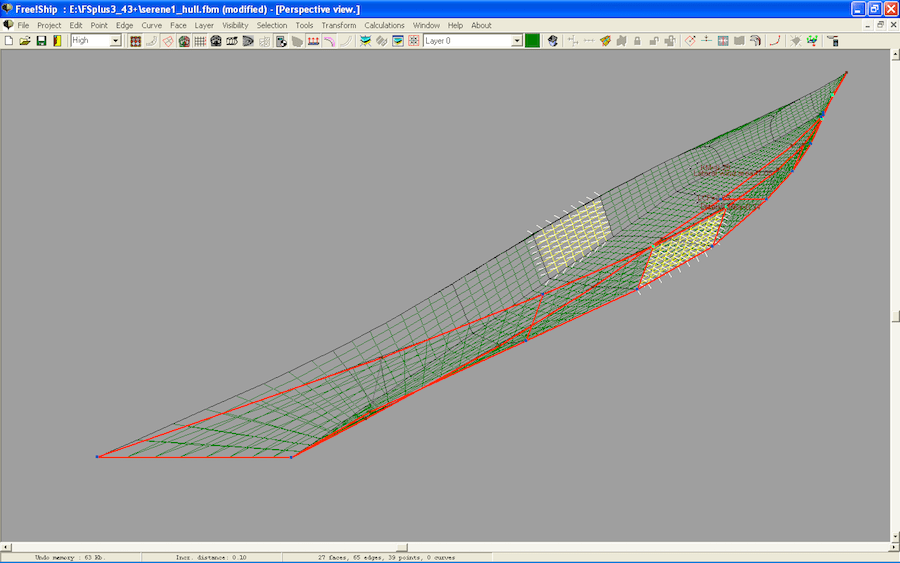
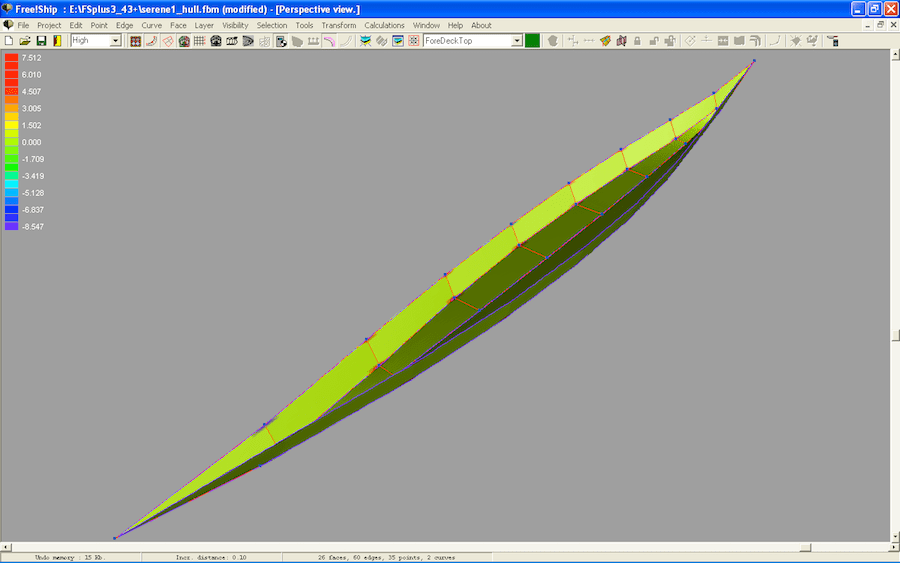
ade some good progress in the process of modeling my new kayak… For a human – powered watercraft, water doesn’t like complex curves and shapes I think, so they need to be as simple as possible (it is not too simple to come to that simplicity though). The model is then decomposed by Free!Ship into several “developable” plates, at this point, professional builders could just output the plates to a large CNC machine, which would precisely cut the plywood accordingly.

I print those plates to paper to make a 1:15 paper model. Cut the plates with a pair of scissors, then stitch them together using transparent duct tape. Making a paper scaled model would help verifying about the “develop – ability” of the product, double check if there is any design mistake, and give a clear view on how we should compose the pieces into the final boat. For simplicity, I didn’t draw details such as the cockpit, skeg, lines or hatches, just the basic shape of the kayak.

The paper model is a bit ugly (my hands are not too skillful though), but the pieces come together perfectly, the shape just looks like a bamboo leaf! This gonna be a long, thin kayak with very little freeboard! Next would be finding some free time to materialize all these drawing onto the plywood sheets. I don’t have a printer that’s large enough to print the plates in their real sizes, so I would just redraw them using offset table exported from the CAD software, actually, I prefer this manual method!

Serene – 1 p1
Serene – 1 p2
Serene – 1 p3
Serene – 1 p4

Back to the number 70.39 Watt, a heavy labour (such as a bricklayer) produces about 75 Watt on average, and for only 8 hours. You know what it’s like to paddle 10, 12 hours on a minimum basic, or even more, like I was paddling for 16 hours from Vũng Tàu back to Sài Gòn in my last trip!

The book Kayaks Of Greenland by Harvey Golden is a great guide for home builders, it contains dozens of kayak models ready to be built, with all the necessary drawings! I used some models from the book as references and comparisons when designing this Serene – 1 kayak!

serene – 1, part 2

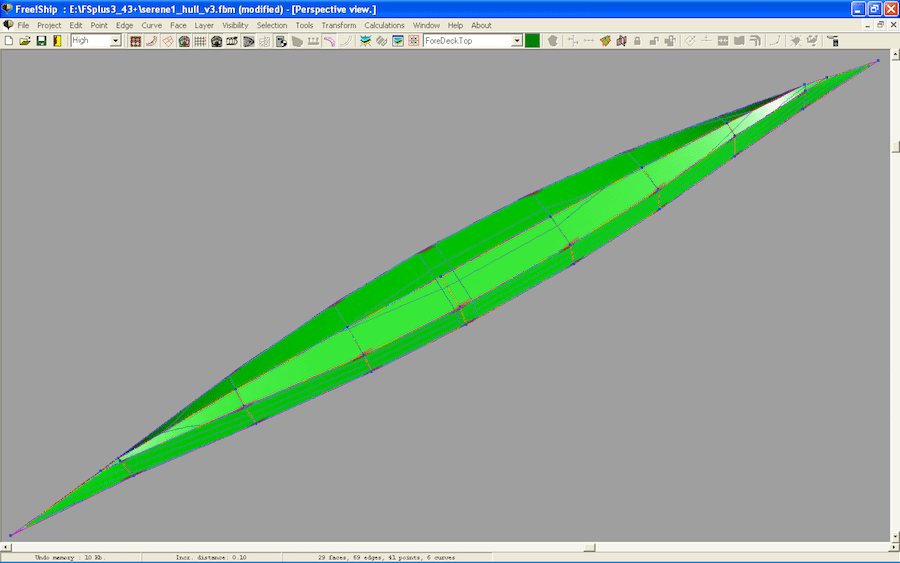
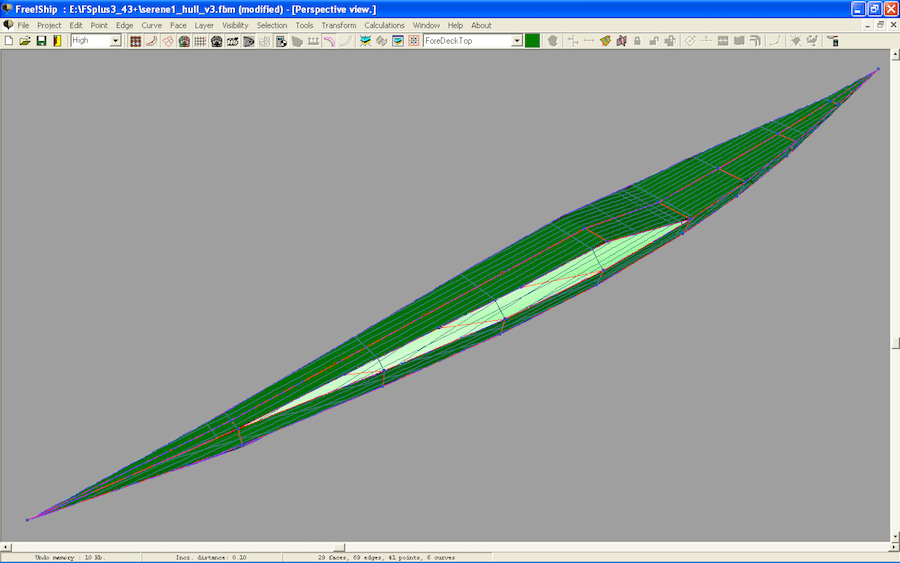
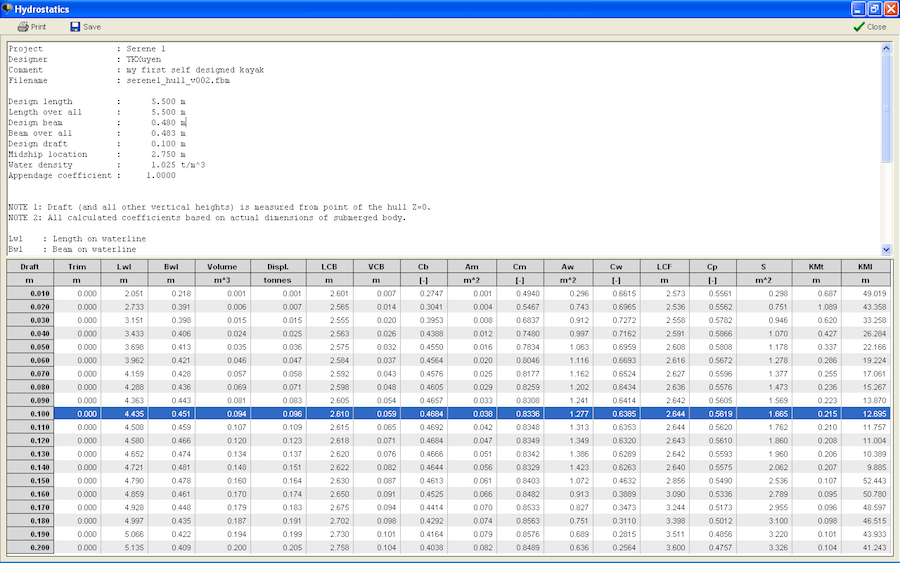
t tooks just a few hours to learn the new software and construct the basic 3D objects: hull & deck. The time – consuming tasks are adjusting the shapes and playing around with hydrostatics. Some basic measures: LOA / LWL (length overall / waterline): 5.50 / 4.44 m, BOA / BWL (beam overall / waterline): 0.483 / 0.451 m, Draft: 0.1 m, S (wetted surface area): 1.66 m2, Cp (prismatic coefficient): 0.5619, LCB (longitudinal center of buoyancy): 0.5150, LCF (longitudinal center of floatation): 0.5192.

Additional hydrostatics parameters, VCB (vertical center of buoyancy): 0.0590 m, Cb (block coefficient): 0.4684, Cm (midship coefficient): 0.8336, Cw (water plane coefficient): 0.6385, Displacement: 0.096 tonne… Well, I wouldn’t pretend that I fully understand those parameters above, cause they contain insights into a boat that can only be correctly interpreted by an experienced designer. However, I’m tweaking around to optimize the parameters toward a higher Cp, higher LWL, and lower S.

Drag (resistance) predicted by the KAPER algorithm looks fine till now, however, the displacement is sacrificed already, 96 kg, barely enough for me (65 kg) plus 30 kg of gears. This gonna be a demanding boat with low primary stability, not recommended for beginner. It takes some real world experiences to understand why low initial stability is indeed a good thing, and why a kayak which appears to be very stable on flat water could probably throw you up side down in bumpy conditions.

Serene – 1 p1
Serene – 1 p2
Serene – 1 p3
Serene – 1 p4

Some rough calculations on the energy required to propel a kayak. My target speed is 7 kmph, or 3.8 knots. From the numbers recorded by my Garmin over the years, in normal big rivers and sea conditions, speed is reduced by 1/3 compared to the ideal condition of flat water.

That is you have to struggle at 5 knots to assure that 3.8 knots. The Kaper algorithm tells you that, this Serene – 1 hull produces a resistance force of 27.35 Newton at 5 knots (or 2.57 meters per second). Making the multiply: 2.57 x 27.35, that’s the output required: 70.39 Watt!

serene – 1, part 1

n the progress of learning to design my new kayak… you know its name already. I’m using Free!Ship, a CAD software running on Win XP virtual machine (with VirtualBox) on my Macbook. I haven’t used any CAD software before, haven’t designed anything 3D, not to say about a watercraft. So why designing a kayak!? Well, first, just for the fun of doing something yourself from A to Z. Second, though I’m no naval designer in any sense, I believe I have some guts on how a good kayak should be!

Many kayaks are designed for 70 ~ 90 kg paddlers on average, I’m not that bold, and I need something slimmer, lighter, with the drawback of sacrificing some load capacity of course. I’m re – modeling my kayak after Björn Thomasson’s Black Pearl, using just some publicly – available pictures of the boat. And it’s not a copy, there’re some modifications: slightly narrower beam, slightly less rocker, and slightly deeper V – bottom. And I would stick still to my familiar stitch & glue construction method.

Why stitch & glue!? Strip build generally offers best boat shapes, but look at the Inuit people’s SOF (skin on frame) kayaks, those “hard chines” suit naturally to S&G, the method is simpler and takes less time (which I don’t really have much for now). It gonna be not an easy process: just for the hull, adjust the 60 control points back and forth, recalculate the stability and performance parameters, repeat again and again until you’re satisfied with the results. I hope I can finish the design in about a month or so.

Serene – 1 p1
Serene – 1 p2
Serene – 1 p3
Serene – 1 p4

Recently, I’d noticed that Japanese kayakers usually use kinds of slim, long kayak similar to the Black Pearl, that’s quite understandable cause the body – building of Japanese is Vietnamese alike, we’re not too bold. Use a slimmer, lighter boat, and pack your gears cleverly for longer trip!

It’s interesting to know that, in the old day, in building kayaks, the Inuit people has “recipes” to measure the size of the boat: length should be 3 times the height of the paddler, width should be the hip plus somewhere from 4 to 8 “finger”. Well, like shoes, boat is tailored to match the user.

300 ca khúc Thái Thanh

Giọt mưa trên lá, tiếng khóc chơi vơi,
Thế giới lạc loài, chưa thoát ra phận người…

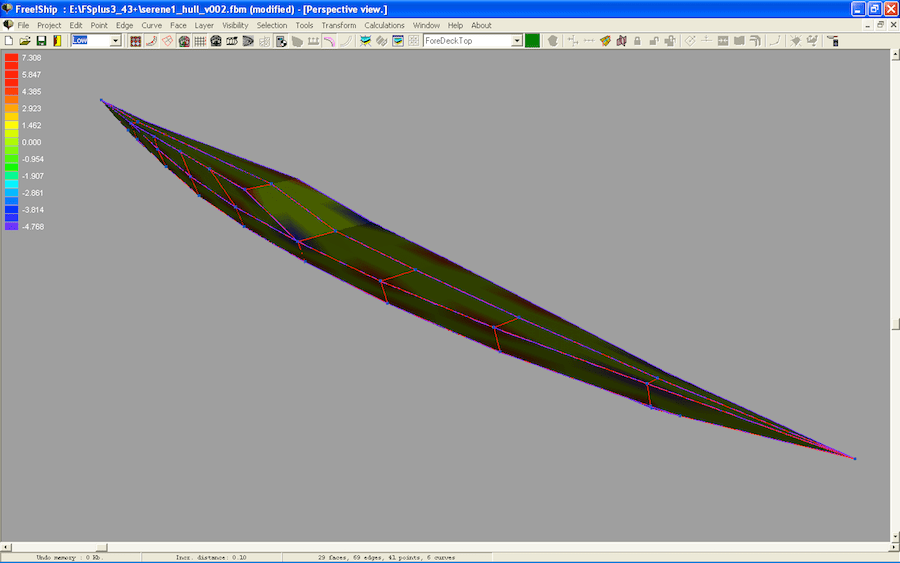
hừng này tạm đủ như một lời giới thiệu ngắn gọn về giọng ca Thái Thanh, hơn 300 ca khúc của nhiều nhạc sĩ khác nhau: Phạm Duy, Phạm Đình Chương, Dương Thiệu Tước, Hoàng Trọng, Văn Phụng, Văn Cao, Lê Thương, Trịnh Công Sơn… Các ca khúc được xếp theo thứ tự ABC để tiện tìm kiếm. Những tựa in đậm là những ca khúc tôi thích và thường nghe. Chất lượng âm thanh không đồng nhất, tốt có, kém có, nguyên bản nhiều, remixed cũng lắm. Chất lượng âm nhạc… cũng thế!

Nhưng có hề gì, miễn là cảm được giọng ca Thái Thanh, hay nói như NS Phạm Duy: Thái Thanh chỉ cần cất giọng là người ta đã mê, bất kể bài nào. Đến giờ, không còn mấy ai cảm được cái kiểu luyến láy nhấn nhá như trước nữa… Một số người vẫn cất công kể lể nhạc xưa thế này, Thái Thanh thế kia, blablabla… Nhưng tôi không nghĩ là họ đã nghe đủ, và càng không tin là họ có hiểu một tí gì, vì dù có nghe cũng chắc gì đã hiểu!? Thực ra tôi không cần đến 3 giây để nhìn ra những điều như vậy!

Dù đó là những đĩa than đã mòn nhẵn với thời gian, hay những thước băng cối đã nhão đến mức khó nhận ra âm điệu gốc, từ những bản thu mộc âm thanh mono cách đây hơn nửa thế kỷ, hay những thu âm CD số hiện đại sau này, thì giọng hát Thái Thanh vẫn không thể lẫn vào đâu được. Nhiều chất giọng cũng cao như thậm chí là hơn Thái Thanh, nhưng những bội âm trong chất giọng của bà là điều mà không một ai bắt chước được, không một kỹ thuật hiện đại nào có thể tái tạo được!