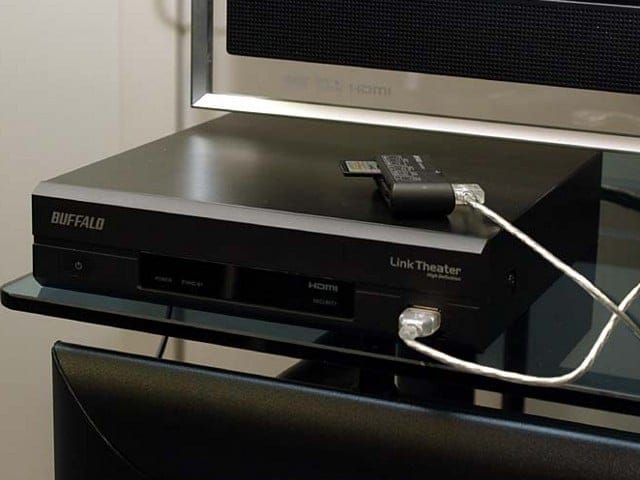
unity


Screenshots of the new Unity desktop. There’s certainly a harsh non – exclusive competing between Unity and GNOME Shell. A proxy war between Ubuntu and Fedora Core, which is in turn a proxy war between Canonical and Red Hat.

Eventually, it’s user experiences that would decide which desktop is best (and best for what), and that’s still a long way to come. But technically, Unity is the first huge bold break from tradition, whose real goal deep inside is replacing completely the age – old heritage of X window system by an OpenGL – based one, a problem partially addressed in my previous post.

am trying Ubuntu’s new desktop introduced lately with Natty Narwhal (11.04). After heavy development phases, Unity has reached its alpha stage, a massive move replacing the GNOME desktop environment by a completely new one written from scratch. I’ve read too many negative reviews about Unity already, but personally I think this is a good move. Developed from Ubuntu’s Netbook Remix (which I didn’t like much, you don’t have to maximize windows like that all the time), switched from Clutter to Compiz 3D windows compositing system (my last experiment with Clutter also hinted potential performance problems), the new Unity shows a huge shift toward Mac’s style desktop. Though there’s still lots of bugs and missing features, a few things can be said about this new Unity.

First, people complains about the break from the norms, some hates Unity because it stops their accustomed habits. The GNOME community (with its long development history) can feel like being betrayed. But for all I knew after some years in graphics, UI design is the job of personality, it’s the task of a small group who decides what is “nice and beautiful”, and which is the way (for other users) to follow, it’s not the task of a committee (that is “People’s Committee” I mean 😬). As a developer, I’m often in the self – conflicting state of wondering what is “nice and beautiful”, modify over and over again some simple UI widgets. It’s no strange that UI always becomes a huge diversity (and problems) for community – driven projects. Key requirements for a UI system in my opinion are: simplicity, consistency and elegance.

For consistency and simplicity, Unity is a big step forward, reasons given that GNOME has become too complex and inconsistent (then how about the much more complex KDE?). Maximized windows have the caption and menu bars all incorporated into the system bar on top, a feature clearly borrowed from Mac, yet further varied and developed. A simple dock bar is positioned on the left, and system menu button doesn’t bring up menu but a searching panel with which you can launch programs, open files… with a few key strokes. I like this much cause it offers a form of GNOME – Do: it’s harder to launch rarely – used items (especially if you don’t remember the names) but it’s more convenient for frequently – used ones. After all, lexical memory is much faster than spatial memory, if one has been trained to that.

One more apparent physical factor is that the vertical screen space is more scarce compared to horizontal space, and 16:9 screens has become quite popular. To conserve useful screen space, UI must make constraints to the caption, menu bars, especially tool bars, there’s even recommendations on eliminating the status bar and minimizing scroll bar at Mark Shuttleworth’s (Canonical’s founder) blog. For scroll bar, that’s quite sure a mimic and modified version taken from iOS. Actually with my recent experiences with Mac and iOS, there’s still a lot of lessons to be learned from these two OSes on how to use space efficiently: remove heavy windows decorations and borders, use lighter UI fonts, smaller and more symbolic icons, design simpler widgets… and in cases even sacrifice some less – used UI features.

The trend of UI becoming simpler and more consistent is quite obvious. Efficient uses of space is the key, but spatial is not all for user experiences: keyboard and mnemonic are also important parts of the learning path (UI effects can be fancy, but over time, people get to love the simplest keystrokes that do the job). The third factor: elegance is even more a topic of debate, people can largely agree to what is simplicity and consistency, but what is aesthetics remains mysterious! Unity claims that it would directly compete Mac on UI designs and user experiences, but my opinion is that its aesthetic aspect is still far behind that of Mac, e.g: Compiz’s effects are numerous, but actually not very fine – tuned compared to the smaller set of animations Mac offers… And even Mac still doesn’t satisfy my eyes in quite many cases…

jingle hell

First, it’s Jabber, then the open standard XMPP, then libjingle (the thing behind GTalk and several other VoIP applications). An essential part of VoIP, VPN, P2P technologies is ICE (Interactive Connectivity Establishment), techniques that help computers behind routers connect to each other…

ow it’s Christmas time, but this has nothing to do with Xmas except the name: LIBJINGLE. For a long time, I’ve been trying to expose one of my home servers to the Internet. Normally, you’d just need to setup dynamic DNS to update the router IP address and NAT (Network Address Translation) to forward one port onto the server. Unfortunately, my ADSL router is a special (hardware / firmware) version OEM-ed by Comtrend to FPT (the local ISP), and no matter how I configure, NAT is simply forbidden. I’ve tried various techniques to punch holes (TCP, UDP) through NAT, such as this pwnat, a trick to fool the router using ICMP echo packet. However, due to different router implementation & configuration, no technique is known to work in 100% of the cases, as pointed out in this paper.

The NAT traversal problem repeats itself in various applications: VoIP, P2P network, VPN (Virtual Private Network), networking for games… Current technologies take a dual approach in solving this: a certain kind of ICE (Interactive Connectivity Establishment) when two peers can directly connect to each other, or a central server in between in case the routers forbid it all. Such as with libjingle, Google Talk servers are used in case a direct connection can not be made. Remember the Skype’s global disconnect problem lately? It’s the same sort of problem with ‘central servers’. With these knowledge in hands, it’s turned out that setting up a VPN to access my home servers from anywhere is quite easy as follow.

Build libjingle and fwd (a simple wrapper around libjingle). Building libjingle on Debian is a nightmare (yes, it’s a real nightmare, libjingle 0.4 has a nasty code base). It took me a whole day, and after changing several dozens of places in libjingle’s code, I got it compiled and run correctly (please refer to this post for some initial building instructions). Once the transportation channel has been established with libjingle, a SSH tunnel is setup to forward a port on your roaming laptop to the SSHD port (22) on the home server:

# on a server inside your home network, this will forward
# port 2222 to port 22 of another machine (‘buffalo’)
./fwd -u account@gmail.com -p password 2222:buffalo:22

# on your laptop from anywhere on the Internet, almost
# the same command, but the -L option for client mode
./fwd -u account@gmail.com -p password -L 2222:buffalo:22

# then connecting to the ‘buffalo’ box is just setting up
# a SSH session, thus a SSH tunnel inside another SSH tunnel
ssh root@localhost -p 2222

The technique works flawlessly, I can now access my home VPN from anywhere. Basically you’re inside a VPN now, so various setups at home would transparently work (strictly speaking, this is still not real VPN as TCP, UDP broadcasting may not work, but most regular connections would). Next, I proceed to exposing some of my home services onto the outside world. Again SSH proves to be such a very very powerful tool as you can build SSH tunnel inside another tunnel, which can be nested for several layers (ssh is actually means ssshhh! – sign used to signal lowering one’s voice I think):

File sharing

SFTP (Secured File Transfer Protocol) is built on top of SSH, and SFTP is native to any Linux (for Windows, we could use WinSCP, and for Mac is Cyberduck). Just connect to one end of the tunnel like with SSH (localhost:2222) and on the other end of the (nested) tunnels, we get access to the whole file system.

Subversion

SSH is built-in into SVN (I often use SVN by command line rather than WebDAV). Something like: svn co svn+ssh2222://user@localhost/svn/project would do the job, where ssh2222 is defined in your subversion’s configuration file (under the [tunnels] section) as: ssh -p 2222, this instructs the secured shell to connect to the host, then call the ad-hoc svnserve instead of a real web server.

Web Proxy

This is very useful since if helps surfing the Internet securely while you’re in public. After setting up Squid web proxy on the same server, the command: ssh -N -L 8080:localhost:8888 root@localhost -p 2222 tells SSH to forward the local port 8080 to the proxy port 8888, then pointing Firefox at localhost:8080 would secure our traffic more than enough (2 levels of nested tunnels and 2 levels of port-forwarding).

Music streaming

I use this to casually enjoy my music collections while not at home. Install FireFly (formerly mt-daapd) music streaming server and forward the default port 3689, then I can listen my favorites songs anywhere using Rhythmbox (Linux). And since the protocol (daap) is originated from Apple, listening is also natively available on any Mac machines using iTunes.

home servers


The C-Media usb board adds a cheap (~ $5) sound solution to the Debian box, sound quality is fair enough for “ad-hoc” listening (comparable to that of AC97 on-board chip, and for serious music, there’s already the home media player).

uite a long time it takes me to finish and “stabilize” all these “home servers”… and finally here it is… On the left, you can see: #1: the 650 Watt UPS that provides about 3 hours of un – interrupted electricity for the whole system, #2: the WAP54G Access Point (hacked with OpenWRT), #3: the Comtrend ADSL router, #4: the LinkStation CHL (Debian Lenny: print server, 1T disk space for samba share, bittorrent server), #5: the LinkStation Duo (Debian Lenny: 1T of RAID-1 disk space for important data, SVN, Web, VPN servers (for remote access) and MPD music servers), #6: speakers.

All these miniature machines help streaming lossless music and HD video to the media player (LT-H90LAN – another Linux box resides in the living room). Except for the router (which is specialized hardware & firmware OEM-ed by Comtrend to FPT – the local ISP), all others devices runs Debian or another Linux variant. The total power consumption of the whole system is less than 50 Watt. Future computers would consume less than 1/10th of power compared to today’s ones… Power is the key, less power means less heat, less noise, more stable and more durable… the factors that make successful home services!

buffalo duo


My Buffalo, a 400 MHz, power-efficient ARM system (it consumes about 17W on average). The duo: two SATA disks (1TB each) running in RAID-1 configuration. The system can also act as a print server: most cheap home laser printer are not stand-alone device (lacking PostScript capability) and need to be attached to a PC in order to print, instead we can connect printer to this Buffalo box via usb and serve printing over network.

y newest toy: a Buffalo LinkStation Duo Network Attached Storage (NAS – or a poor man’s home server). Had thought about this long ago but don’t have time till now to dig a little bit low-level to get the thing to work! Basically what I want to have is a miniature general-purpose home server, which would run continuously 24/7. But you know with the temperature and electricity conditions here in HCMC, most PC would surely break down if let running continuously for a few months. The idea is to hack this NAS device to run Debian and turn it into a hybrid system: NAS (file server, torrent, UPnP…) and a home server which would handle a little more extra tasks. I took me a whole night to figure out how to do it.

1.   Boot the device via tftp, using u-boot, the universal bootloader. We need to to erase the HDD’s partition table (with something like: dd if=/dev/zero of=/dev/sd[a/b] count=1) to force the device into tftp boot.

2.   Telnet to the device and prepare the disks: using fdisk to apply a same partition structure to both two disks (/dev/sda and /dev/sdb) with the usual Linux FS: /boot, /swap, /(root), and /data). The disk structure would appear like this:

Device Boot Start End Blocks Id System
/dev/sda1 1 6 48163 fd Linux raid
/dev/sda2 7 1200 9590805 fd Linux raid
/dev/sda4 1201 60801 478745032 85 Linux extended
/dev/sda5 1201 1329 1036161 82 Linux swap
/dev/sda6 1330 60801 477708808 fd Linux raid

3.   Setup the RAID-1 (one-to-one mirror) structure, you can see that we mirror /boot (sda1, sdb1), /(root) (sda2, sdb2), and /data (sda6, sdb6), there’s no need to mirror /swap:

mdadm –create /dev/md0 –level=1 –raid-devices=2 /dev/sda1 /dev/sdb1
mdadm –create /dev/md1 –level=1 –raid-devices=2 /dev/sda2 /dev/sdb2
mdadm –create /dev/md2 –level=1 –raid-devices=2 /dev/sda6 /dev/sdb6

4.   Install Debian (Lenny) using debootstrap, a very handy tool to install Debian directly from a repository. DeBootStrap pulls the packages over network, build a new rootfs, after chroot-ing to the newly build system, pull and build the kernel from source. After that, we can use regular Debian commands to update, configure network, add softwares, etc… After rebooting, we’d got a brand new Debian with 1TB of RAID-1 disk space, which runs flawlessly and which is ready to serve my various automation tasks!

Notes: installing Debian would void the warranty and could easily brick your device, use the information at your own risk. The steps here are just summary, there’s been various try and fail to get the thing done, e.g: we need priorly to have binutils, wget, zlib and libssl binaries for debootstrap to work (download the deb files from Lenny’s repository, extract and copy over the Buffalo), after debootstrap-ing, I forgot to set the root password, and unable to login when the machine reboot, thus having to start the whole process over again 😢. For further details, please consult the Buffalo NAS community.

UPDATE, Nov 18th, 2010

For a NAS which runs 24/7, it’s critical to monitor system status (temperature and the moving parts). I wrote this little fand script, a daemon to monitor hard disk temperature and adjust the fan’s speed accordingly. HDD’s temperature can be retrieved using smartmontools (most hard disk nowadays has S.M.A.R.T capabilities). And fan control on Buffalo LS Duo is done via the gpio module (thanks to talent hackers on the Buffalo NAS forum), something like this:

# values can be ‘off’, ‘slow’, ‘fast’ and ‘full’
$ echo ‘slow’> /proc/linkstation/gpio/fan

I’ve defined some thresholds, in a tropical country like VN, room temperature around 30° ~ 35° (Celsius) is a common thing, so if the HDD’s temperature is below 35°, we would turn off the fan. If it is between 35° ~ 40°, the fan speed would be ‘slow’, from 40° to 45°, the fan will be turned to ‘fast’, and if temperature excesses 45°, fan speed is set to ‘full’. Well, and even if 50° is reached, we would send a notification email (via sendmail) and shutdown the system. If you find it interesting, here is the fand scripts.

UPDATE, Nov 20th, 2010 (THE REAL DUO)

To pair with the Link-Station NAS is its cousin also from Buffalo, the Link-Theater LT-H90LAN. The LT-H90LAN reads media from Samba shares or DLNA server via LAN and is a 720p and 1080i HD-ready device. Although not Full-HD (1080p), that’s enough for my need (I don’t have a Full-HD TV in my house anyhow, maybe I’m waiting for 3D home video). It’s quite pleasing to enjoy good video quality and excellent audio in your living room, all streaming from a central NAS. The box also runs a variant of Linux (though hacking can be a pain, I would only left the device untouched for safe). This is one further step toward an all-Linux-devices home (thought I should buy an OpenMoko phone then).

kindle and feeds

fter years in IT career facing monitors, it’s now time to care a little about your eyes, and I’m now using my Kindle for reading news, documents everyday! However web browsing on Kindle is quite inconvenient, there’s of course no touch screen (imagine how touch would look like with a 3fps responsiveness display), and the 5-ways button make web pages’ navigation a kind of clumsiness! I was thinking about some form of automation, basically we would need to convert some news-feeds into Kindle’s native format (mobi) for the ease of our reading, the steps below:

We’re going to use Calibre, the famous ebook-converting tool: sudo apt-get install calibre. Or you can install it (binary or source from) on Linux as guided here. The very nice feature of Calibre is that it can fetch news-feeds, parse and format them following a pre-defined rule-set called “recipe”, there’re hundreds of built-in recipes as well (“recipes” are actually python scripts used to parse and layout the data in html and some css). Below is how I fetch feeds from Engadget and VnExpress and convert them to .mobi, the native format that layouts very well on your Kindle:

$ ebook-convert /opt/calibre/resources/recipes/endgadget.recipe endgadget.mobi –output-profile=kindle
$ ebook-convert /opt/calibre/resources/recipes/vnexpress.recipe vnexpress.mobi –output-profile=kindle

Copy the files over your Kindle, the news feeds read out very very nice! (images on the left, click to enlarge). The next step is of course some further automation, you don’t want to do the whole thing manually everyday, do you!? All these works can be accomplished by a shell script, scheduled by crontab! Just have your home server prepare the documents and sync it to you via Dropbox, from which you can download and view on the device (Kindle naturally permits downloading .mobi documents). I’m using this way to serve myself latest news with coffee every morning!

kindle development without kdk

DK, the Kindle’s Software Development Kit has been released for quite some times but Amazon still strictly restrict accessing to it, many many software developers (like me) have registered and received no reply. It is understandable that Amazon could be skeptical on what to put on Kindle’s app store, but it should not be that conservative toward the developing community. KDK is basically just a PBP (Personal Basic Profile) J2ME (Java Micro Edition) with Amazon’s extension, a Kindle emulator, and some tools…

Having no KDK doesn’t mean that we can not develop software for Kindle! Below are my notes on building, deploying an example application for Kindle. This would make cleared the steps needed to write applications for Kindle without the KDK. Please notes: the information is collected from many different sources, jailbreaking could be considered “illegal” according to some Term Of Use. Use the information at your own risk!

1.   Jailbreaking and usbnetwork

Download kindle-jailbreak and kindle-usbnetwork from here. Choose the files that is suitable for your device, e.g: for my Kindle 3 (wifi + 3G), it would be the jailbreak_0.4.N_k3g and usbnetwork_0.27.N_k3g. Copy the jailbreak_0.4.N_k3g file to your Kindle, then proceed to updating the system. The jailbreak exploits a hole in Busybox implementation to gain root access. Next, do the same thing with usbnetwork_0.27.N_k3g, which provides a secure shell via USB connection.

Launch the Search box on our Kindle, type ;debugOn, press enter to execute the command, then do the same thing with ~usbNetwork to start the sshd daemon. The default configuration would set Kindle to 192.168.2.2 and expect the connected PC to be 192.168.2.1. Now we’ve got root access and the entire FS (file system) in the palms of our hands. Spend some times exploring it, when done, put the Kindle back to normal use by issuing ~usbNetwork again, then ;debugOff.

2.   Key and file signing

This is the most important part! Kindle’s “kindlets” are exactly Java’s jar file with .azw2 extension, however, we can’t just simply copy and run it. The applet is linked against several system libraries located at: /opt/amazon/ebook/lib/Kindlet-1.1.jar and /opt/amazon/ebook/sdk/lib/*.jar (copy these files to your PC for local jar building in place of those provided by the KDK).

The .azw2 file must also be signed with 3 different keys located at: /var/local/java/keystore/developer.keystore and the security policy is defined at: /opt/amazon/ebook/security/. For more information on signing, please refer to this post. If you’re tweaking your Kindle and writing apps for it, I suggest that we would just use the signing key of Andrew de Quincey, the first one to figure out about this, so that free softwares can be easily shared among Kindle’s users.

Configure the usbnetwork interface and access Kindle via sshd. Image below: the command htop running on Kindle’s ssh console.

When finished with hacking, we can un – install these two exploits to restore Kindle back to original state (and receive official updates from Amazon), but that would be after the next section, when we’d been able to deploy our own software on it!

3.   KindleGoban – an example app

I’m going to deploy KindleGoban, a Go (weiqi) game viewer, as an example app. Adrian Petrescu, the man behind this open source game, is perhaps, an insider of Amazon’s KDK project. But technically he’s under a NDA (non disclosure agreement) and won’t be able to say anything except the publicly available information. However, he did indirectly provide valuable resources.

First, copy the developer_keystore (mentioned in #2) to your PC & Kindle (at /var/local/java/keystore/developer.keystore). Then download KindleGoban (and its dependency library KWT. Make some changes to the build.xml to include KWT (adding several widgets) and get rid of the KDK’s stuffs (which we don’t have). Then build, sign and deploy the .azw2 file to your Kindle. And there you are, a nice Go game viewer!

# first, build and sign the jar file
$ ant build.xml
$ jar cvfm KindleGoban.azw2 KindleGoban.mf bin/*
$ ./signkindlet developer_keystore KindleGoban.azw2
# copy the file over to your Kindle, also need
# to copy an example .sgf file for testing
$ scp KindleGoban.azw2 root@192.168.2.2:/mnt/us/documents

4.   Resources

This section gonna be regularly updated on the availability of documents, tools.. for development on Kindle. Please note most of these are from third – parties rather than Amazon, which are the results of hacking, reverse – engineering… and some other information indirectly available from the KDK. At the moment, we only have this official javadoc from Amazon which describes the KDK’s APIs.

  • Savory: a native ebook converting daemon for Kindle.
  • Kindle emulator: need to double check this.
  • KWT: Kindle Widget Toolkit.
  • Mangle: a manga viewer for Kindle.
  • Qindle: a Qt port for Kindle.

KindleGoban screenshots, this is, like most Kindle projects at the moment, is just starting, would expect more features in the time coming.

kindle 3


an not resist to this temptation anymore. Kindle price dropped significantly lately and it’s time to pick a e-ink display book reader for myself. I’ve been curious about electronic paper display, the alternative to LCD or OLED displays widely used on hand – held. Actually there’s been various devices (phone, watch…) which make use of electronic paper, but none has the success like Kindle.

The first impression is that the display, which is 16 gray – scale colors, really looks like traditional paper, and reading on it is an actual pleasure. The screen refresh rate is quite low (maybe less then 6 fps), which means video would never be an option on Kindle. To my surprise, sound is extremely good, the external speaker produces stereo which may be far better than on my laptop. Wifi works fine and the experimental browser (which only supports JavaScript, no Flash, no Java) is enough for basic email and web surfing.

Connecting to my Linux box, the device appears as a normal USB mount to easily copy files over. I find Kindle very suitable for my needs: document reading, a bit of music, and casual web & email. Moreover, Kindle does not create the impression that it is an electronic device. The battery is advertised to last about 10 days (with wifi on, and even more with wifi off), so we don’t have to care about recharging very often. It simply boots up and runs, and displays nice pictures in screen – saver mode.

Amazon recently released Kindle’s SDK beta (Software Development Kit) with Java as the primary language (J2ME), and maybe C/C++ for system development. The machine’s GUI proposes to me a lot of interesting ideas on usabilities and UI design!

chinese rendering server

n my previous post, we can see the image – replacement technique being applied to mathematical formulas rendering. Replacing text by image can be seen in various Web’s techniques, mainly to display things that browser can’t! It’s a possibility that many Web technologies would never converge into common “form factors”: how many years have passed but SVG is still not supported on all browsers, how font technologies are still fighting stiffly with each other? Various issues would always remain unresolved and image replacement, though ugly and inconvenient, could be used as a temporary solution.

As you can see in the image above: the first line is a popular Chinese straight – stroke font that can be seen on most browsers, the next lines are nice calligraphy (brush – stroke) fonts that can hardly be seen on the web! I’m going to try using FreeType2 for a very specific problem: rendering Chinese fonts, the only reason is just simple: aesthetics! Searching around, I can’t find any simple, standalone solution: nice Chinese fonts are very big, a typical ttf file has size from 5MB to 50MB depending on the character set and quality (with that size, it’s obvious that we should use a server side solution). Packages like Pango or Cairo are too complex, and would require additional dependencies (which is unavailable on a free Linux host).

It takes me a whole day struggling with FreeType2’s reference and manual to get it work with Chinese fonts (quite different from conventional Latin fonts indeed), and finally here it is! You can access the executable at: http://tkxuyen.com/freetype2.php with the following syntax: freetype2.php ? text=… &font=… &size=… &color=… here is an example. Below are renderings with different sizes (anti – alias works really well):

text=洛阳城东桃李花飞来飞去落谁家&font=2&size=11&color=111111
text=洛阳城东桃李花飞来飞去落谁家&font=2&size=12&color=111111
text=洛阳城东桃李花飞来飞去落谁家&font=2&size=13&color=111111
text=洛阳城东桃李花飞来飞去落谁家&font=2&size=14&color=111111
text=洛阳城东桃李花飞来飞去落谁家&font=2&size=15&color=111111
text=洛阳城东桃李花飞来飞去落谁家&font=2&size=16&color=111111
text=洛阳城东桃李花飞来飞去落谁家&font=2&size=18&color=111111
text=洛阳城东桃李花飞来飞去落谁家&font=2&size=19&color=111111

and renderings with 3 different Chinese fonts (very big files, installed on server) and in different colors. Just note these fonts are a bit non-standard: they produce traditional Chinese characters as output, but only accept simplified Chinese as input:

text=洛阳城东桃李花飞来飞去落谁家&font=2&size=19&color=FF1111
text=洛阳城东桃李花飞来飞去落谁家&font=1&size=19&color=11FF11
text=洛阳城东桃李花飞来飞去落谁家&font=0&size=19&color=1111FF

Update, Jun 6th, 2021:

Due to some changes on my web-hosting, CGI is disabled for some reason. I really don’t have time to figure out why, so just temporarily remove the Chinese font rendering for now!

FreeType2 is an very handy open source library, it’s available on many flatform: Unix, Dos, Windows, Mac, Amiga, BeOS, Symbian… and it does a very good job of handling typefaces! Since FreeType2’s patent issues have expired since May, 2010, we would see an increasing application of FreeType2 in many areas.

This is my very simple C code (~250 LOC) to experiment with FreeType2: loading font, loading glyph, rendering bitmap, dealing with Unicode… To compile, just something like: gcc gifsave.c freetype2.c -o freetype2.cgi `pkg-config --cflags --libs freetype2`. I hope I can have time to extend the code into a more usable form: multi – line layout, alignment, RTF support, etc… Some restrictions are imposed to protect the server, if some text can’t be rendered (e.g: rendering dimensions are too large), an error image like this is displayed instead:

latex rendering server


Some example expressions rendered by MimeTeX (it’s good to appear to be smarter than you are 😬!) If an expression fails to be rendered, you would see an error image like this:

ecently, the wonderful yourequations.com site (which I’ve been using to occasionally render mathematical expressions on web pages) has ceased it’s service due to heavy traffic. I was thinking about running my own LaTeX rendering server, things turned out to be pretty easy as follow, thanks to the excellent MimeTeX package, a LaTeX reduced subset. It’s also interesting to experiment the “stone age technique” of CGI, first download and compile the package:

wget http://www.forkosh.com/mimetex.zip
unzip mimetex.zip
cd mimetex
cc -DAA mimetex.c gifsave.c -lm -o latex.cgi
# test the binary, view the ‘fermat.gif’ image
./latex.cgi -i “a^2+b^2=c^2” -e fermat.gif

Uploaded to host, latex.cgi runs without any dependencies. The ugly thing with my (free) Linux host is that although it does allow CGI, it doesn’t allow CGI to return documents of type ‘image/gif’ no matter what. To work around, I wrote a small PHP script, which parses the GET input, calls CGI to generate and save image in a cache directory, then redirects request to the LaTeX image. This also helps not to expose your CGI directly on the web too!

// use ‘system’ command to execute CGI
$cmd = “$mimetex_path -e “.$full_filename;
$cmd = $cmd.” “.escapeshellarg($formula);
system($cmd,$status_code);
$text = $pictures_path.”/”.$filename;
return $text;

I’ve been always loving CGI for its simplicity, CGI, Perl, Python… old things never die! Although I have almost no experiences with them, they let you do whatever you want to given a little tweaking know – hows. Please note that MimeTeX is not as full – featured as LaTeX, it can’t render some too – complex expressions and it uses an ugly bitmap font. If your server has some LaTeX support, consider using MathTeX, a more advanced version from the same author.

Update, Jun 6th, 2021

Due to some changes on my web-hosting, CGI is disabled for some reason. I really don’t have time to figure out why, so just temporarily remove LaTeX rendering for now!

Win vs. Mac font rendering (and the way for Linux)

We could easily see the very poor font rendering quality of Windows right on Windows itself using Safari. Safari has different smoothing modes (image above) and another mode named “Windows’ standard” (image below)


Differences between font rendering on Ubuntu (above) and Windows (below).

everal years ago, on earlier versions of Fedora, Ubuntu… font rendering is just a crap! Many people would find Windows better at text rasterization, and both are far inferior compared to Mac. In latest versions of Linux desktop, things are much improved, while Windows (Vista, Win7) is still much lagging behind, Linux made bold advances from lessons learned from both Win and Mac!

Novice users on Windows would find its text sharper, clearer and easier to read, while Mac’s one is a bit blurry! That is because Mac and Win have different origins and targets! Apple has deep legacy in graphics designs and desktop publishing, its algorithms try to preserve the nature of typefaces as much as possible, which implement true sub-pixel rendering aiming at high-resolution output devices. Meanwhile, Win sticks to pixel unit and aims at low-resolution device (like computer screen which usually less than 100 dpi in resolution).

The consequence is that while Win’s text look sharper and clearer on screen, it would turn into a whole crap when come to printing, where Mac’s publishing products are closer to its screen look! Even worse, Windows text rendering solutions are just suitable for simple typefaces, when complex, high-quality font is needed, the output is usually very poor due to various wrong implementations in hinting, anti-aliasing, kerning algorithms. This paper (2007) addresses in details many Microsoft’s implementation problems, and suggest the correct ways for text rasterization, resulting in a now-much-better Linux desktop!

(If you’re using a Mac or a Linux desktop, you would see this blog text in VN URW Gothic L, a aesthetically fine font. Windows readers would only see the text in Arial, as I have to turn off font embedding for Windows due to its very poor presentation.)

Update, Feb, 20th, 2011

The font used now is Tex Gyre Adventor, an enhanced font based on URW Gothic L, you can see the hinting is quite better, especially for Vietnamese text. The trade – off is that file size is much larger, almost triple the URW Gothic L’s size.