kindle development without kdk

DK, the Kindle’s Software Development Kit has been released for quite some times but Amazon still strictly restrict accessing to it, many many software developers (like me) have registered and received no reply. It is understandable that Amazon could be skeptical on what to put on Kindle’s app store, but it should not be that conservative toward the developing community. KDK is basically just a PBP (Personal Basic Profile) J2ME (Java Micro Edition) with Amazon’s extension, a Kindle emulator, and some tools…

Having no KDK doesn’t mean that we can not develop software for Kindle! Below are my notes on building, deploying an example application for Kindle. This would make cleared the steps needed to write applications for Kindle without the KDK. Please notes: the information is collected from many different sources, jailbreaking could be considered “illegal” according to some Term Of Use. Use the information at your own risk!

1.   Jailbreaking and usbnetwork

Download kindle-jailbreak and kindle-usbnetwork from here. Choose the files that is suitable for your device, e.g: for my Kindle 3 (wifi + 3G), it would be the jailbreak_0.4.N_k3g and usbnetwork_0.27.N_k3g. Copy the jailbreak_0.4.N_k3g file to your Kindle, then proceed to updating the system. The jailbreak exploits a hole in Busybox implementation to gain root access. Next, do the same thing with usbnetwork_0.27.N_k3g, which provides a secure shell via USB connection.

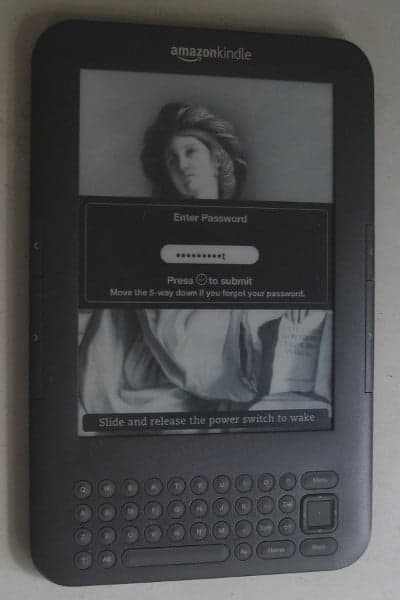
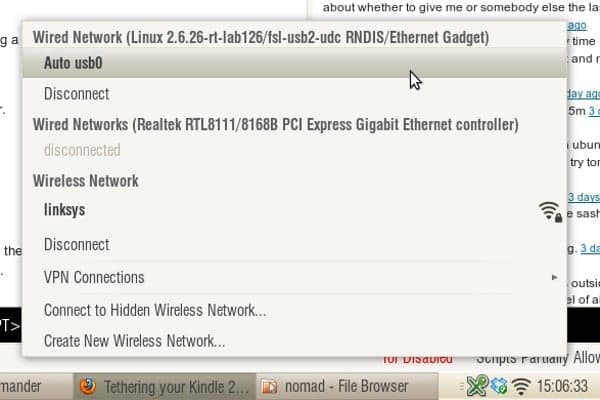
Launch the Search box on our Kindle, type ;debugOn, press enter to execute the command, then do the same thing with ~usbNetwork to start the sshd daemon. The default configuration would set Kindle to 192.168.2.2 and expect the connected PC to be 192.168.2.1. Now we’ve got root access and the entire FS (file system) in the palms of our hands. Spend some times exploring it, when done, put the Kindle back to normal use by issuing ~usbNetwork again, then ;debugOff.

2.   Key and file signing

This is the most important part! Kindle’s “kindlets” are exactly Java’s jar file with .azw2 extension, however, we can’t just simply copy and run it. The applet is linked against several system libraries located at: /opt/amazon/ebook/lib/Kindlet-1.1.jar and /opt/amazon/ebook/sdk/lib/*.jar (copy these files to your PC for local jar building in place of those provided by the KDK).

The .azw2 file must also be signed with 3 different keys located at: /var/local/java/keystore/developer.keystore and the security policy is defined at: /opt/amazon/ebook/security/. For more information on signing, please refer to this post. If you’re tweaking your Kindle and writing apps for it, I suggest that we would just use the signing key of Andrew de Quincey, the first one to figure out about this, so that free softwares can be easily shared among Kindle’s users.

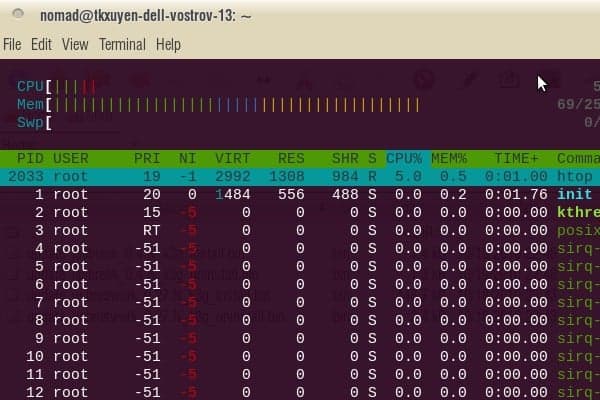
Configure the usbnetwork interface and access Kindle via sshd. Image below: the command htop running on Kindle’s ssh console.

When finished with hacking, we can un – install these two exploits to restore Kindle back to original state (and receive official updates from Amazon), but that would be after the next section, when we’d been able to deploy our own software on it!

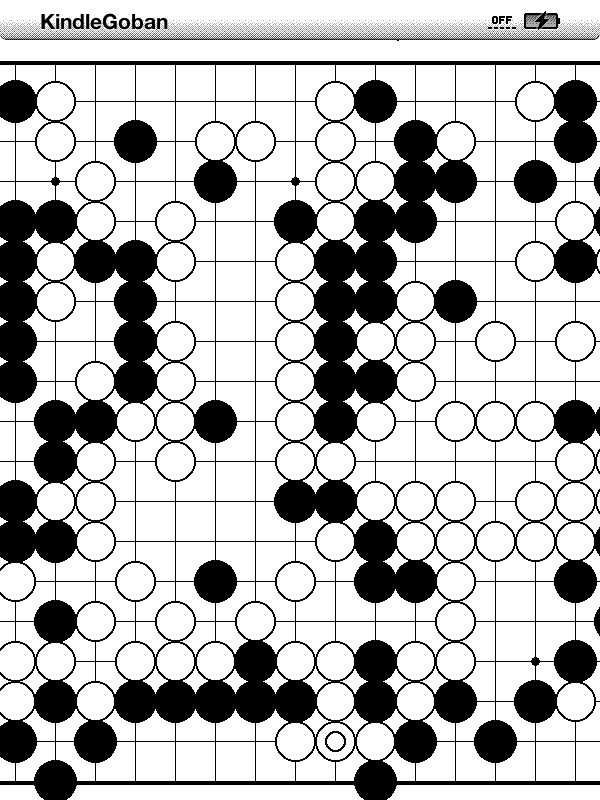
3.   KindleGoban – an example app

I’m going to deploy KindleGoban, a Go (weiqi) game viewer, as an example app. Adrian Petrescu, the man behind this open source game, is perhaps, an insider of Amazon’s KDK project. But technically he’s under a NDA (non disclosure agreement) and won’t be able to say anything except the publicly available information. However, he did indirectly provide valuable resources.

First, copy the developer_keystore (mentioned in #2) to your PC & Kindle (at /var/local/java/keystore/developer.keystore). Then download KindleGoban (and its dependency library KWT. Make some changes to the build.xml to include KWT (adding several widgets) and get rid of the KDK’s stuffs (which we don’t have). Then build, sign and deploy the .azw2 file to your Kindle. And there you are, a nice Go game viewer!

# first, build and sign the jar file
$ ant build.xml
$ jar cvfm KindleGoban.azw2 KindleGoban.mf bin/*
$ ./signkindlet developer_keystore KindleGoban.azw2
# copy the file over to your Kindle, also need
# to copy an example .sgf file for testing
$ scp KindleGoban.azw2 root@192.168.2.2:/mnt/us/documents

4.   Resources

This section gonna be regularly updated on the availability of documents, tools.. for development on Kindle. Please note most of these are from third – parties rather than Amazon, which are the results of hacking, reverse – engineering… and some other information indirectly available from the KDK. At the moment, we only have this official javadoc from Amazon which describes the KDK’s APIs.

  • Savory: a native ebook converting daemon for Kindle.
  • Kindle emulator: need to double check this.
  • KWT: Kindle Widget Toolkit.
  • Mangle: a manga viewer for Kindle.
  • Qindle: a Qt port for Kindle.

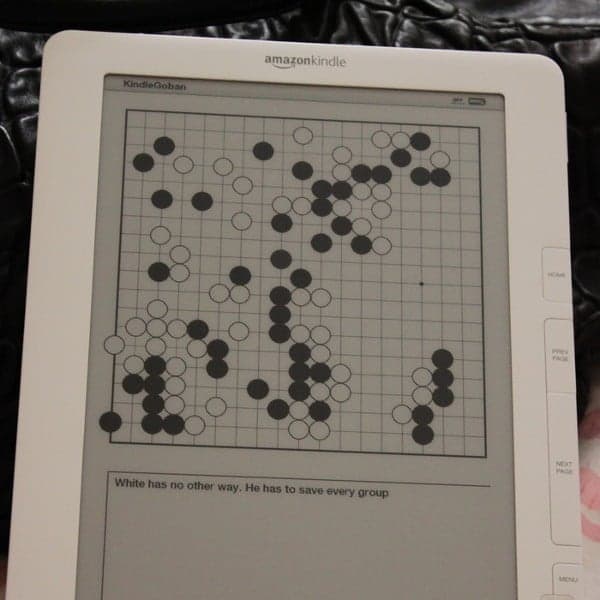
KindleGoban screenshots, this is, like most Kindle projects at the moment, is just starting, would expect more features in the time coming.

vietnamese dictionaries for kindle


The dictionaries’ screen-shots

indle in my idea, is a very promising device, and I’m compiling, for the purposes of reading, some Vietnamese dictionaries for it. For the Chinese language, there’s no non – trivial solution at the moment, but it’s simple for the cases of English and French. Below are the steps I note down for remembering, it’s just a matter of data conversion and packaging. Non – technical readers can skip directly to step #5 below to download and use the dictionaries.

Dictionaries on Kindle have Mobipocket’s format (Amazon bought Mobipocket in 2005). The data set we’re going to use is available on StarDict in which the English ↔ Vietnamese and French ↔ Vietnamese data was originally created by the author Hồ Ngọc Đức. The data set has some minor holes and errors, but it’s the most usable set for Vietnamese at the moment (many Vietnamese softwares, websites… use this data).

1.   Download the data from StarDict, e.g: stardict-dictd_anh-viet-2.4.2.bz2. Extract it, there will be a .ifo (info) file, a .idx (index) file, and a .dz file which actually has .gz format, rename to .gz and unzip to get the real data file (.dict).

2.   Convert the data to an intermediate format, we’re going to make a tab – delimiter file. Fire – up StarDict utility: stardict-editor, jump to the 2nd tab (Decrypt), browse to the .ifo file and have it convert the data to something like: dictd_anh-viet.txt.

3.   Convert to Mobilepocket format: python tab2opt.py -utf dictd_anh-viet.txt. The python script used to convert data is available at this site and would produce a file like: dictd_anh-viet.opf.

4.   Package the final .mobi file: wine mobigen.exe dictd_anh-viet.opf. The mobigen utility is available from here, for convenient reason, I would just use this Windows’ binary via wine.

5.   Connect your Kindle using USB cable and copy the anh_viet.mobi or phap_viet.mobi files over to the ‘documents’ directory. The dictionaries should be available for use right now on Kindle’s home page. We can also set one of these to be Kindle’s default dictionary so that we can lookup words’ meanings without leaving the document we’re on!

kindle 3


an not resist to this temptation anymore. Kindle price dropped significantly lately and it’s time to pick a e-ink display book reader for myself. I’ve been curious about electronic paper display, the alternative to LCD or OLED displays widely used on hand – held. Actually there’s been various devices (phone, watch…) which make use of electronic paper, but none has the success like Kindle.

The first impression is that the display, which is 16 gray – scale colors, really looks like traditional paper, and reading on it is an actual pleasure. The screen refresh rate is quite low (maybe less then 6 fps), which means video would never be an option on Kindle. To my surprise, sound is extremely good, the external speaker produces stereo which may be far better than on my laptop. Wifi works fine and the experimental browser (which only supports JavaScript, no Flash, no Java) is enough for basic email and web surfing.

Connecting to my Linux box, the device appears as a normal USB mount to easily copy files over. I find Kindle very suitable for my needs: document reading, a bit of music, and casual web & email. Moreover, Kindle does not create the impression that it is an electronic device. The battery is advertised to last about 10 days (with wifi on, and even more with wifi off), so we don’t have to care about recharging very often. It simply boots up and runs, and displays nice pictures in screen – saver mode.

Amazon recently released Kindle’s SDK beta (Software Development Kit) with Java as the primary language (J2ME), and maybe C/C++ for system development. The machine’s GUI proposes to me a lot of interesting ideas on usabilities and UI design!

whatever happened to programming?

There’s the change that I’m really worried about: that the way a lot of programming goes today isn’t any fun because it’s just plugging in magic incantations – combine somebody else’s software and start it up. It doesn’t have much creativity. I’m worried that it’s becoming too boring because you don’t have a chance to do anything much new… The problem is that coding isn’t fun if all you can do is call things out of a library, if you can’t write the library yourself. If the job of coding is just to be finding the right combination of parameters, that does fairly obvious things, then who’d want to go into that as a career? (Coders at Work – Peter Siebel, quoting Donald Knuth)

Ví dụ về chức năng đơn giản nhất: resize ảnh trên các browsers, ảnh trên: Firefox, ảnh dưới: Chrome, (ảnh được chụp lại và hiển thị nguyên kích cỡ từ 2 browser, cả 2 dùng cùng một ảnh gốc kích thước lớn). Có thể thấy chức năng resize ảnh của Firefox, IE kém rất xa so với các browser khác.

hatever happened to programming? Điều gì đã xảy ra với lập trình? Khi ở năm 1 đại học (1998), tôi có viết một 3D engine đơn giản bằng Borland C, lúc đó sách vở thiếu, internet thì chưa có. Mục tiêu đặt ra rất đơn giản: hiển thị (xoay) một đối tượng 3D đọc từ file mô tả tọa độ các đỉnh. Bằng những hình dung hình học đơn giản, tôi xây dựng một phép chiếu: giao điểm của đường thẳng từ mắt tới các đỉnh của vật thể với mặt phẳng chiếu chính là pixel được hiển thị trên màn hình. Sau đó ít lâu đọc thêm tài liệu, tôi mới biết đó gọi là: phép chiếu phối cảnh – perspective projection. Một số đoạn code released từ game Doom giúp tôi hiểu rõ hơn kỹ thuật chiếu dùng trong game thực: ray casting.

Sau đó 1 thời gian bắt đầu có internet, chúng tôi lại “say mê” tìm hiểu các kỹ thuật graphics “tối tân” hơn. Còn nhớ lúc đó có trang web winasm.net, nơi chỉ vẻ rất nhiều về Gouroud, Phong shading, light, bump mapping, sprites… Chúng tôi đọc các code viết chủ yếu bằng Assembly, rồi viết lại bằng C/C++ trong cái “engine” của mình. Chuyện là như thế, chúng tôi “nghĩ gì viết nấy”, đa số các trường hợp là “phát minh lại cái bánh xe”, bắt đầu bằng việc tự xây dựng những mô hình, thuật toán “ngây thơ” trong đầu. Cái “engine” của tôi so với các engine chuyên nghiệp bây giờ thì thật đáng xấu hổ, nhưng ít nhất chúng tôi hiểu những ý tưởng, nguyên tắc vận hành cơ bản.

Những điều kể ra trên đây chỉ mới là a, b, c… trong computer graphics, lĩnh vực có rất rất nhiều thuật toán, kỹ xảo, mánh khóe… hấp dẫn và độc đáo. Còn nhớ vì ham thích viết các chương trình đồ họa và xử lý ảnh nên một số môn khác tôi không chú ý tới. Như các môn AI, có lần tôi copy code của một người bạn về nộp làm bài tập (đã được cho phép). Đó chỉ là một chương trình chơi caro (croix-zero) dùng thuật toán A*, nhưng vì cúp cua nên tôi không biết về A*, ngồi cả đêm đọc xem cái chương trình đơn giản đó làm cái gì nhưng vẫn không tài nào hiểu được. Sau đó “bổ túc kiến thức” thì biết là A* cũng chẳng phải là điều gì phức tạp, nhưng nếu không có ý tưởng về thuật toán trong đầu… thì code cũng như một đám rừng chẳng cho anh biết được gì về nó.

Sau đó tôi viết nhiều về xử lý ảnh, tới đây thì nền tảng toán trở nên quan trọng, đa số các khái niệm là đủ phức tạp để không tự hình dung bằng trực quan trực giác được. Nhưng nghiên cứu kỹ lưỡng chút thì rồi chúng tôi cũng hiểu được ý tưởng đằng sau các khái niệm convolution, high – pass, low – pass filters… Nhờ những kiến thức đó mà bây giờ tôi có thể có được những nhận định đúng hơn, ví dụ như một chức năng tưởng chừng hết sức đơn giản như resize ảnh, nhưng cho đến tận bây giờ vẫn chưa được implement đúng trên hầu hết các trình xử lý ảnh phổ biến: GIMP, Photoshop… Có thể các bạn không tin điều này, nhưng GIMP, Photoshop, Firefox… resize ảnh bằng giải thuật tuyến tính nên có thể bỏ đi những thông tin quan trọng, và giữ lại những pixel không quan trọng.

Một số kỹ sư phần mềm nói với tôi: suốt nhiều năm đi làm chưa bao giờ anh ta phải cài đặt một thuật toán nào đã học ở trường, việc lập trình hiện tại chỉ là lắp ghép các module, library ở high – level, rất ít khi đụng đến bản chất thật low – level bên dưới. Tôi cũng đồng ý như thế, một số dự án đơn giản là làm việc ở high – level, không phải sản phẩm nào cũng đòi hỏi kỹ năng sáng tạo, đòi hỏi kỹ sư có hiểu biết sâu về các thuật toán chuyên biệt. Nhưng nói như vậy không có nghĩa là những kỹ năng đó không cần thiết và không quan trọng. Nếu không có những kỹ năng đó thì mãi mãi chúng ta chỉ làm được những công việc “làng nhàng”, thậm chí những công việc “làng nhàng” cũng đòi hỏi những khả năng know – how, tổ chức code nhất định. Trong nghề lập trình tôi vẫn ưa thích kiểu người hay “đi phát minh lại cái bánh xe”.

Thế nên mới biết là những điều nói ra càng đơn giản thì lại càng không đơn giản! Nhiều engineer trẻ tôi gặp sau này thường không có sự quan tâm tới những yếu tố đơn giản và cơ bản như thế. Dĩ nhiên những điều trên đây chẳng có gì to tát, cũng như đa số các vấn đề lập trình cũng không phải là điều gì lớn lao. Nhưng trước hết hãy cho tôi thấy bạn có hiểu biết cơ bản về vấn đề mình đang làm, đừng gọi hai vòng lặp for lồng nhau là: “thuật toán”, hãy có khả năng đọc hiểu mô tả của thuật toán và biến nó thành code chạy tốt… trước khi phán đó là những điều cơ bản không cần để ý tới. Tất cả bắt đầu với suy nghĩ của chính mình, với cái mô hình và trình tự trong đầu mình, chứ không phải bắt đầu với danh sách các khái niệm, chữ nghĩa, API… mà anh thậm chí không hiểu nội dung đằng sau nó! Sau đó thì mới có thể nói đến ý tưởng, điểm mạnh điểm yếu, chỗ dùng được (không dùng được) và sự khác biệt của các công nghệ!

Một cách rất quan trọng để hiểu công nghệ không phải là từ thuật toán, ý tưởng, mà là từ… lịch sử. Nếu quan tâm đọc lịch sử computer graphics, bạn sẽ biết đằng sau “Phong shading” là Bùi Tường Phong, một người Việt. Hay bạn sẽ hiểu tại sao SGI (Silicon Graphics Inc.) có nhiều ảnh hưởng đến thế, tại sao những phong cách, sản phẩm của công ty đó lại thiết đặt nên những tiêu chuẩn vàng trong cộng đồng computer graphics (ví dụ như OpenGL), tại sao máy Mac dùng UEFI chứ không dùng BIOS, tại sao NextStep và OpenStep dùng “vector display” chứ không phải là “bitmap display” như đa số các windowing system khác… Sự phát triển của công nghệ là một quá trình tiến hóa liên quan tới những yếu tố xã hội và con người, chứ không đơn giản là sự phức tạp hóa các ý tưởng kỹ thuật!

đặng lệ quân

Nhạc ngoại đặt lời Việt bất kể thế nào cũng phải cho nó một cái nội dung bi lụy, buồn phiền… để phù hợp với tâm lý đa số thính giả!

ần đây nghe nhiều nhạc của cô ca sĩ Đài Loan này. Những người bạn TQ tôi gặp, cả những người bạn Việt có học tiếng Hoa mỗi khi karaoke thì lại lôi những bài của Teresa Teng ra: Vầng trăng nói hộ lòng tôi月亮代表我的心, Ngày nào anh trở lại何日君再来… Chẳng phải trước đây ở Trung Hoa (lục địa) người ta thường nói: ngày nghe Lão Đặng (Deng Xiao Ping), đêm nghe Tiểu Đặng đó sao!?

Lời Việt: Tan tác - Ngọc Lan 

Điều này hơi hơi giống như sau 75, Hà Nội âm thầm và nồng nhiệt đón nhận giọng ca não nề Khánh Ly và loại âm nhạc thiểu não, trừu tượng của Trịnh Công Sơn như những liều thuốc an thần giúp lãng quên và xoa dịu đời sống tinh thần bế tắc… Điều khác biệt ở chỗ của người tràn đầy sức sống: 请爱着我请再爱着我, trong khi của ta xứng đáng được liệt vào loại vong quốc chi ca.

chinese rendering server

n my previous post, we can see the image – replacement technique being applied to mathematical formulas rendering. Replacing text by image can be seen in various Web’s techniques, mainly to display things that browser can’t! It’s a possibility that many Web technologies would never converge into common “form factors”: how many years have passed but SVG is still not supported on all browsers, how font technologies are still fighting stiffly with each other? Various issues would always remain unresolved and image replacement, though ugly and inconvenient, could be used as a temporary solution.

As you can see in the image above: the first line is a popular Chinese straight – stroke font that can be seen on most browsers, the next lines are nice calligraphy (brush – stroke) fonts that can hardly be seen on the web! I’m going to try using FreeType2 for a very specific problem: rendering Chinese fonts, the only reason is just simple: aesthetics! Searching around, I can’t find any simple, standalone solution: nice Chinese fonts are very big, a typical ttf file has size from 5MB to 50MB depending on the character set and quality (with that size, it’s obvious that we should use a server side solution). Packages like Pango or Cairo are too complex, and would require additional dependencies (which is unavailable on a free Linux host).

It takes me a whole day struggling with FreeType2’s reference and manual to get it work with Chinese fonts (quite different from conventional Latin fonts indeed), and finally here it is! You can access the executable at: http://tkxuyen.com/freetype2.php with the following syntax: freetype2.php ? text=… &font=… &size=… &color=… here is an example. Below are renderings with different sizes (anti – alias works really well):

text=洛阳城东桃李花飞来飞去落谁家&font=2&size=11&color=111111
text=洛阳城东桃李花飞来飞去落谁家&font=2&size=12&color=111111
text=洛阳城东桃李花飞来飞去落谁家&font=2&size=13&color=111111
text=洛阳城东桃李花飞来飞去落谁家&font=2&size=14&color=111111
text=洛阳城东桃李花飞来飞去落谁家&font=2&size=15&color=111111
text=洛阳城东桃李花飞来飞去落谁家&font=2&size=16&color=111111
text=洛阳城东桃李花飞来飞去落谁家&font=2&size=18&color=111111
text=洛阳城东桃李花飞来飞去落谁家&font=2&size=19&color=111111

and renderings with 3 different Chinese fonts (very big files, installed on server) and in different colors. Just note these fonts are a bit non-standard: they produce traditional Chinese characters as output, but only accept simplified Chinese as input:

text=洛阳城东桃李花飞来飞去落谁家&font=2&size=19&color=FF1111
text=洛阳城东桃李花飞来飞去落谁家&font=1&size=19&color=11FF11
text=洛阳城东桃李花飞来飞去落谁家&font=0&size=19&color=1111FF

Update, Jun 6th, 2021:

Due to some changes on my web-hosting, CGI is disabled for some reason. I really don’t have time to figure out why, so just temporarily remove the Chinese font rendering for now!

FreeType2 is an very handy open source library, it’s available on many flatform: Unix, Dos, Windows, Mac, Amiga, BeOS, Symbian… and it does a very good job of handling typefaces! Since FreeType2’s patent issues have expired since May, 2010, we would see an increasing application of FreeType2 in many areas.

This is my very simple C code (~250 LOC) to experiment with FreeType2: loading font, loading glyph, rendering bitmap, dealing with Unicode… To compile, just something like: gcc gifsave.c freetype2.c -o freetype2.cgi `pkg-config --cflags --libs freetype2`. I hope I can have time to extend the code into a more usable form: multi – line layout, alignment, RTF support, etc… Some restrictions are imposed to protect the server, if some text can’t be rendered (e.g: rendering dimensions are too large), an error image like this is displayed instead:

latex rendering server


Some example expressions rendered by MimeTeX (it’s good to appear to be smarter than you are 😬!) If an expression fails to be rendered, you would see an error image like this:

ecently, the wonderful yourequations.com site (which I’ve been using to occasionally render mathematical expressions on web pages) has ceased it’s service due to heavy traffic. I was thinking about running my own LaTeX rendering server, things turned out to be pretty easy as follow, thanks to the excellent MimeTeX package, a LaTeX reduced subset. It’s also interesting to experiment the “stone age technique” of CGI, first download and compile the package:

wget http://www.forkosh.com/mimetex.zip
unzip mimetex.zip
cd mimetex
cc -DAA mimetex.c gifsave.c -lm -o latex.cgi
# test the binary, view the ‘fermat.gif’ image
./latex.cgi -i “a^2+b^2=c^2” -e fermat.gif

Uploaded to host, latex.cgi runs without any dependencies. The ugly thing with my (free) Linux host is that although it does allow CGI, it doesn’t allow CGI to return documents of type ‘image/gif’ no matter what. To work around, I wrote a small PHP script, which parses the GET input, calls CGI to generate and save image in a cache directory, then redirects request to the LaTeX image. This also helps not to expose your CGI directly on the web too!

// use ‘system’ command to execute CGI
$cmd = “$mimetex_path -e “.$full_filename;
$cmd = $cmd.” “.escapeshellarg($formula);
system($cmd,$status_code);
$text = $pictures_path.”/”.$filename;
return $text;

I’ve been always loving CGI for its simplicity, CGI, Perl, Python… old things never die! Although I have almost no experiences with them, they let you do whatever you want to given a little tweaking know – hows. Please note that MimeTeX is not as full – featured as LaTeX, it can’t render some too – complex expressions and it uses an ugly bitmap font. If your server has some LaTeX support, consider using MathTeX, a more advanced version from the same author.

Update, Jun 6th, 2021

Due to some changes on my web-hosting, CGI is disabled for some reason. I really don’t have time to figure out why, so just temporarily remove LaTeX rendering for now!