serene – 2, part 19

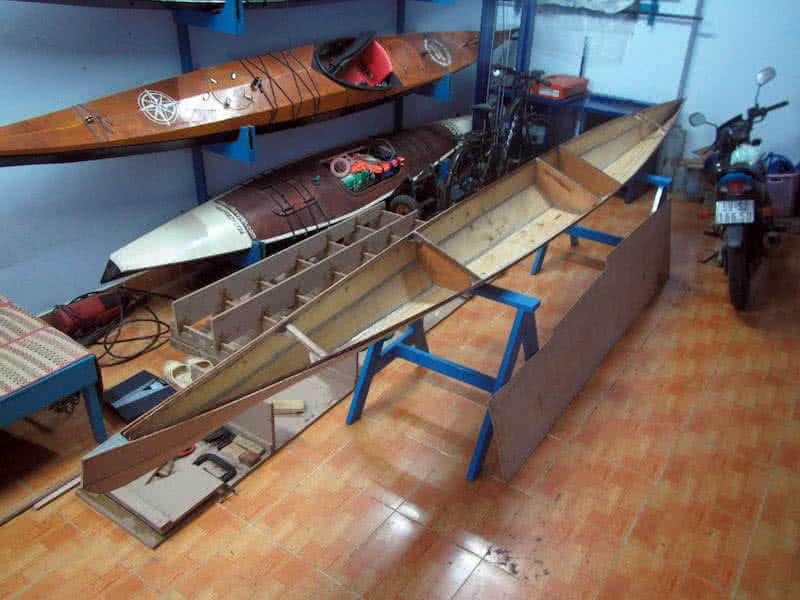
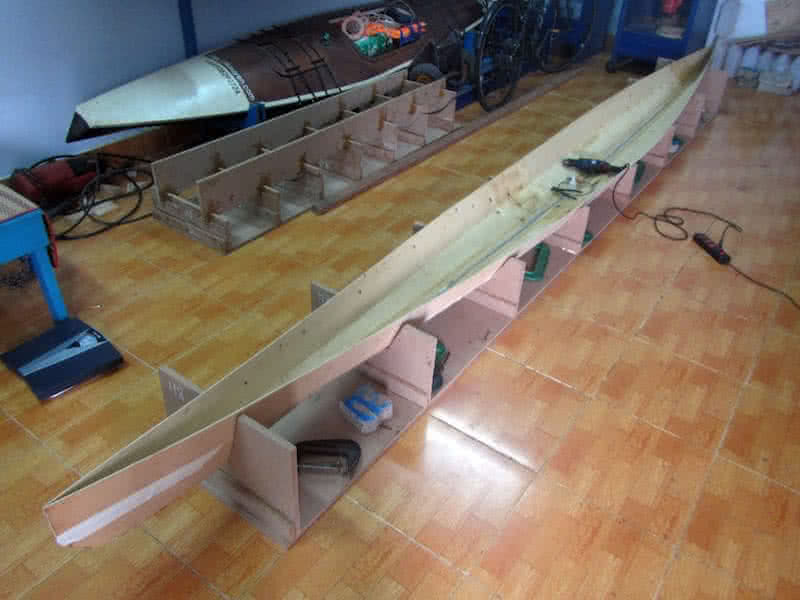
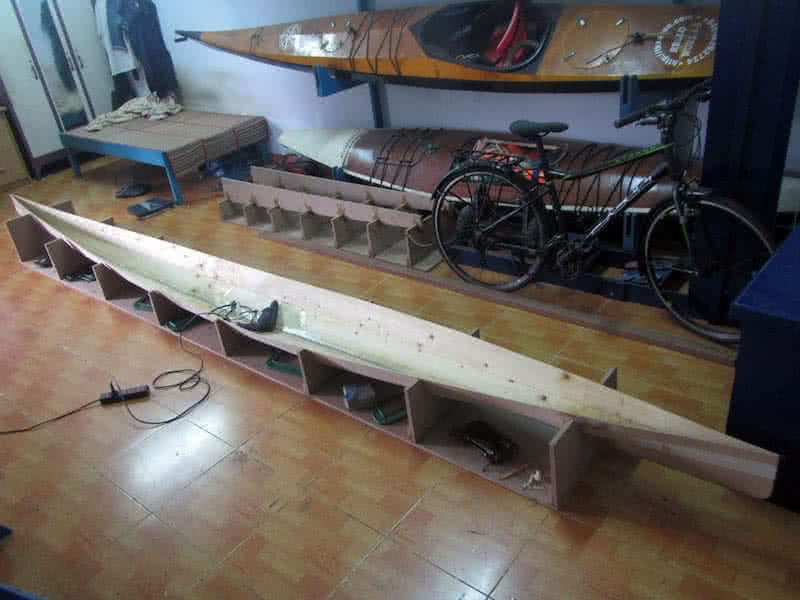
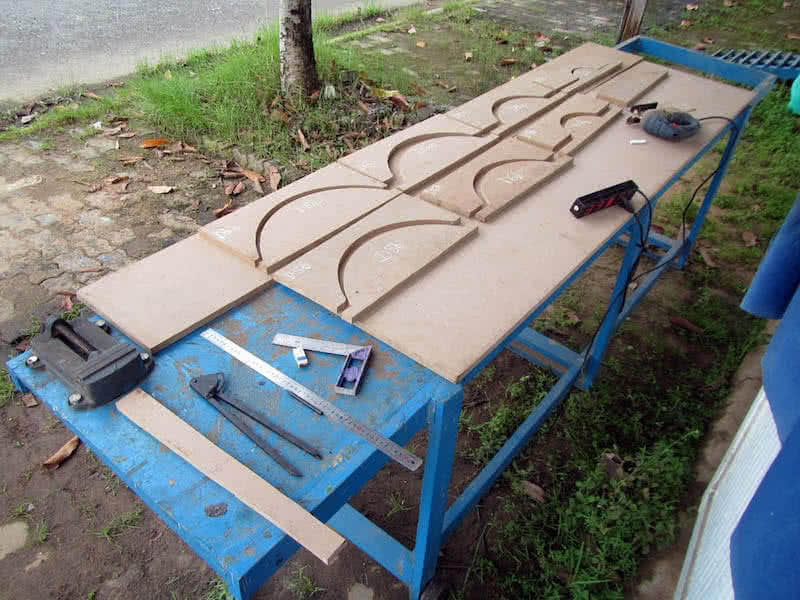
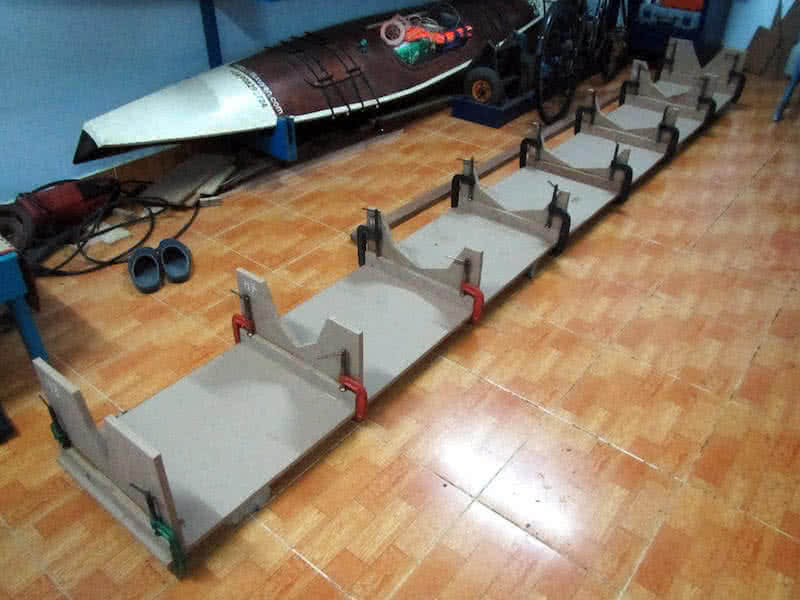
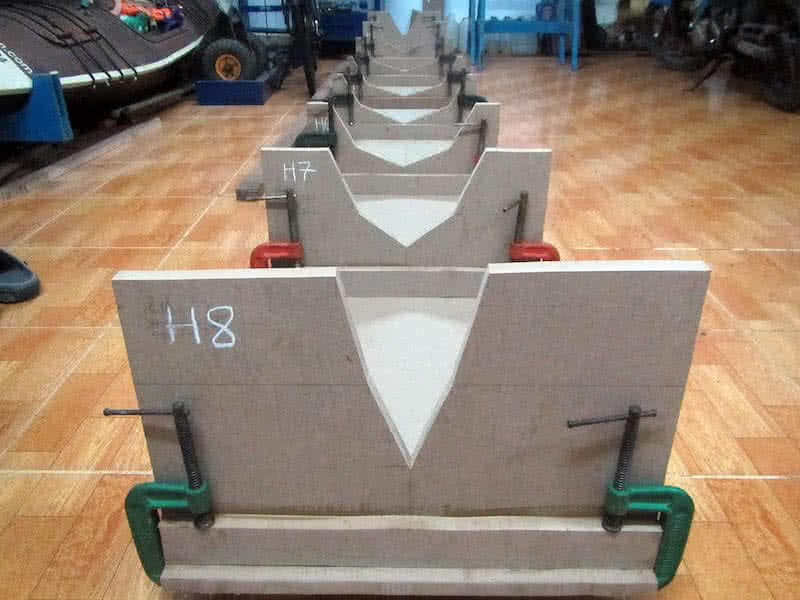
First image: the basically completed hull, put aside, now working on the deck part. Compared to the hull, which is… simpler and more well defined in term of geometrical shape, the deck is just loosely draft out in overall shape, it’s cut slightly over size, so that when fitted together with the hull, it would be trimmed to match. The construction is also more complex, due to the rounded shape of the forward part.

I had a hard time thinking about the cockpit and spray skirt size. A width of 44 cm is almost the minimum that could fit a cockpit, that in turn, could fit the smallest spray skirt sold on the market. Ready – made spray skirt (e.g: Snapdragon, Seals, Sea to Summit…) usually have 44 x 75 cm as the smallest dimension, other than that, you would need to order a custom made one, which is an expensive and complicated process.

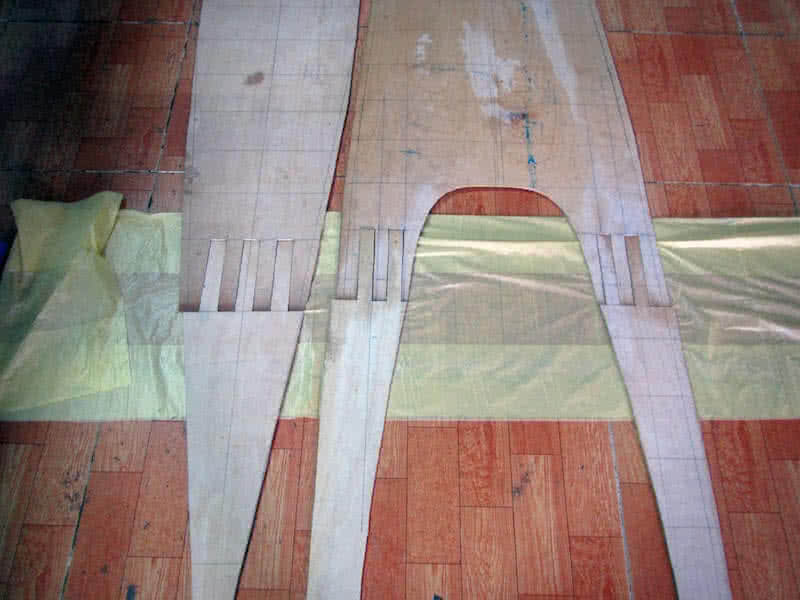
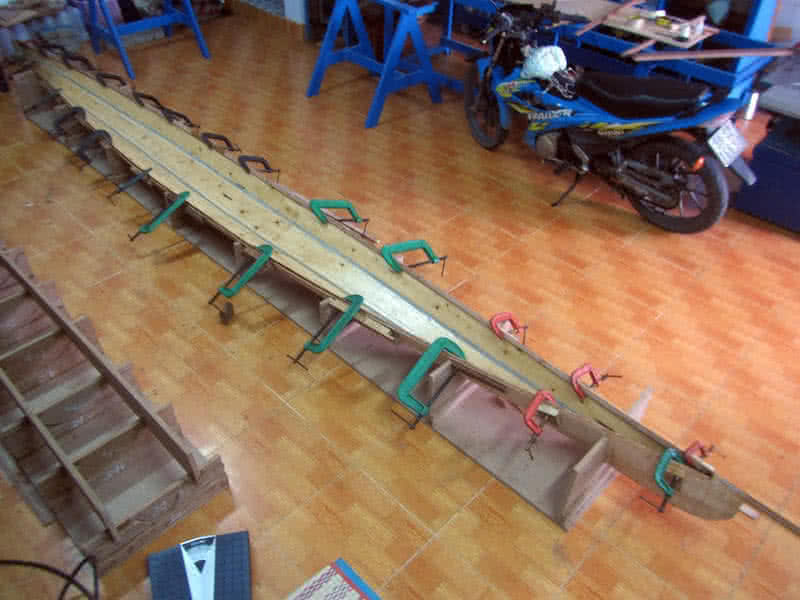
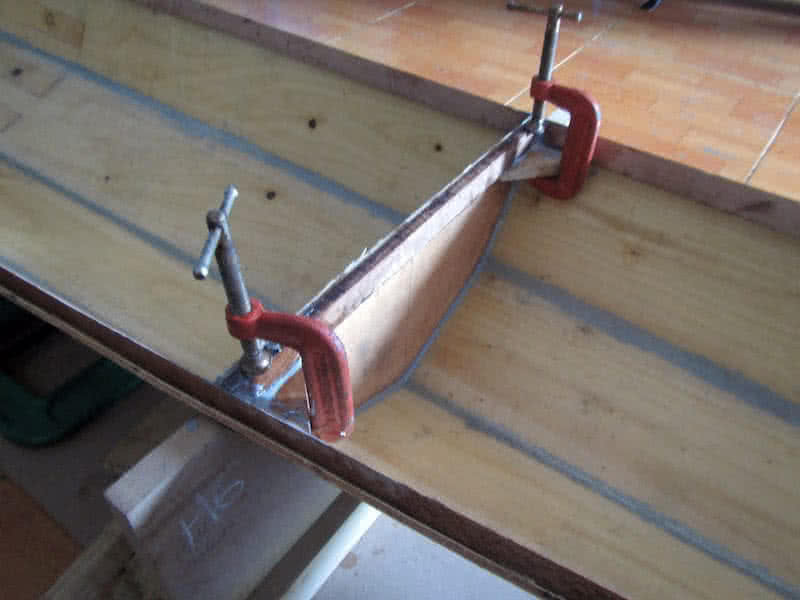
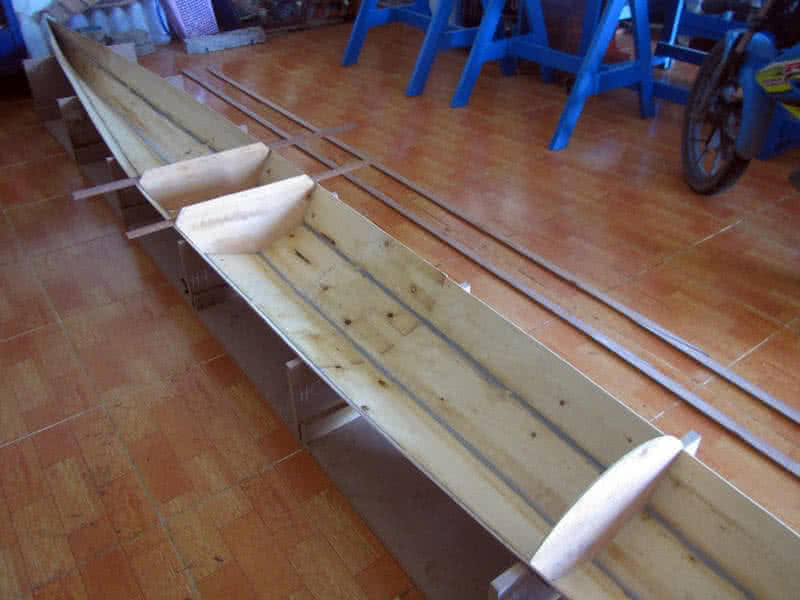
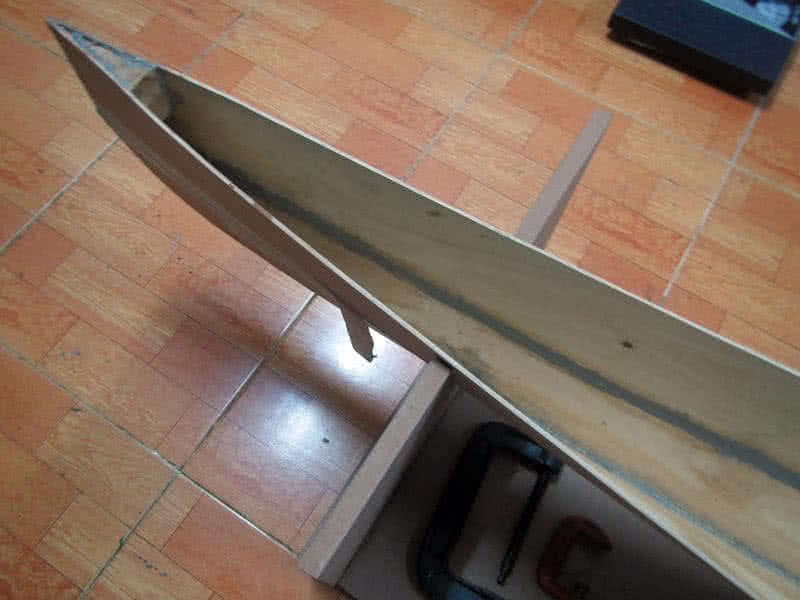
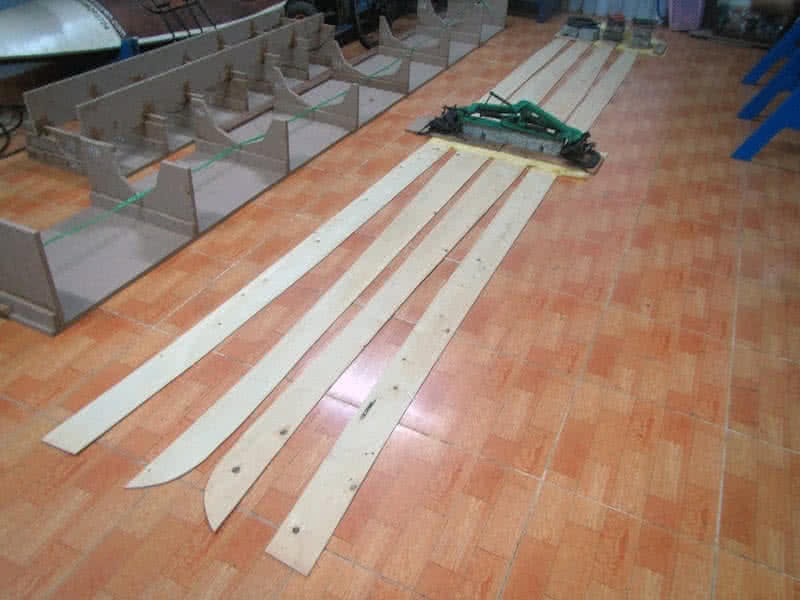
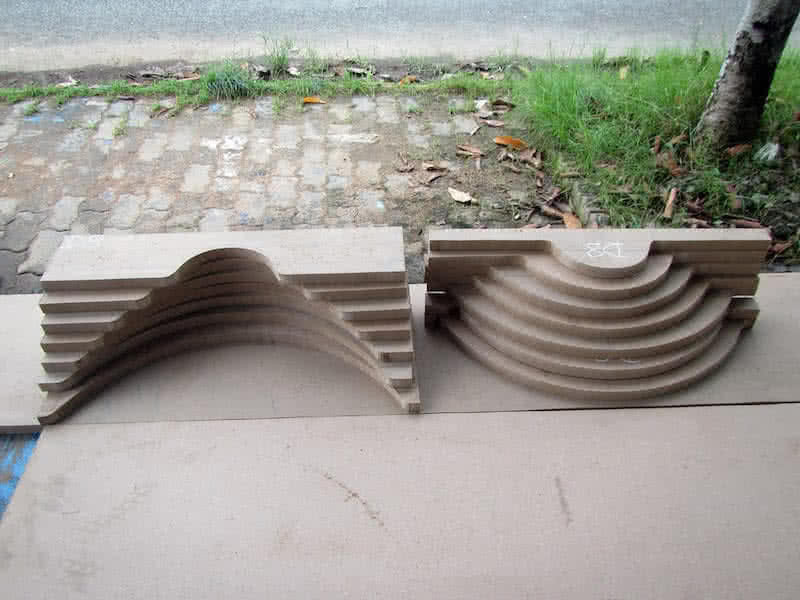
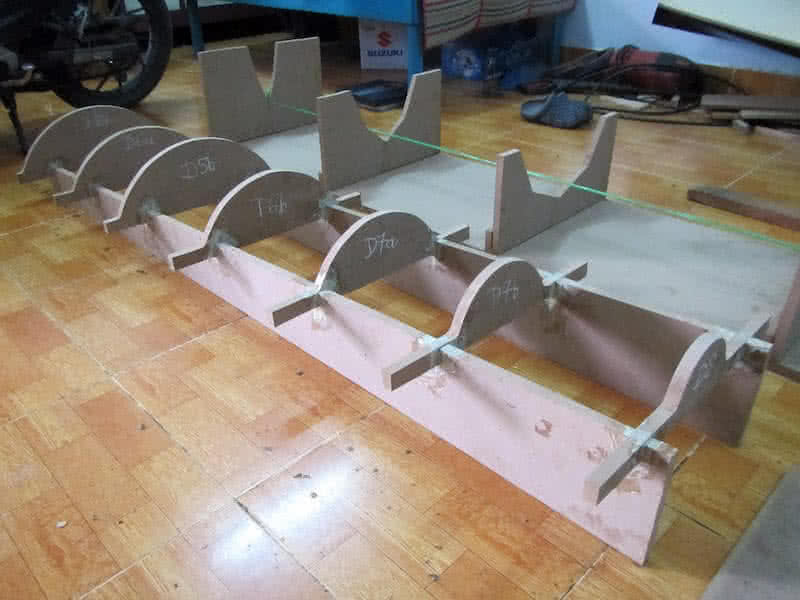
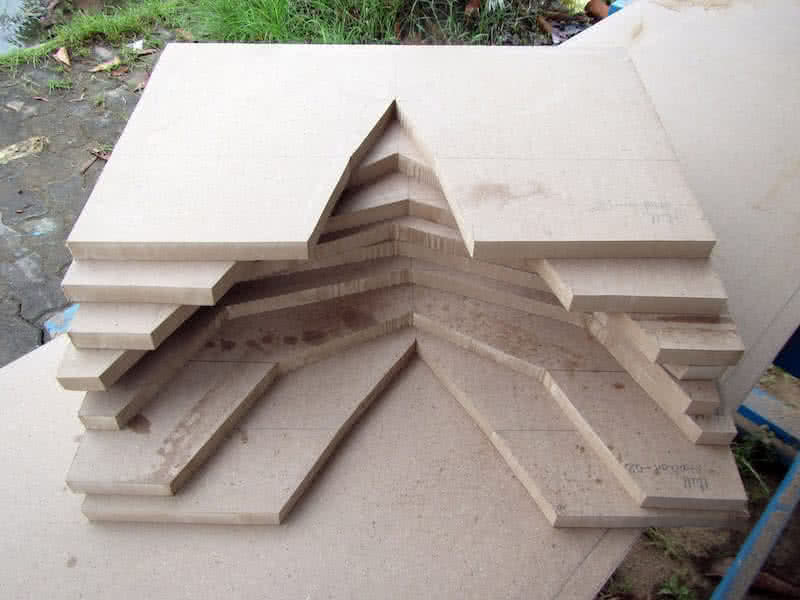
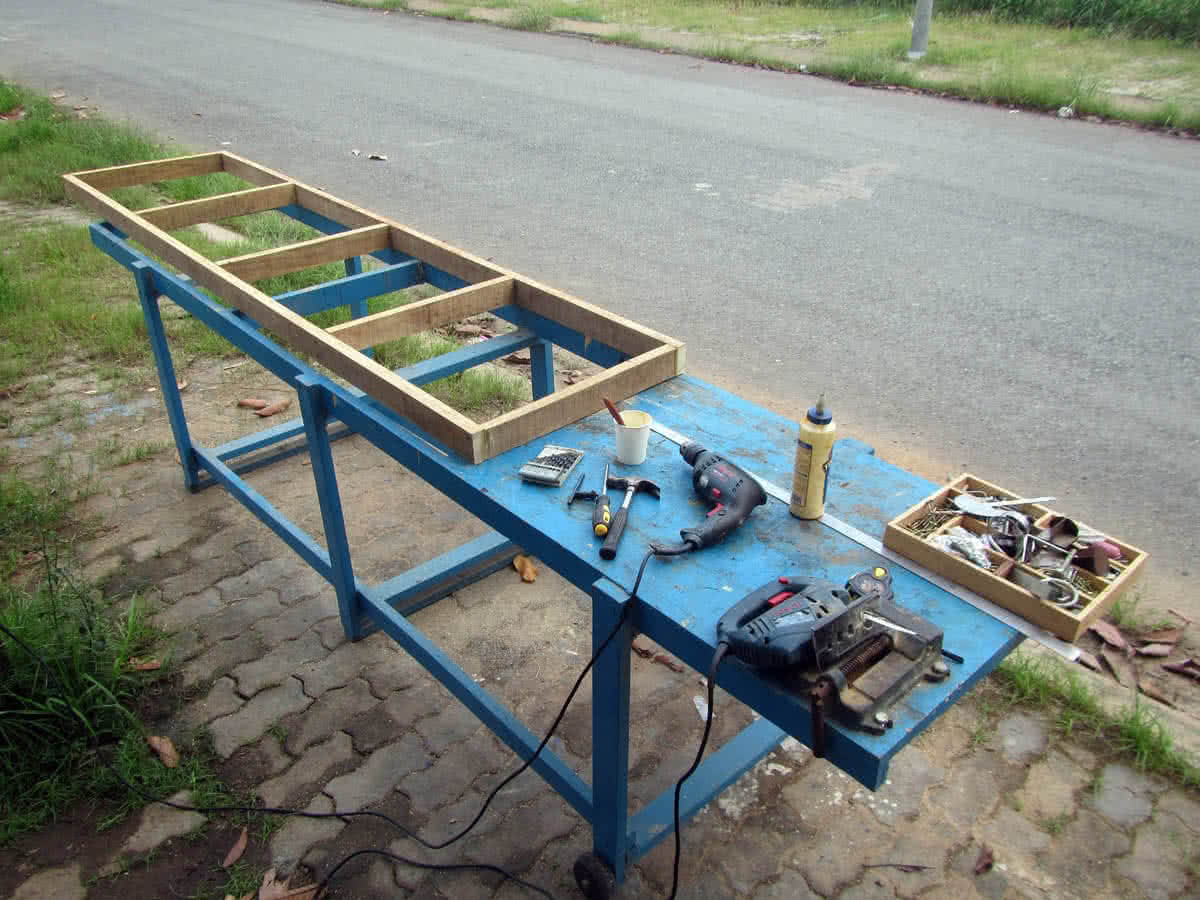
Second image: drafting out the deck shapes on plywood. Third image: jointing the pieces together, again with those simple finger joints. Fourth image: the two main “components” composing the deck, the aft (far, left), and the front (lower right). I slightly bevelled their edges at places, so that they could fit more precisely together. The white duct tape: pin down the parts so that they’re correctly symmetrical along the longitudinal axis.

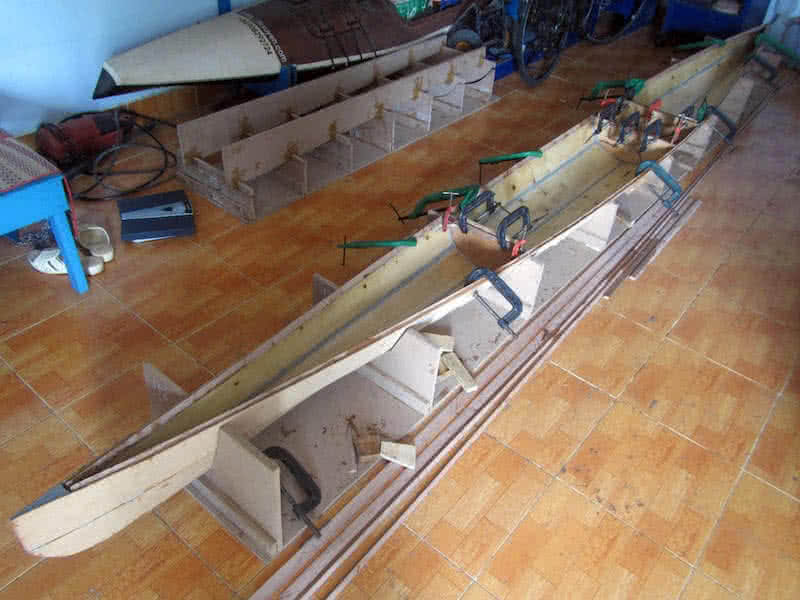
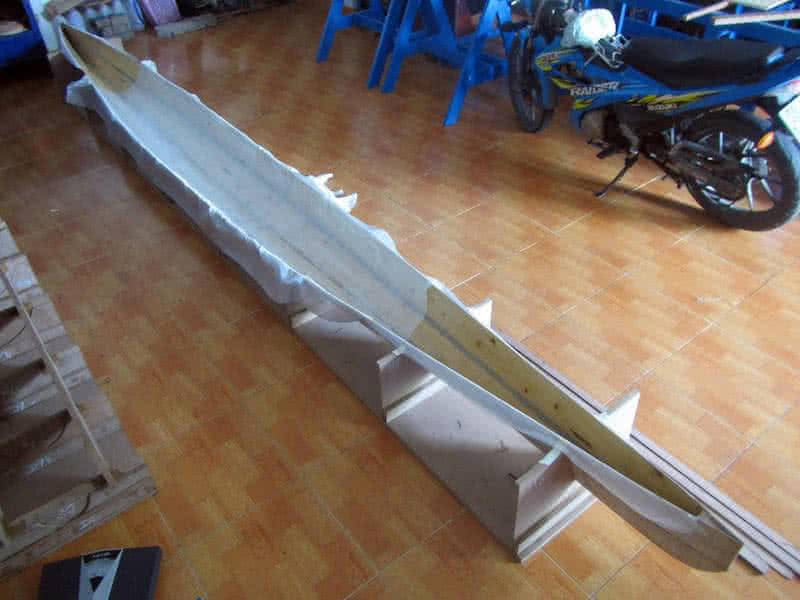
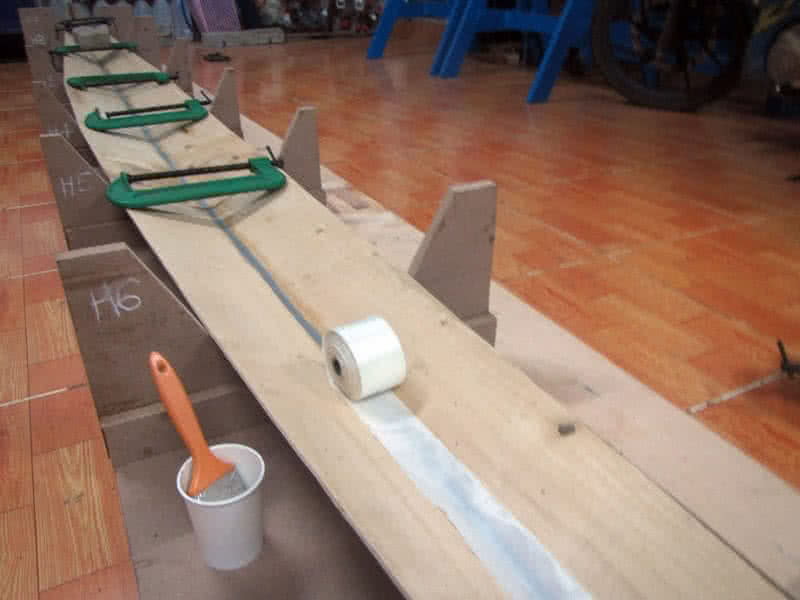
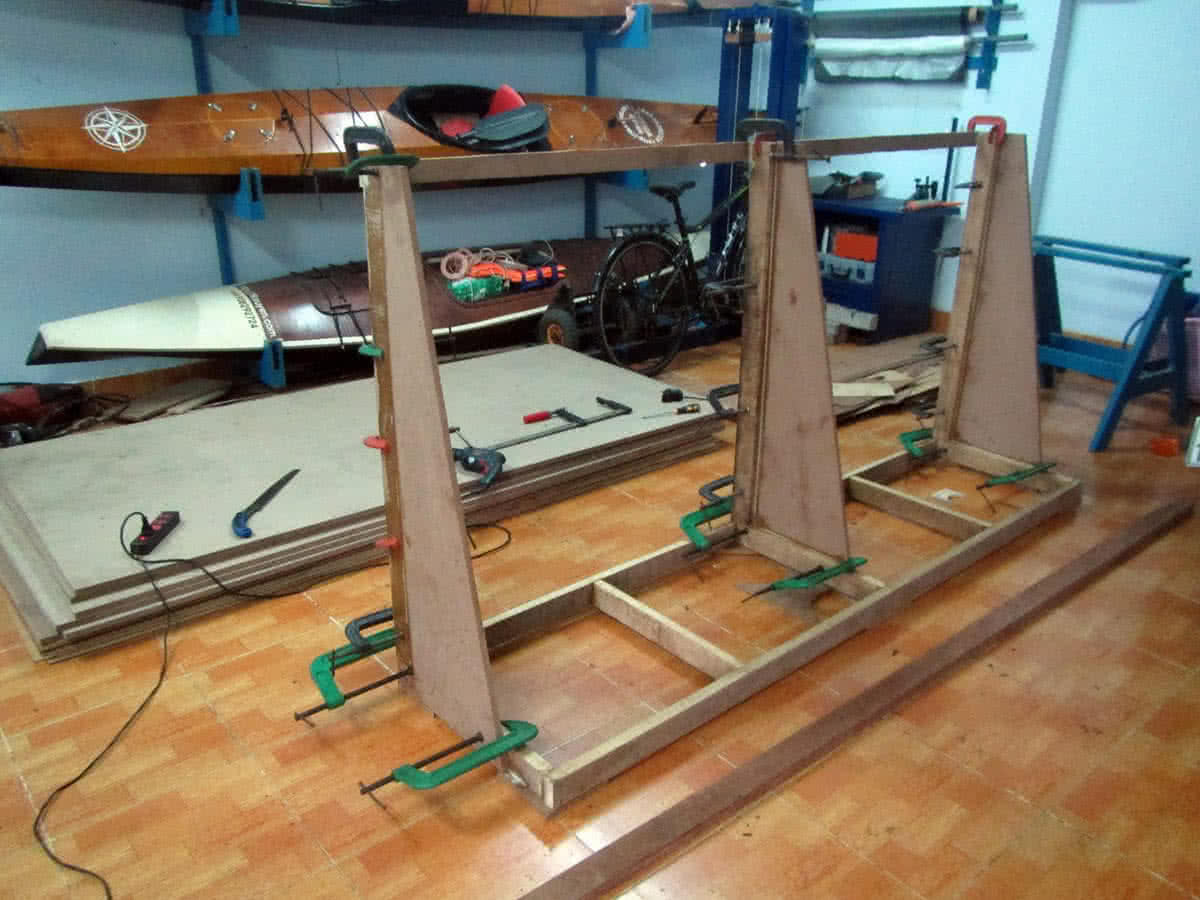
Next is the very important job of torturing the deck into rounded shape. By now, I’ve realized that there’s too much curvature on the molding frame, and I wonder if the plywood could bend that much to make a very curved shape, only experiment would tell. In order to help the ply bending well, I would make many longitudinal cuts on its internal side, then wet it completely overnight for the wood to become more flexible.

serene – 2, part 18

After the internal side get glassed, goes in the gunwales (American English: the sheer clamp), port and starboard at the same time. The gunwales are very thin strips of wood, 2.5 x 1 cm in cross section, and are bevelled at 45 degree all along its length (they are bevelled with my table saw), later the bevel angle would be adjusted along the boat hull (with an angle grinder) to better accommodate the deck.

Second image: the 3 bulkheads, the small compartment right behind the cockpit would be the place of the day hatch, to store food, drink and other various things you would frequently need during a paddling day, and could be accessed while afloat (still sitting inside the cockpit). For other hatches, you would need to beach the boat in order to access them. Third image: the bulkheads are filled with putty at the joints and glass on one side.

Fourth image: triangle blocks of wood use to reenforce the joint between the gunwales and the bulkheads. With no need for nail or bolt, the triangle wooden blocks link the squared corners, this way, the kayak’s “frame” would be significantly stronger, stiffer, a simplest, yet elegant solution. There’re two additional thwarts installed near the bow and stern to strengthen the boat’s overall structural stiffness.

Completed most jobs with the hull (there’re some more on the external side of it – puttying, glassing… but that would be a later phase of the project), now moving on to the deck part. It doesn’t seem immediately apparent, but the deck part is a more complex part, compared to the hull, it would house many things: the 3 hatches, the compass, the rudder pedals and control lines, the anchor points for bungee cords, etc…

goat cart

The two sides of my life: The world wide web and The wide wild wet, a heavy – loaded feeling like the donkey in the image below!

serene – 2, part 17

Finishing the fist step of forming the hull into shape, then filling the seams with putty and glass them with my 2 – inches fiberglass tape. The glass tape is my life saver, thanks to it helps again, that the seams could look neat and nice. To this day, I’ve acquired enough experiences and skills working with epoxy and putty already, so I’ve been able to mix the very precise (usually very small, e.g: 30 ~ 60 gr) amount required for each task.

Remember my very first days coming to boat building, working with epoxy has been a nightmare, that extremely sticky substance that messes and flows around. I have a very good feeling that everything is completely under my control in this build: the bilges fit tightly, the bulkheads fits very well, there’s no need to adjust here and there, the amount of epoxy and putty used could be estimated with quite an accuracy.

Second image: dry fitting the bulkheads, this time the cockpit would be slightly larger, to accommodate the bilge pump, and the rudder control pedals. Third image: fitting 2 prism – shape wood blocks at the two ends of the kayak, one at the bow for getting the pulling line through, and one at the stern to mount the rudder post. Again, very little epoxy and putty used, the wooden blocks add some saving to the final boat weight.

Fourth image: glassing the internal side of the hull, I’ve been thinking over and over again about this issue, do I really need to glass the hull internal side, consider the glassing seams are quite strong already. Finally, I decided to glass anyway, as my plywood is not of very good quality, it’s better to have some protection in the long run, with the cost of about 0.4 kg of epoxy (plus the fiberglass fabric) added.

serene – 2, part 16

Fitting the bilges is quite straight forward. Compared to my previous boats, this time, due to more careful drawing and cutting, having a good shape, the bilges fit together pretty much better, there’s almost no gaps between them. It requires still some little fastening with wires, but not much, and some dots of CA glue (cyanoacrylate) to help the edges staying head – on. Then I proceed to filling the seams with thickened epoxy.

First image: the bottom pair of bilges fit together. Seeing them fitting so well to the molding frame, I decided to putty – fill and glass the bottom seam before adding the second pair of bilges (second image). I really appreciate my 2 – inches – width fiberglass tapes, they help the seams to be very clean and tidy (and hence less epoxy used). With out them, fiberglass cloth bias cutting would be a nightmare for me…

…As the kind of fiberglass cloth I’m using is not too good in quality. Third and fourth images: the second pair of bilges goes in, also very good fit, requiring little fastening. Due to the sloping sides of these bilges, filling the seams with putty could be tricky, as the thickened epoxy wouldn’t hold shape but flowing down slowly due to its viscosity. So, I apply a small amount of putty, then immediately cover them with duct tape.

This way, the epoxy would hold shape, leaving a good looking seam. After the epoxy completely cures (about 8 hours in my case), I peel off the tape. It’s so good a feeling to see your boat take its initial shape. I spend sometimes standing, watching the bow and stern, its full water line, its slim and sleek lines. Still many things to be done, but this gonna be my Andalusia horse on the wide wild wet water space!

serene – 2, part 15

Proceed to cutting and jointing the bilges. This step is done quite quickly as I’ve now had plenty of experiences. I read the offset – table directly from the FreeShip software, then draw the bilges on the 122 x 244 – cm plywood sheet. For the 17 feet hull, there’re 3 pieces per bilges, and hence, 2 joints need to be made for each bilges. I clamp 2 plywood sheets together and cut the port & starboard parts at the same time.

It takes some little skills and experiences to make the joints perfectly fit with just a jig saw. And I still prefer the straight finger joints as used on my previous boat, they are simpler to cut, simpler to align and to make sure that the jointed bilges are in correct shapes. Too bad, my plywood is of too poor in quality, it’s so fragile, so easy to crack, so I have to take extra cares at this steps, or the “fingers” of the joints could break.

First image: transferring the lines from offset table to plywood boards (with the help of a cup of coffee, be careful not to make any mistake). Second image: all pieces cut, third image: the finger joints (no glueing yet). Fourth image: jointing the pieces together with epoxy (just use many weights to press on), then glassing them (the internal sides) with one layer of 6 – oz fiberglass.

Decided not to bevel the bilges’ edges, though beveling helps making tighter seams, my plywood is quite thin, so the seams wouldn’t be very perfect, they hardly could stay precisely edge on edge with each other (and beveling adds some more works to be done). With Serene – 2, I proceed with the hull first, then the deck, not doing them in parallel like my previous boat, as the deck part could be quite complex this time.

serene – 2, part 14

Framing for the deck is more complex than the hull, since the deck would be curved in cross section, it require torturing plywood to a considerable degree to acquire that shape. From my previous experiences with bending plywood panels, I decided to break the deck framing into 2 parts, one is female, the other is male in shapes, then compressing the plywood sheet in between using many G – clamps.

First and second images: cutting the deck framing stations, can see clearly that the upper and lower parts of the deck frame are cut from the shame plywood sheets. Unlike the hull’s stations, which is positioned at an interval of 60 cm apart, the deck’s stations are placed denser, one for every 30 cm. The deck plywood would be tortured between these upper and lower stations to achieve the desired curved shape.

Bending plywood, particularly the 4 – mm thich ply I’m using, could be a hard task (and currently I don’t have any 3 – mm or thinner ply readily for making the deck). More over, the plywood I purchased is not of very good quality, it could crack too easily. So I would need lots of tricks to get the job done: soaking wet the plywood overnight with water to soften it, using hot boiling water to soften it even more.

(Currently I don’t have any wood steaming device, and there’s no plan to build one just yet.) Another trick for bending plywood is making shallow cuts longitudinally onto one side of the plywood sheet for it to bend easier. Fourth image: the curved stations of the deck glued on. Now all jobs related to the framing is done, next would be proceeding to cutting and joining the bilges… the long and hard way is still ahead!

serene – 2, part 13

Simple thing that is done many times already, since the very first time I was building the Hello World -3 kayak, so there is nothing special about setting up the “female” frame for shaping up the kayak hull and deck. The stations (as called so by the software FreeShip) are placed evenly at an interval of 60 cm, there are 8 of them for the 17 feet (approximately 518 cm) hull. All is cut from 18 mm – thick MDF.

First image: the stations cut, second and third images: since the 18 mm – thick MDF I used is at the maximum that my compress – air staple gun could handle, I simple glue the stations on along a MDF board, each 60 cm apart. You can see the stations numbered, from H1 to H8 (from stern to bow). Fourth image: another view of the completed female frame, looking this way, one could see that the kayak hull is so slim. It’s so indeed!

At 44 cm, this Serene – 2 kayak is just slightly narrower compared to my previous boat. Serene – 1, which was at 45 cm. One of the main reasons why it took me so long to start this kayak building is that, I greatly appreciate my previous boat’s abilities in rough water, it did give me a lots of confidence. I wouldn’t want to lose that very special capabilities along my design progress, while improving some shortcomings…

…That my previous kayak had had. It is a very good feeling watching the “female – molding” frame, which gives me a very first impression on how my future boat would look like. But the long way is still ahead, it would take much efforts in completing my “perfect sea kayak”! By the way, the “rule” for choosing a sea kayak hull is that: build / buy a longest and thinnest one that you could still find it controllable and comfortable!

serene – 2, part 12

Not entirely related to this Serene – 2 building, but I would want re – organize my woodworking workshop a bit. My working place is quite small in floor area, so everything need to be stored neatly and tidily. Having quit some ideas, but would carry them out only one at a time, since I still have limited free time in the present. First is a shelf to store my plywood and MDF sheets (lots of them), and many other things.

The plywood and MDF sheets need special treatments, they could deform in shape or absorb moisture if stored inappropriately for a long time. The shelf would have two sides, the sloping side is for storing the sheets, and the other side is reserved for other things. The whole thing would be put on 6 small wheels so that it can be pulled and repositioned around the workshop, or moved just for cleaning the floor.

1st image: making the shelf base, 2nd image: the 3 supporting walls (to withstand the MDF and ply sheets’ weight, which could be very heavy). 3rd image: the shelf taking shape, 4th image: the completed and marine – blue painted product, ply and MDF sheets stored on one side (facing the wall). I need lots of shelf spaces to store various miscellaneous assets, which is growing to a unmanageable number.

Sometime, I’ve forgotten that I’ve purchased something just because there’s a huge pile of them around. The workshop looks very tidy now, having more spaces to store various things. It’s very important to keep thing tidy, uncluttered, as you wouldn’t want to waste time finding an item when needed. It’s now time to move on to the main parts of the project, I’ve been lingering around on other issues for long enough.

đèo ngang

Chưa đi chưa biết Đèo Ngang
Đi rồi mới biết Đèo Ngang… đang nghèo (!?)

Nhớ lại 1 chuyện khó quên gần đèo Ngang, Quảng Bình, gần Tết 2015. Chiều hôm đó, phi quá đây thì… xe xịt lốp sau, mưa xối xả, lạnh cắt da, đói và trời đã gần 6h chiều. Thấy cái khách sạn đầu tiên, quyết định nghỉ vì khó lòng đi tiếp. Sau một hồi đứng cho ráo nước, nhìn quanh thì thấy một cảnh tượng kinh ngạc, cái khách sạn sang trọng không từ nào tả xiết. Gỗ quý ốp từ sàn, tường tới trần, từ khắp sảnh trước ra nhà sau, cầu thang, bàn ghế, thậm chí cả sàn phòng tắm cũng lát gỗ. Không chỗ nào là không có gỗ, gỗ tốt khắp mọi nơi, chạm trổ tinh xảo, cầu kỳ, sang trọng đến choáng ngợp!

Bèn hỏi ngay lễ tân giá cả trước khi đặt phòng, thì được biết cái giá 150 ngàn/đêm. Lúc này thì thực sự đã kinh ngạc lắm rồi, không biết mình đang lạc vào cái “động” nào đây. Nhưng cũng ra vẻ tự nhiên xách đồ lên phòng, tắm rửa sạch sẽ rồi xuống ăn tối. Đồ ăn ngon, nêm nếm đậm đà kiểu Huế, 1 đĩa cá kho, 1 tô canh chua, 1 đĩa rau xào, cơm… tổng cộng 35 ngàn! Đến lúc này thì ngạc nhiên đến tập thứ ‘n’ chứ không ít! Nhưng tính không thích hỏi, số sướng cứ việc hưởng, nhìn chị chủ khách sạn chỉ thấy điệu cười tinh tế, nhè nhẹ, chu đáo, phong thái con nhà quý tộc chứ không phải buôn bán tầm thường.

Sáng hôm sau thanh toán tiền rồi rời đi, mình cũng không hỏi, không nói gì, mà chị chủ cũng chỉ điệu cười nhẹ nhẹ ấy! Bản lai diện mục các bạn thử đoán xem sao nhé!

mộng thuỷ tinh

Lâu lâu cũng post nhạc “đương đại” 1 chút, một bài cũng bình thường chỉ để thi thoảng hát nhóp nhép chơi: Mộng đẹp như thuỷ tinh rơi, Người xa, tình xa khuất chân đồi… Thuỷ tinh rơi thì sao, thuỷ tinh rơi sẽ vỡ… Cái logic hiển nhiên ấy khá phổ biến trong các ngôn ngữ khác (Anh, Pháp, Hoa…)

Mộng thuỷ tinh - Lệ Quyên 

Nhưng lại không phổ biến với ngôn ngữ, với tâm hồn Việt, người Việt chỉ hiểu / chỉ muốn cái gì rõ ràng, trực tiếp… chứ không phiếm chỉ như thế. Cái ca từ này có lẽ được dịch từ ngoại ngữ, kiểu: shattered like a falling glass…

serene – 2, part 11

First image: assembling the rudder’s components, the rudder in its dropped down position, 2nd image: the rudder in its retracted position. Everything works smoothly as calculated, the blade could be pulled up and down by a pair of line running back to behind the cockpit (but that would be done later, when attaching the rudder to the kayak hull), with two circular ratchets glued on the two side of the rudder blade.

4th image: the rudder stained with colored – epoxy and then painted (with transparent PU – PolyUrethane). It looks so nice, the dark brown color with coarse wooden grains. The rudder control system is another complex problem, but that I would address it later on on the following phases of this building project, as I’m still hesitating between the two styles of rudder steering mechanisms as described below.

One style is the T – bar of those Olympic kayak, and the other is the normal 2 – pedals usually found on touring boats. The Olympic style is simpler, but it’s quite counter – intuitive as you would have to use the left leg kicking the bar to the right, in order for the boat to turn right. The 2 – pedals system is more user – friendly, you simply kick with the right leg to turn right. I also may use kind of a cross between the two mechanisms.

This is the first time I use a rudder, so many consideration and calculation have to be made. First in designing the hull, the hull should work efficiently and independently without a rudder, that is, it should track straight in most circumstances. Only under extreme turbulences that the rudder should be deployed, to save yourself from the extreme fatigue of one side paddling, or to have more responsiveness to the moving water.

serene – 2, part 10

Skeg, rudder or none!? It has always been an everlasting debate among the sea kayaker community. Some advocates using none, as getting the job done with your paddles alone would greatly improves your skills. While I partially agree to this argument, I also think that the argument only holds true on flat water only. When in turbulences, which could be extreme, you would need something to assist in tracking and steering the boat.

All my previous kayaks was using skegs. While a skeg wouldn’t help in steering, it would help a lot keeping the boat on a straight track when underway. Gradually, and especially in my last 9 – days trip, I realize that a rudder could potentially become a great benefit. You could pull it up to reduce drag (with a retractable rudder) and maneuver the boat with your paddle alone when it’s relatively calm, and deploy it down in turbulences.

Not only it helps turning your boat to compensate leeway, it’s also a way to have instant responsiveness, e.g: to deal with large chasing waves. So I decided to overcome my fear of complexity and build a rudder for my next Serene – 2 kayak. Yet, complexity is the reason most pro – skeg paddlers would give, to justify their favor for skeg. But serious sea – paddlers would agree, I think, that rudder outperforms skeg in most situations.

It’s not too complex (as it seems) to draft out the rudder’s parts on wood. 1st image: elements of the rudder, 2nd and 3rd images: gluing them together. 4th image: the rudder blade is (like they usually call) a high – aspect – ratio foil, 10 x 50 cm in dimensions. The 2 circular discs: ratchets for pulling the blade up and down. Now, I definitely think I could build a rudder that would work, both efficiently and reliably!

algorithms

Một phần quan trọng của 4 năm ĐH nằm trong cuốn này. Sách ngoại văn bìa cứng, bản in đẹp giấy tốt, đồng giá 50K/cuốn. Những năm 199x, FAHASA nhập sách ngoại về, bán chẳng ai mua, canh me đi qua lúc nó sale off, xúc luôn một lúc cả chục cuốn, từ Algorithms, Data structure, Computer graphics… cho đến Algebra, Advanced Calculus, Statistics, Mathematical Analysis, etc… Cũng là lý do tại sao thuật ngữ Toán, Tin… ko hề biết tiếng Việt. Cũng chưa thấy cuốn sách Tin học nào hay và bổ ích như cuốn này. Nói cho đúng là cái cách hành văn khoa học tiếng Anh của nó ám ảnh mình, ít khi thấy được một cách hành văn hay, súc tích, dể hiểu đến như thế, cộng thêm minh hoạ cực kỳ xinh đẹp.

Nếu nói mức độ hiểu vấn đề nó thể hiện qua khả năng diễn đạt, trình bày lại để cho người khác cũng hiểu thì tác giả cuốn này đúng là siêu đẳng! Về sau phát hiện ra, cả thư viện Đại học Khoa học Tự nhiên cũng chỉ có đúng một cuốn này, mình có riêng một cuốn! Không có thói quen đọc nhiều sách, theo mình, cả ĐH chỉ cần đọc chừng 3, 4 cuốn, và cả cuộc đời chắc không cần đến 20 cuốn. Đọc nhiều phí hoài tuổi xanh đi! Dự định sau này mình sẽ đóng cái kệ sách cao đến sát trần nhà, bỏ bớt những cuốn không đọc lên trên cao để không phải đụng đến chúng! Sách hay thì ít như sao buổi sớm, mà sách lôm côm lại nhiều như… lá rụng mùa thu! Sau bác nào đó thấy sách ngon, mượn ko trả, tiếc đứt ruột!

serene – 2, part 9

The structure of the hatches is nothing fancy, three tight rings nested inside each other per hatch, two belongs to the lid, and the other would be attached to the base (deck). First image: the 9 rings forming 3 hatches, filled with some thinned epoxy (about 400 gram of epoxy) to harden the MDF. This is not a very good way to make hatches (weight wise), but it would be just as heavy (or lighter) compared to plastic ones.

I was thinking a lot about the hatch locking mechanism. But finally decided to just use cords and cleats to tie down the hatches. The metal locks are too complex and fragile, unendurable to salt water. Tying down the hatches is much simpler and secured, and is easy to repair when something breaks. Between the 2 rings of the lid is a thin layer (about 3 mm) of epoxy (the softer, elastic kind) filled in to function as a gasket.

At first, I intended to glass in and out of each of the hatches’ rings, but the 9 mm – thick MDF walls have absorbed enough epoxy, and have become really strong (maybe more than enough, they’re now a bit too heavy), so there’s no need for glassing. The good thing is that once everything is assembled together, they fit very tightly, the lids and the bases, and the dark brown color is stained nicely too!

3rd image: the complete products, lids opened, 4th image: the lids closed. Once I’ll finish building up the kayak’s deck, the hatches would simply be glued on. Only the front hatch needs some special treatments, as the front deck is curved in shape. Also, the compass would be mounted right on this front hatch lid, to save deck space, and to simplify the building process. But that would be another later phase of this project.

serene – 2, part 8

Had a major setback with making the hatches with wooden strips, the strips didn’t make perfect circles as I’ve expected, although they bend quite well, they’re off by small amount (e.g: 0.5 ~ 1 mm) here and there, and that’s an unacceptable precision for hatches, just a small gap and water could leak in. I had to abandon the method of making hatches using wooden strips, and tried to find some alternative ways instead.

Finally, I resorted to cutting the hatches’ rings (lips) using my routing table. The home – built machine is made quite a long time ago, but this is only the first time making some serious use of it. It’s quick to make a circular cutting jig, as shown in the 1st image: the MDF “disc” would rotate around a pivot point that could be adjusted by sliding the wooden bar. The jig proved to offer good cutting accuracy (sub millimeter).

That’s really good, as I want very tight fits between the hatches’ rings, 3rd image: 2 rings cut, there’re still lots of it to be made. Using solid MDF as hatches’ rings has a serious down side: you would need to fill the MDF with much epoxy for it to be hardened, and waterproof, thus increasing the overall weight. On the other side, MDF is easy to cut into perfect shapes! Decided to go this way anyhow as I have few material choices!

Last image: all the hatches’ rings is cut, 3 hatches, 3 lips per hatch, and 2 rings per lip (since they’re cut in 1.5 cm MDF, it requires 2 rings to form a 3 cm height lip), quite some work to be done, and too much of sawing dust too! And I’ve taken care on “quality assurance” to make sure that each ring is cut at its precise diameter. Though I don’t expect the hatches to be waterproof, it should be watertight as much as possible.