Nhân dịp đi thăm khu di tích Lam Kinh vừa rồi, tám chơi một vài chuyện lịch sử vặt vãnh. Nguyễn Trãi, như lịch sử kể lại, là bậc anh hùng dân tộc, là danh nhân văn hoá lớn của Việt Nam, người đã giúp Lê Lợi đánh đuổi quân Minh, xây nên triều đại nhà Lê. Kháng chiến thành công, Lê Thái Tổ xuống chiếu ban thưởng cho các vị khai quốc công thần, gồm 2 đợt: Đợt 1 (1428): ban thưởng cho 121 người, không có tên Nguyễn Trãi. Đợt 2 (1429): ban thưởng cho 93 người, cũng không có tên Nguyễn Trãi.
Nguyễn Trãi làm quan dưới các triều vua Lê, chức: Nhập nội hành khiển, tước: Triều liệt đại phu, hàm: Tam phẩm, vẫn còn dưới nhiều quan to khác (Nhất phẩm, Nhị phẩm). Tại sao thế!? Muốn hiểu tại sao, phải truy nguyên về Hội thề Lũng Nhai, năm 1416. Lịch sử chép về hội thề Lũng Nhai có nhiều phiên bản khác nhau chút ít, nhưng đại để: Lê Lợi, Lê Lai, Lê Thận, Lê Văn An, Bùi Quốc Hưng, Trịnh Khả, Trương Lôi, Vũ Uy, Đinh Liệt… cả thảy 19 người thề cùng ra sức chống giặc ngoại xâm.
Trong danh sách này không có Nguyễn Trãi! Thực tế, hội thề diễn ra vào năm 1416, thì mãi 4 năm sau, Nguyễn Trãi mới gia nhập phong trào Lam Sơn, mặc dù vai trò của ông trong cuộc kháng chiến dài 11 năm này không ai có thể phủ nhận. Phong trào Lam Sơn thời gian đầu nhiều gian khó, bản thân Lê Lợi từng 2 lần phải chui vào bụi cây trốn chó săn của quân Minh lùng sục. Hai lần chui vào bụi rậm trốn, cả 2 lần đều xuất hiện một con cáo (hồ ly) ở đâu ra, đánh lạc hướng chó săn của quân Minh.
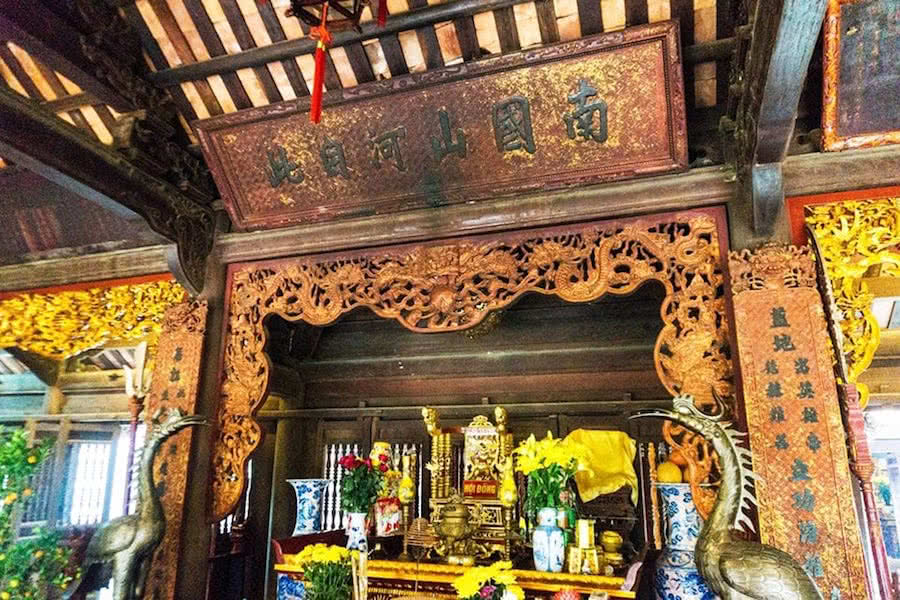
Những chi tiết này là thật, các sử quan vài thế kỷ sau, khi vào điện chầu thời Lê, vẫn còn thấy bức tượng đầu là thiếu nữ xinh đẹp, thân là cáo, thờ trong điện, ấy là Lê Lợi nhớ “ơn cứu mạng” ngày xưa mà tạc tượng thờ. Các vị họ Lê, đa số là con cháu, họ hàng trong gia tộc Lê Lợi, kẻ chết vì sự truy đuổi của quân thù, người hy sinh vì mũi tên hòn đạn nơi trận tiền, nhiều không sao kể xiết. Không chỉ có Lê Lai hy sinh cứu chúa, cả 3 người con trai của Lê Lai đều lần lượt bỏ mình trong chiến trận.
Lam Sơn không chỉ phải đấu tranh với một mình quân Minh, còn có cả quân Ai Lao, Chămpa cũng vây đánh Lam Sơn theo sự điều động của Bắc triều, ấy là chưa kể bao nhiêu nội gian, nội phản. Thế nên, máu đã đổ, đổ rất nhiều. Nói theo ngôn từ của quốc ca Pháp ấy là: L’étendard sanglant est levé
, tiêu chí chọn lựa được đo… bằng máu! Thế nên, tuy là người tham mưu, hoạch định sách lược, công lao vô kể như Nguyễn Trãi, nhưng trong 2 đợt “phong thần” đầu tiên đều không có tên ông.
Ấy là vì ông không nằm trong số những người phải “đổ máu” những ngày đầu gian khó! Nguyễn Trãi là bậc Nho học uyên thâm, để lại nhiều tác phẩm văn học có giá trị, tên tuổi lưu vào sử sách, còn những người dẫn quân xông pha trận mạc như Lê Ê, Lê Văn Lễ, Ngô Kinh, Nguyễn Xí… đa phần còn không biết chữ! Kể chuyện vặt vãnh để thấy rằng, trong “lý lịch cán bộ” của giai đoạn lịch sử gần đây, cái chi tiết “năm vào Đảng”, trước / sau 45, trước / sau 54, trước / sau 75 là tối quan trọng!


 –
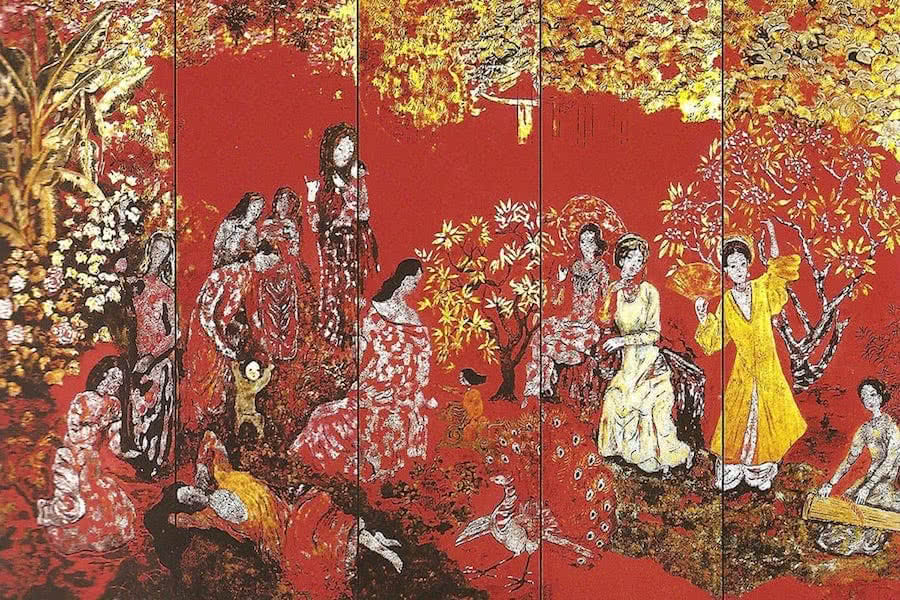
–  – đỏ nhiều vàng ít, hay vàng nhiều đỏ ít, cũng đều là những “màu nguyên” thuần khiết không pha. Hình dưới: bảo vật quốc gia – bức tranh Vườn xuân Trung Nam Bắc – sơn mài – hoạ sĩ Nguyễn Gia Trí.