Chương trình âm nhạc cuối tuần, bài hát đơn giản nhiều người biết, nhất là các bạn trẻ: МЫ АРМИЯ НАРОДА – Chúng ta là quân đội nhân dân! Phần lời dịch không chuẩn lắm: nếu kẻ thù muốn thử thách sức mạnh của chúng ta, thì bảo đảm rằng đó là điều cuối cùng chúng thử được!
giáo dục thể chất, 1
Đây là hệ quả của cái lối: “chơi thể thao một cách triết học, và suy nghĩ triết học một cách thể thao”! Ai cũng biết sức khoẻ, thể chất là nền tảng của mọi điều, ấy thế mà vẫn chỉ “thể dục, thể thao” trên giấy, vẫn cố viết “sách”! Riết rồi suốt ngày chỉ loanh quanh với ba cái ngôn từ vớ vẩn, tìm cách “chơi chữ”, tìm cách “hơn người” bằng hoa ngôn xảo ngữ, chứ động tay động chân thì hoàn toàn không muốn và cũng không làm được!
Không chỉ thế, nó ảnh hưởng suốt phần đời sau của đứa học sinh! Học cái gì cũng không có “hành”, chỉ lải nhải một mớ lý thuyết, ngôn từ chết! Học cái gì cũng lớt phớt bề mặt, không có chiều sâu, không có công phu! Nói đâu xa, ngay trong giới lập trình viên hiện tại, 10 người thì hết 9.5 người, hỏi gì cũng biết, công nghệ nào cũng biết, trên trời dưới đất, chỉ có là những kỹ năng lập trình phức tạp, thực tế không làm được!
non-skid
Ngày mưa bão, ngồi nhà tu bổ 2 cái mái chèo. Nhìn kỹ sẽ thấy lớp lưới nhựa chống trượt (non skid mesh) bọc vào chỗ tay cầm. Tui bị cái là da mặt rất nhờn (nhiều dầu), trong cơn mưa, lỡ mà vuốt mặt cái là cầm cái mái chèo nó cứ trượt đi, bèn đi siêu thị, mua tấm lưới nhựa đen, chính là tấm lót dùng trên bàn ăn… bọc quanh và dán lại bằng epoxy!

fm đầu bạc
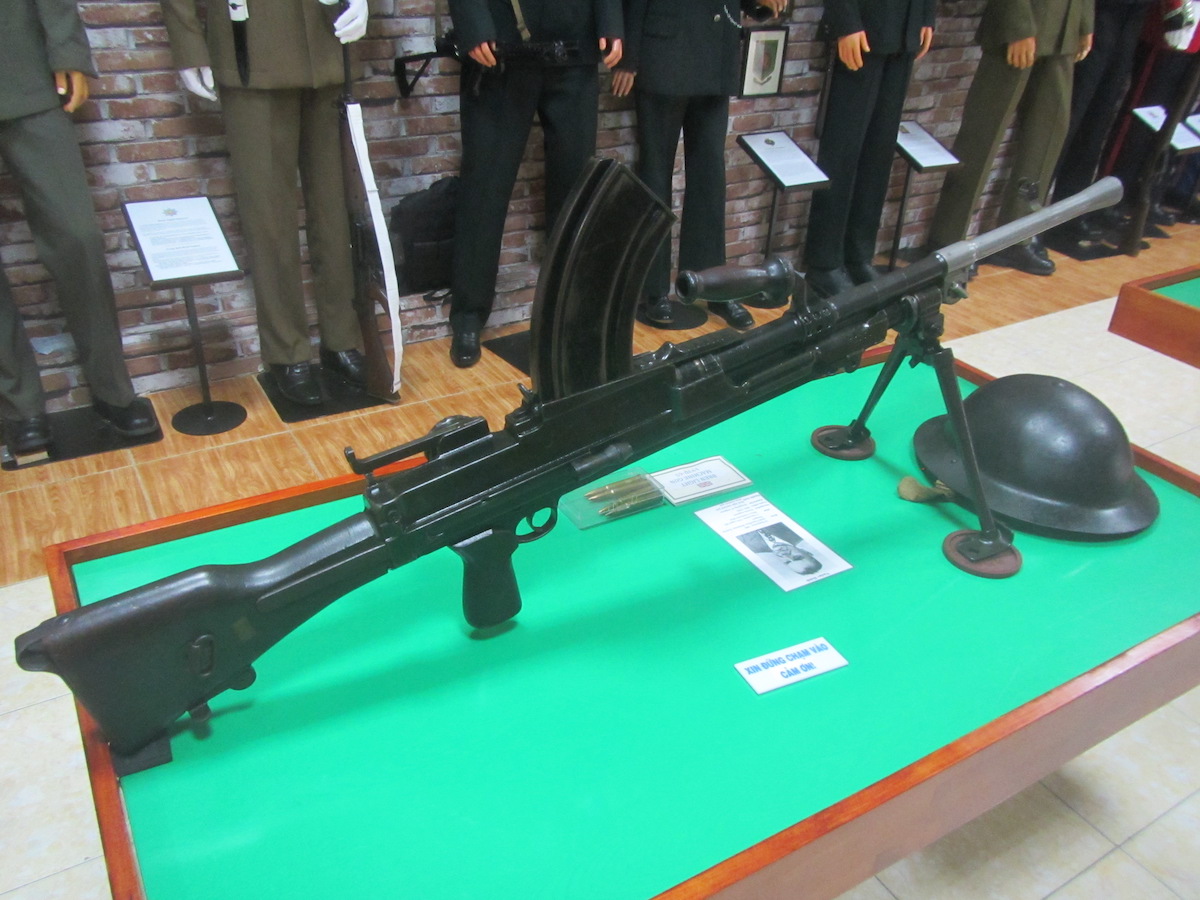
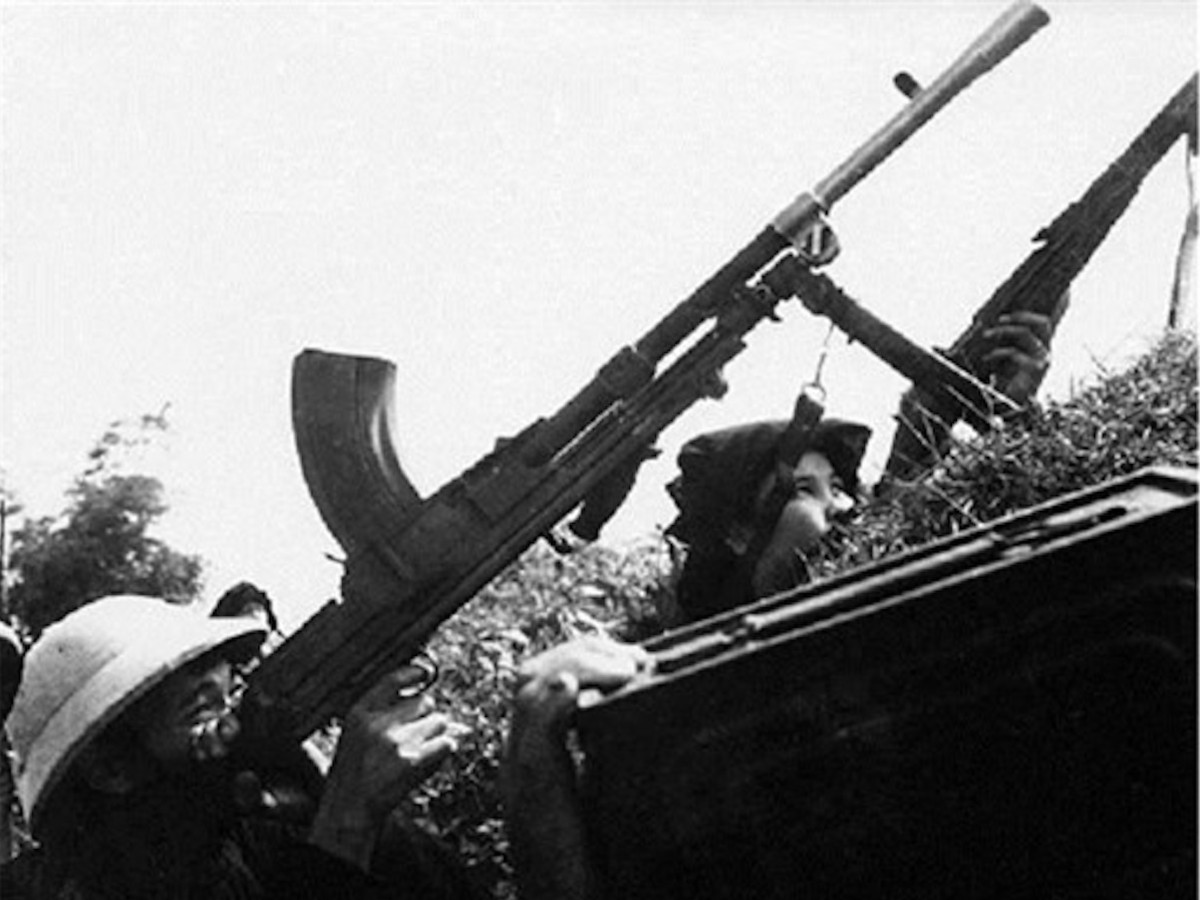
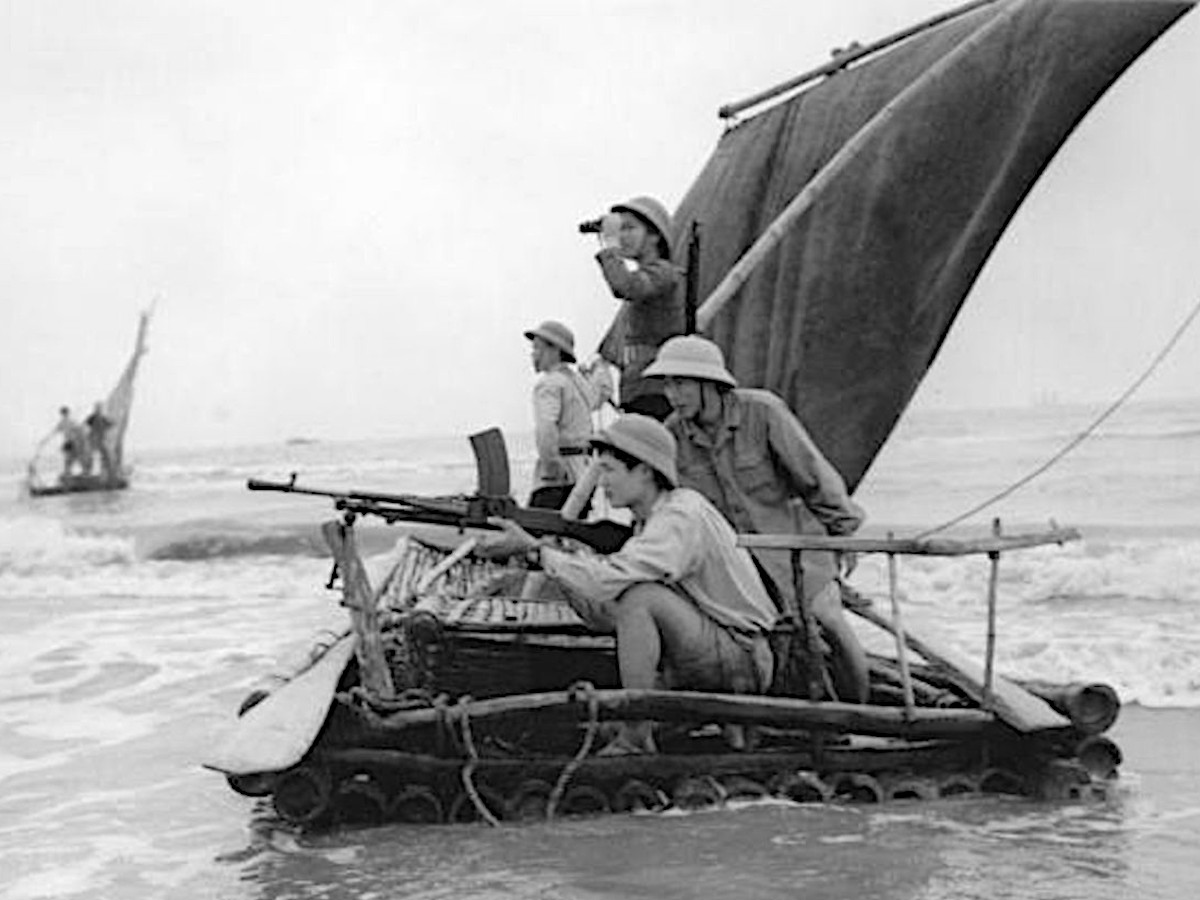
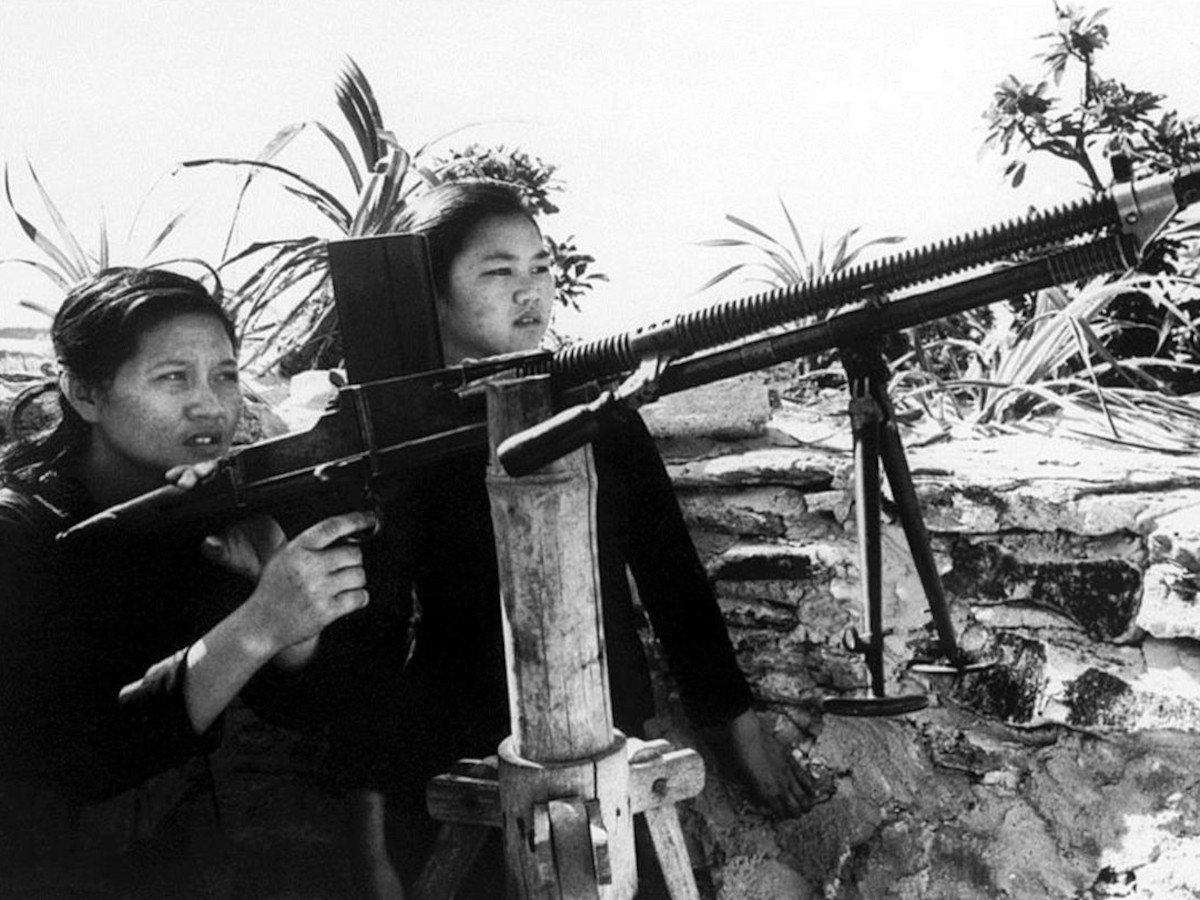
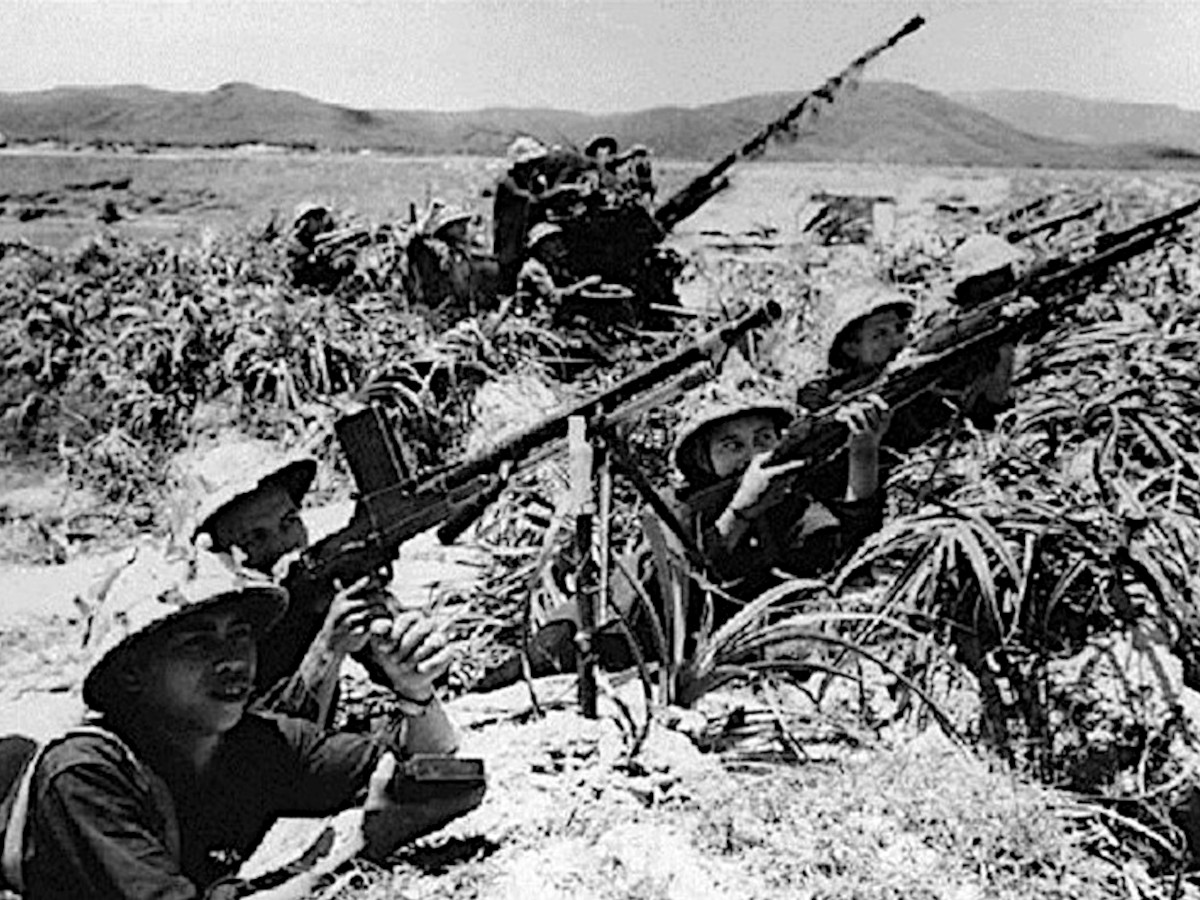
Trong chuyến đạp xe đi Vũng Tàu, ghé thăm bảo tàng vũ khí Robert Taylor năm ngoái, có nói về khẩu “FM đầu bạc”, tên chính thức là “trung liên Bren”, dưới đây là một số hình của khẩu súng đó trong hai cuộc kháng chiến. Lưu ý có một số khẩu Bren nhưng “đầu không bạc”, cũng là kiểu súng đó nhưng do sản xuất ở những nhà máy khác nhau. 3 bức ảnh cuối là “ZB vz. 26” (băng đạn thẳng), là một người anh em rất gần với Bren!

Dutton
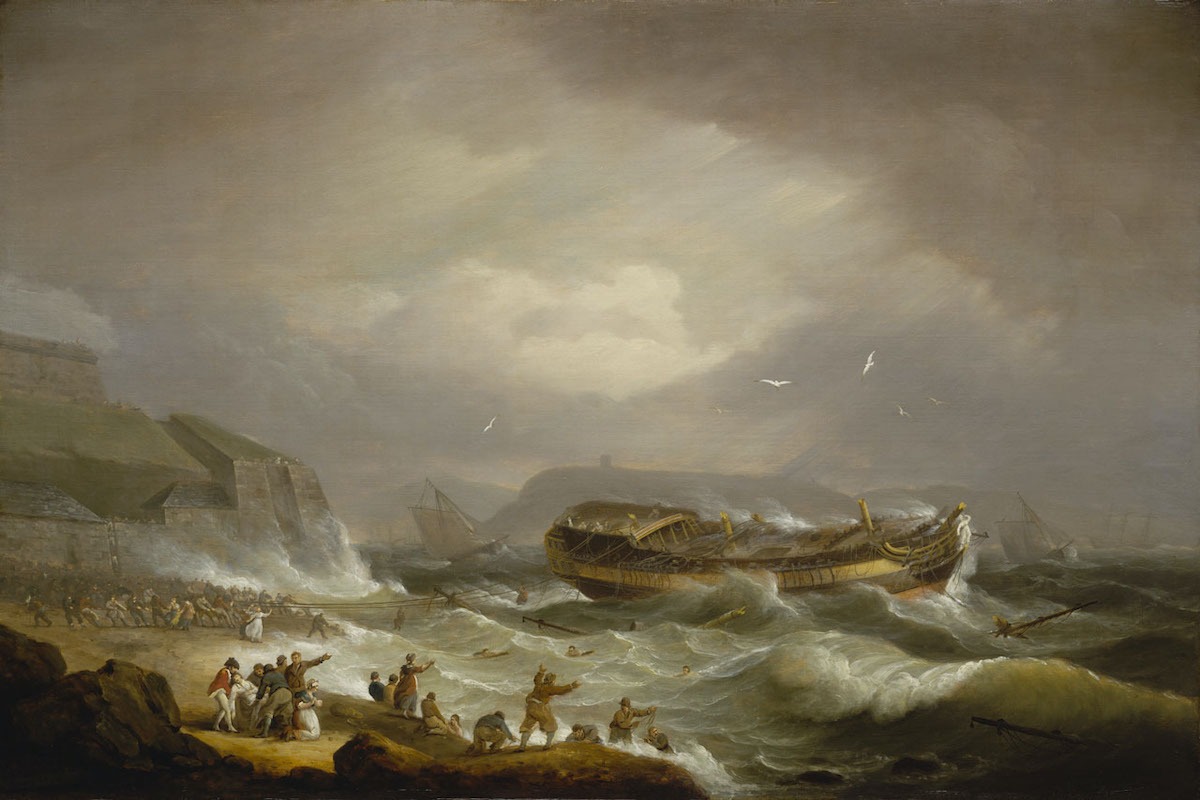
Dutton là con tàu của công ty Đông Ấn, bị cày neo và mắc cạn trong cơn bão gần Plymouth. Edward Pellew, vốn nổi tiếng bơi giỏi, đã bơi vào bờ trong sóng lớn, nối một sợi dây với bờ, hơn 400 mạng người được cứu. Vì thành tích này, từ dân thường, ông được phong baronet (tước hiệu quý tộc nhỏ, dưới Nam tước một chút), về sau, sau nhiều chiến công thăng dần lên Tử tước, phó Đô đốc Anh quốc. Bức tranh thể hiện lại đúng những gì đã xảy ra, con tàu đã chặt hết cột buồm để cân bằng hơn trong gió bão!
ai đi ngoài sương gió
Ai đi ngoài sương gió – Ngọc Cẩm & Nguyễn Hữu Thiết. Tham gia kháng chiến 9 năm, đi dọc Trường Sơn từ Thừa Thiên ra tận Việt Bắc, năm 1953 cặp song ca này “về thành”. Dựa theo các cứ liệu lịch sử, có thể đoán rằng đây là việc được sắp xếp, chả phải “dinh tê”, “chiêu hồi”…
Nguyễn Hữu Thiết - Ai đi ngoài sương gió

hòn vọng phu 1 – trần văn trạch
Dưới một góc độ nào đó, ông Trạch tài năng hơn anh của mình là ông Trần Văn Khê nhiều (mấy anh em nhà này toàn đặt tên theo bộ “thuỷ”). Và tôi rất thích cách hoạt kê, tài tử của ổng… Xang xang xang xê hò xự xang, xê líu, xề xang líu líu hò hò hò…
100 watt
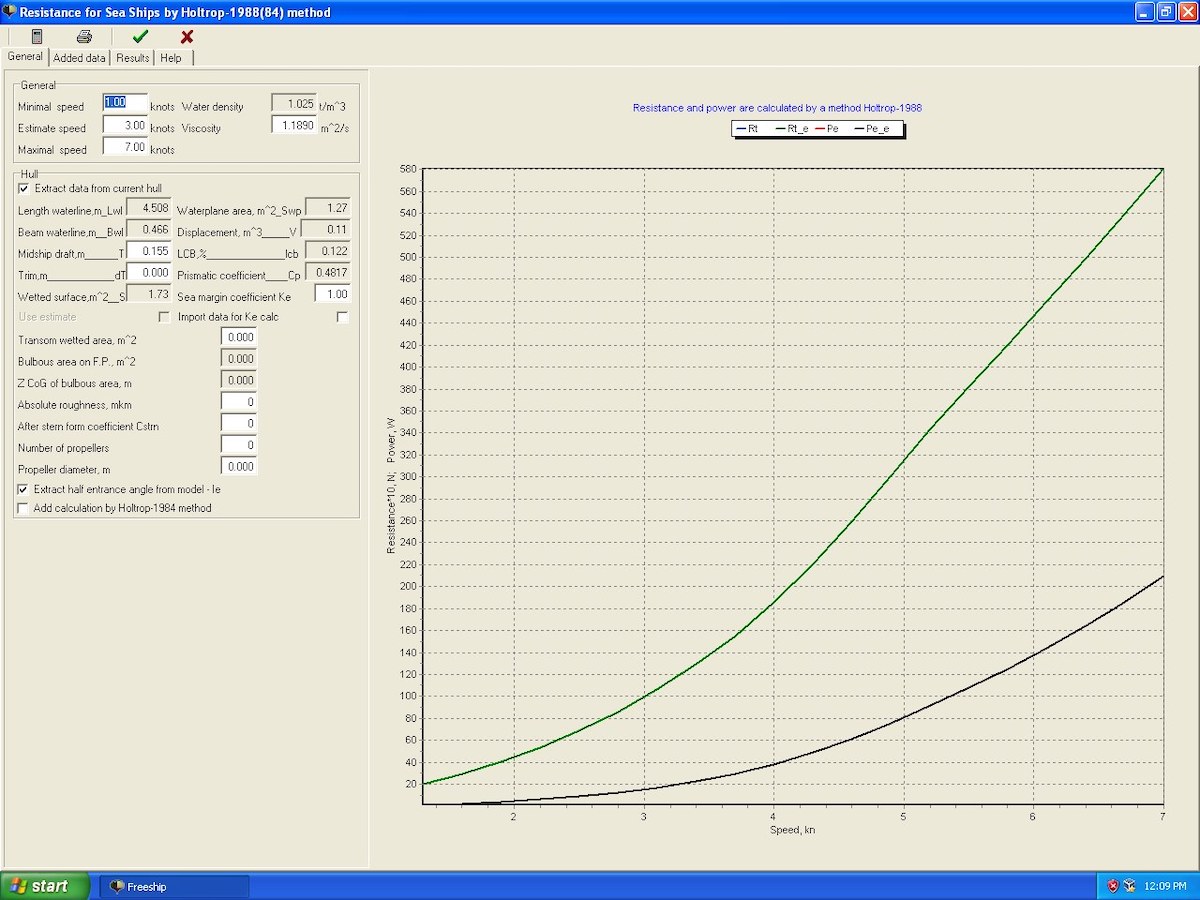
Một vài phép tính đơn giản… 1 người trung bình tiêu thụ 1 ngày hết 2000 kcal. 1 calorie = 4.2 joule, 1 ngày = 86400 giây, công suất = 2000 x 1000 x 4.2 / 86400 = 97.2 Watt. Trong biểu đồ dưới đây, phần mềm cho ta biết, năng lượng để chèo xuồng ở tốc độ 3 knot vào khoảng 100 Watt.
Và sự thật là chỉ ngang mức ấy, cái ngưỡng quan trọng 100 Watt này tương đương ở mức 23 kmph với xe đạp, và duy trì vận tốc này nguyên 1 ngày 10 ~ 12 tiếng không hề đơn giản chút nào. Nhiều năm tập luyện kiên trì cũng chỉ nâng lên được ở mức 100 ~ 125 Watt, rất khó khăn!!!
let’s go
Chương trình âm nhạc cuối tuần, thêm một bài hát siêu hay, siêu ấn tượng nữa của âm nhạc Xô-viết: В путь – V Put – Let’s go, 1954: Hãy để kẻ thù của chúng ta nhớ điều này, nói chả phải doạ, nhưng chúng tao sẽ đuổi theo tụi mày vòng quanh quả đất, và nếu cần sẽ làm thêm vòng nữa! Này em thương yêu, thư cho em đã gởi rồi, giờ phải lên đường đây!
Người Nga có một cái rất “dở”, họ toàn làm những chuyện kinh thiên động địa, mà không làm những chuyện nhỏ được! Và với tên lửa động cơ hạt nhân + đầu đạn hạt nhân “9M730 Burevestnik” có dự trữ hành trình không giới hạn, có thể bay hoài bay mãi từ ngày này sang tháng khác thì cái chuyện đuổi theo ‘n’ vòng này sắp thành hiện thực!
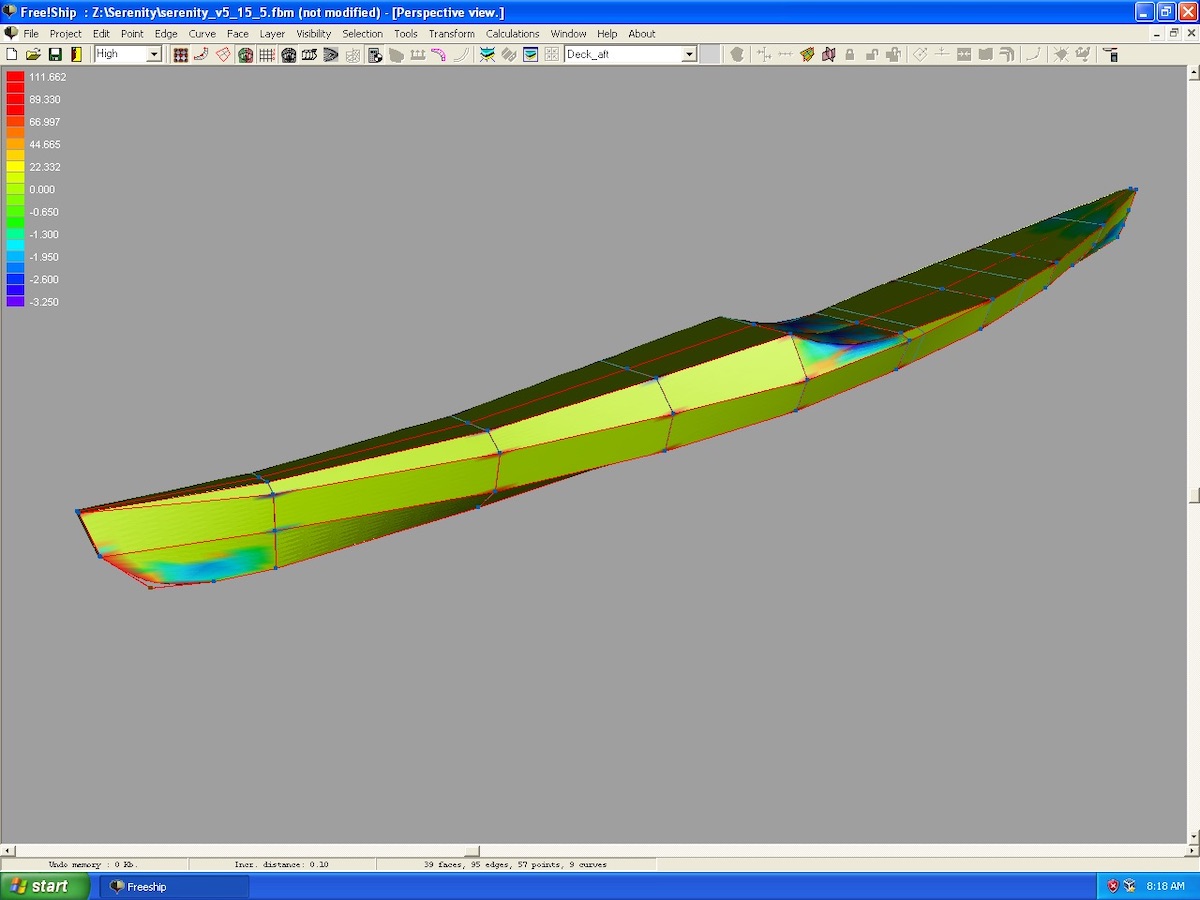
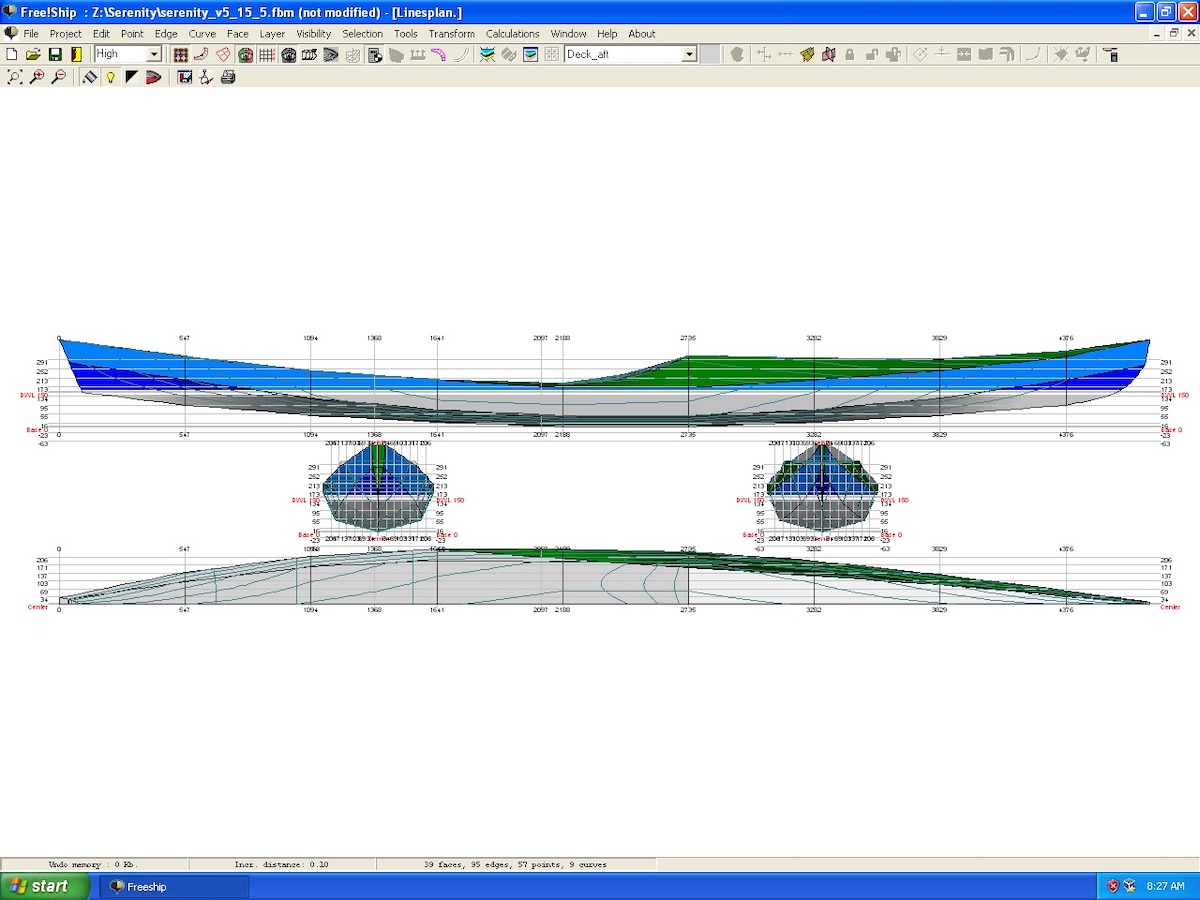
serenity – 1, p2
Loay hoay chỉnh tới chỉnh lui rất nhiều, tập trung vào phần drag (resistance)- sức cản nước. So với 3 chiếc kayak trước thì tại cùng 1 tải trọng danh định (120kg), chiếc Serenity này có sức cản thấp nhất, và Cp (Prismatic coefficient) cũng xuống rất thấp, tròn 4.8!
Thân thuyền “fine” hơn so với Serene – 3, nhưng “full” hơn so với Serene – 2, nên độ ổn định cũng nằm giữa của 2 chiếc đó. Tiếp tục cách thức của Serene – 3 là sử dụng độ cong (rocker) của thân thuyền để tăng độ ổn định, và dĩ nhiên cũng đồng thời tăng độ sâu của đáy chữ V.
Sau nhiều năm chèo, hiểu ra 1 chân lý đơn giản: tốc độ trung bình khi đầy tải, và khi chèo suốt ngày, chỉ loanh quanh trên dưới 3 knots, không hơn, ngay cả với các tay chèo “siêu nhân” của thế giới, vì công suất 1 người trong suốt 1 ngày trung bình chỉ vào khoảng 100 ~ 150 Watt.