
Over the years of designing and building wooden kayak, often a recurring question comes to my mind: how can we precisely construct a kayak cockpit shape in a mathematical way. Today, I spent 30 minutes to figure out the problem, it turned out to be quite easy indeed. But first of all, there are so many different shapes for cockpits, and everyone may have his / her own preference on how it should look like. Here I try to plot a shape that is most suited to my eyes, and closed to what’s usually called “an ocean cockpit” found on Greenland kayaks.
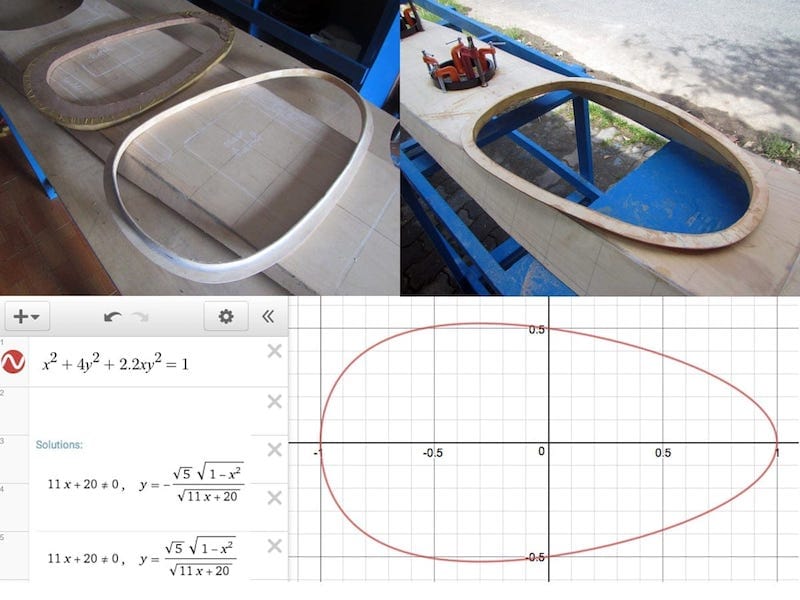
I went to the Wolfram Alpha website (wolframalpha.com) and entered an ellipse function. Apparently a cockpit shape is not elliptic, but rather an asymmetric “egg shape”. I tweaked around the equation for a while, changing its components, and the shape came out, closely resembles that of my Serene – 2. I’d also tried to construct other types of “egg shapes”, for example, an 3 – ellipse that has 3 foci, something that could be drawn with closed thread of rope running around 3 nails pinned on a wooden board (similar to drawing an 2 – ellipse with 2 foci).
Next come the question of how to draw this shape onto the wooden board that would actually construct the cockpit coaming? A bit of thinking has the problem solved too. The Wolfram Alpha website provides us with numerical formulas. The general steps are like this:
1. Draw a bounding box in the dimensions you want, mine is: 39×72 (cm), the dimension that your spray skirt would fit into (and the spray skirt vendor usually supply you with this information before – hand). The x value would have the value range of [-1, 1].
2. Draw a dense grid of x & y inside that bounding box, for each value of x from -1 to 1, calculate the y value with the formulas given above. Giving very fine incremental values of x, say every 1 or 2 cm, it would be possible to construct a good looking “egg shape” then.
Of course, I want to find out a way to draw the “egg shape” more precisely and more conveniently, e.g: print the plotting actual size on paper, but found it a bit cumbersome as I have no printer of that size! Anyone finding out a good way, please kindly let me know!
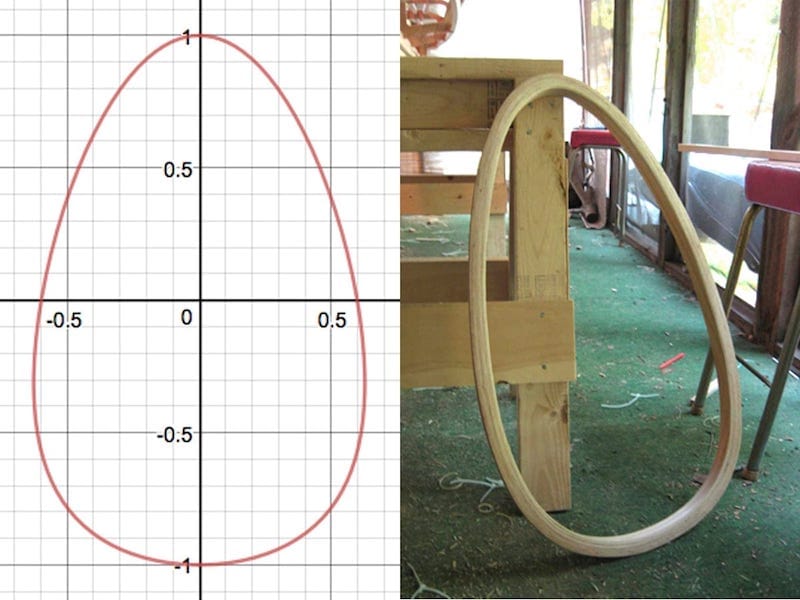
But it’s hard to determine the dimensions of that 3 – ellipse, and the positions of its 3 foci. Finally, I found out the formula that is best suited for me, something that could be determined numerically to ease out the actual drawing. The formula finally: x2 + 3.5y2 + 1.5xy2 = 1. Upon close inspection, the “egg shape” turned out to be very satisfactory. One might try changing just the “weight” parameters (e.g: 3.5, 1.5…) and retaining degrees of the polynomial’s terms, to experiment with different other shapes, to figure out what is best according to one’s need.